Do you want to resend welcome emails to your WordPress users?
A welcome email helps build trust with new users and ensures that people remember your website and business.
However, your welcome emails can sometimes end up in the spam folder, or users don’t receive the messages. That’s why it’s important to resend welcome emails.
In this article, we will show you how to resend new user welcome emails in WordPress.

Why Resend Welcome Emails to New Users in WordPress?
Creating welcome emails is a great way to customize the emails that new users receive when they register on your website. This helps build your brand and makes your site memorable for customers, members, and subscribers.
However, the welcome emails that you send might not make it to your users’ inboxes. Plus, email providers like Gmail can also flag your emails as spam.
One of the reasons for this issue is that WordPress hosting services don’t configure the mail function properly. As a result, your welcome emails fail to reach your users or land in the spam folder.
To overcome this issue, you can use an SMTP (Simple Mail Transfer Protocol) service. It allows you to use an SMTP server to send WordPress emails and ensure that they reach your users.
An SMTP service also allows you to log any emails that don’t get delivered so that you can easily resend them.
That said, let’s look at how you can log welcome emails that didn’t reach new users in WordPress.
How to Set Up Email Logs in WordPress
WP Mail SMTP is the best SMTP service for WordPress. It’s super easy to use and connects with popular email services like SendLayer, SMTP.com, Brevo (Previously Sendinblue), Gmail, Office 365, and more.
With WP Mail SMTP, you can track email deliverability in WordPress. The plugin keeps a record of every email sent from your website and lets you resend emails that haven’t been delivered.
First, you will need to install and activate the WP Mail SMTP plugin on your website. For more details, please see our guide on how to install a WordPress plugin.
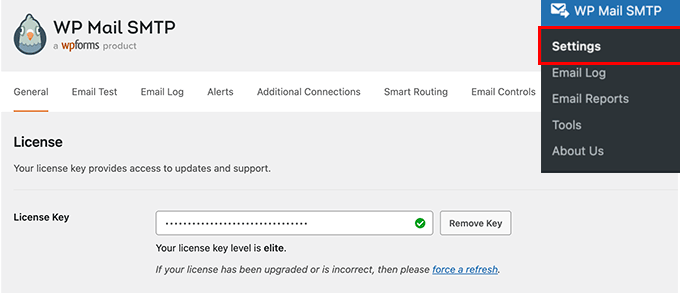
Upon activation, you can head over to WP Mail SMTP » Settings from your WordPress dashboard and then enter the license key.
You can find the key in your WP Mail SMTP account area.

After entering the license key, go ahead and click the ‘Verify Key’ button.
Next, you can scroll down to the Mailer section and choose how you would like to send your WordPress emails.

All you have to do is select your preferred mailer. The PHP mail will be selected by default, but we don’t recommend using this method as it’s unreliable.
For more information, you can follow our detailed guide on how to use a free SMTP server to send WordPress emails.
After that, you need to go to the Email Log tab in the WP Mail SMTP settings and check the box for the ‘Enable Log’ option.
This way, you will be able to track email deliverability in WordPress.

When you enable the option, you will see additional email tracking settings under the Email Log tab.
Go ahead and check the boxes for Log Email Content, Save Attachments, Open Email Tracking, and Click Link Tracking so that you will get more data about email deliverability.

Next, you can select the time period for keeping the email logs.
Simply choose an option from the dropdown menu for ‘Log Retention Period’ and then click the ‘Save Settings’ button.

How to Resend New User Welcome Emails
After setting up email logs, you can now see which welcome emails didn’t reach your users and which ones need to be resent.
To start, simply navigate to WP Mail SMTP » Email Log from your WordPress admin area.

The plugin will show all your emails in this section. You can see the email subject, who it’s been sent to, the source, and whether users opened and clicked the email.
If you see a red dot for any email, it means it wasn’t delivered. On the other hand, a green dot shows the email has reached the user’s inbox.
To resend a welcome email that didn’t get delivered, go ahead and click the ‘View Log’ option.

Now, you will see logs for the individual email.
After that, navigate to the ‘Actions’ tab and click the ‘Resend’ button.

A popup window will now appear.
Simply enter the recipient’s email address and click the ‘Yes’ button to resend the email.

Next, if you see multiple emails that failed to deliver, you can use the bulk resend feature from the email log screen.
Go ahead and check the box next to the emails you want to resend. After that, select the ‘Resend’ option from the Bulk Actions dropdown menu.

When a popup window appears, you can click the ‘Yes’ button to resend multiple emails.
That’s it! WP Mail SMTP will resend welcome emails and any other email that fails to reach your new users.

We hope this article helped you learn how to resend new user welcome emails in WordPress. You may also want to check out our guide on how to choose the best website builder and our expert picks for the best WooCommerce plugins.
If you liked this article, then please subscribe to our YouTube Channel for WordPress video tutorials. You can also find us on Twitter and Facebook.
این خبر را در ایران وب سازان مرجع وب و فناوری دنبال کنید