Are you wondering how to moderate comments on your WordPress site?
WordPress’s built-in comment system allows your readers to engage with your content and interact with you directly. That said, some comments may contain elements that hurt your brand and your website.
In this beginner’s guide, we will show you how to moderate comments in WordPress using the default WordPress features and some plugins.
In WordPress, comment moderation is a feature that lets users control and filter the comments submitted on their websites.
With comment moderation, you can approve, edit, remove, or mark comments as spam before they appear publicly on your site.
While comments can build your website engagement, they can also pose a significant risk to your WordPress security.
Harmful comments usually come from spambots. These bots can fill the comment section with irrelevant or repetitive messages. As a result, it may be hard for real visitors to find and interact with each other.
Additionally, spam comments may have malicious links that redirect users to phishing websites or spread viruses by encouraging users to download dangerous files onto their devices.
Without comment moderation, your website can provide a poor user experience for your readers. It can also negatively impact your WordPress SEO.
If your site is filled with spammy comments, it can affect your site’s credibility and trustworthiness, leading to lower search engine rankings.
Whenever you build a new WordPress site, the default WordPress comment system will be active. Your blog post will have a comment form displayed at the bottom. Note that it may look different or not appear depending on the WordPress theme you are using.
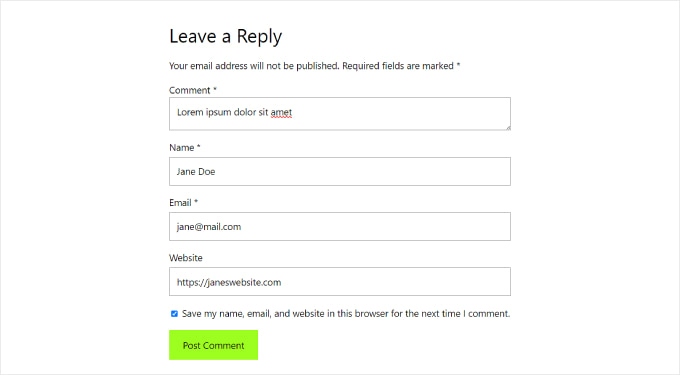
Generally, anyone with a valid name and email can leave a comment without verifying their identity. However, it doesn’t mean the comment will get approved automatically.
Instead, they will see a preview of it and a message that the comment awaits moderation. This means the website owner will decide whether to approve or delete the comment.
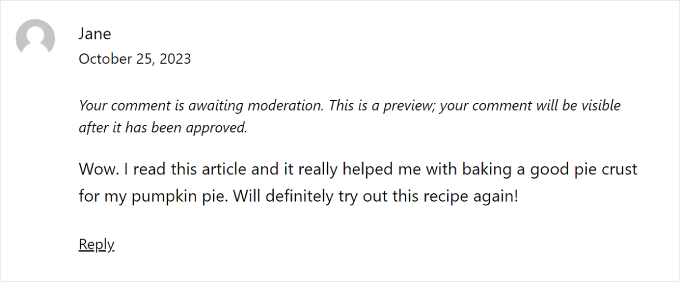
This basic setting is good enough to filter genuine comments from harmful ones. But there’s actually a lot more that you can do to keep your WordPress blog safe.
With that in mind, let’s take a look at how you can moderate comments on your WordPress website. You can use these quick links to jump between the different sections:
You can see all comments on your WordPress website by clicking on the ‘Comments’ menu in the WordPress dashboard.

To learn more about the Comments page, you can check out our glossary entry on WordPress comments.
In this guide, we will talk more about what you should do when you receive a comment and what factors to look for when moderating it.
First, let’s cover some basics. When moderating comments, you should look for the following signs:
- A bunch of links, keywords, and strange characters – This is the most obvious type of spam comment. Be careful of clicking any links here, as they could contain inappropriate content in the comment or even viruses.
- Suspicious or generic names – If you see a comment left by a user named ‘Best Mortgage Rates’ or ‘Cheap Printer Ink,’ then it may be a marketer trying to spam your site for a backlink.
- Generic messages – Often, spammers rely on generic comments to bypass your spam filter. Examples include Thank You, Really Nice Article, or a generic statement with your post title. It might also be something like, “I agree, beginner’s guide to comment moderation is essential.”
- Offensive language – It’s important for WordPress bloggers to create a respectful space for their audience. Otherwise, you may risk making certain readers uncomfortable.
Now, let’s look at the different comment action links, which will appear when you hover your cursor over a comment. There is Approve, Reply, Quick Edit, Edit, History, Spam, and Trash.
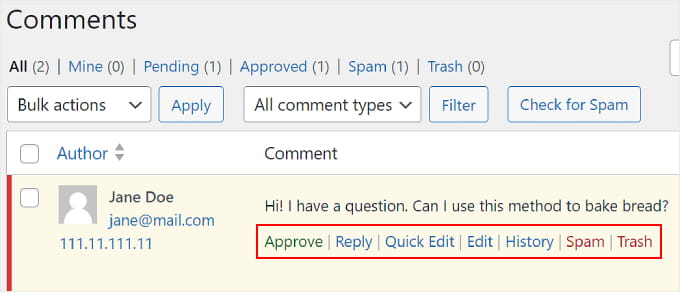
To accept a comment, you can click on the ‘Approve’ button. This will make the comment publicly visible on your website.
If you want to let users know that their comment is live, read our guide on how to notify users when their comment is approved in WordPress.
To mark a comment as spam, you can click the ‘Spam’ button. It will move the comment to the Spam tab on the Comments page.
If a user complains that their comments are not appearing on your website, then this is the first place you should look. You can go to the ‘Spam’ tab and click the ‘Not Spam’ button below the comment.
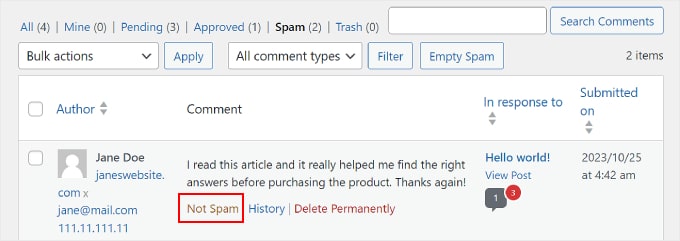
You can also click on the ‘Empty Spam’ button to delete all spam comments at once. Even if you don’t, WordPress will automatically delete spam comments after 15 days.
If you find a comment in the All tab that is not necessarily spam but may be harmful to you and your readers, you can click the ‘Trash’ button. This will add the comment to the Trash tab.
Comments in the Trash will stay there for the next 30 days. After this time, WordPress will automatically delete them forever.
If you accidentally deleted a comment, then simply visit the ‘Trash’ tab and click on the ‘Restore’ link below the comment.

If you want to delete or mark multiple comments as spam, then you can use the ‘Bulk actions’ dropdown menu at the top of the comment list.
Note that doing this may cause your website to slow down while it processes all the comments.
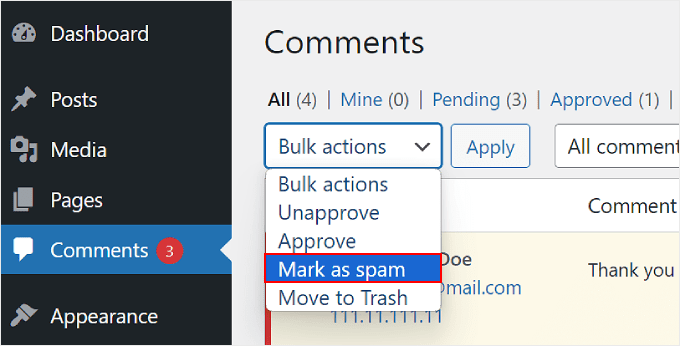
For more information, you can check out our guide on how to batch-delete spam comments in WordPress.
You can respond to a comment by clicking on the ‘Reply’ link. Once you’ve inserted your response, just click ‘Approve and Reply.’
Note that replying to a comment automatically approves it as well.
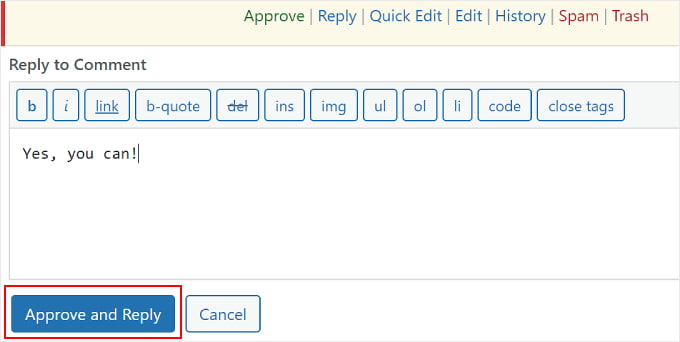
The Quick Edit and Edit buttons work similarly. You can use either setting if you want to make the comment’s language clearer for visitors.
The difference is that, with Edit, you will be redirected to the Edit Comment page. With Quick Edit, you can modify the comment right on the Comments page like this:
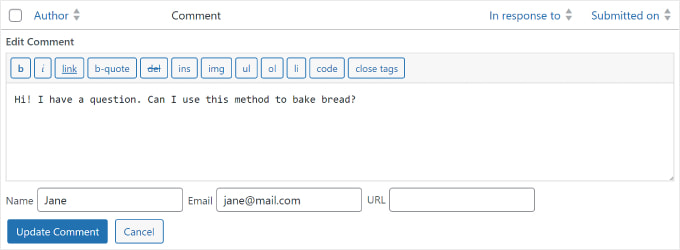
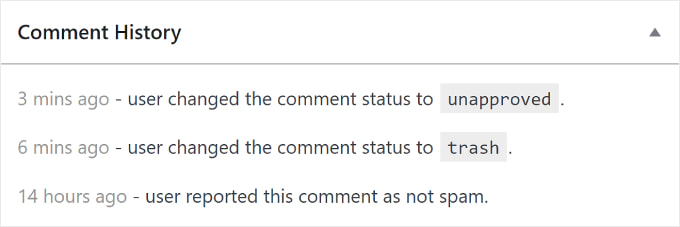
If you click the ‘History’ button, then you will see all the actions that have been done to the comment.
This feature can be helpful if you work with a team. It can help you track changes and understand how other people moderate comments on your site.
We’ve covered the basics of moderating WordPress comments. We will now discuss the built-in WordPress comment settings, which will help you filter and control what kind of comments will appear on your website.
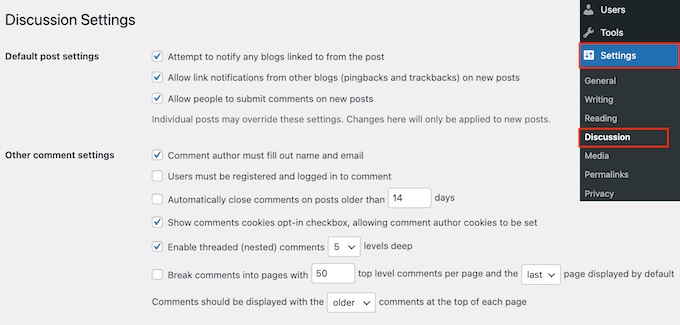
The comments settings page is located at Settings » Discussion. There are different sections on the discussion settings page, and we will walk you through each option on the page.
Default post settings
The Default post settings offer three options to manage interactions and comments on your WordPress site:

The first option allows your blog to notify other blogs when you link to them in an article. The second option accepts notifications when they link to your articles.
These notifications are called pingbacks and trackbacks, and we recommend you uncheck both of these options. The first option can slow down your entire site, and the second option could bring you a lot of spam comments.
The third option on the article settings screen is ‘Allow people to post comments on new posts.’ It enables comments for all new articles you write on your WordPress blog.
Alternatively, you can turn comments on and off for individual articles, which we will show you later.
Other comment settings
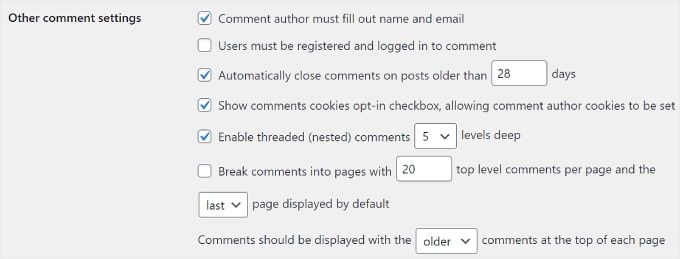
In this section, you will notice the first option is ‘Comment author must fill out name and email.’ This option makes it mandatory for comment authors to provide a name and email address with their comments.
You need to check this option unless you want to allow anonymous commenting on your website.
There is also an option to require users to register on your site before leaving a comment. However, in our opinion, it’s not necessary for most sites as it may discourage new users from interacting with your post.
You will also see the option for closing comments on older articles. Some website owners use this to prevent spam, but it’s completely a personal preference.
Next is the ‘Show comments cookies opt-in checkbox, allowing comment author cookies to be set.’ Checking this box will let your website save the commenter’s name, email, and website details for when they want to comment on your post in the future.
Sometimes, WordPress comments can become a long thread that is difficult to keep track of. In this case, we recommend ticking the ‘Enable threaded (nested) comments’ option so that replies to specific comments appear directly beneath the original comment.
Having too many nested comments can negatively affect your page’s readability. The default setting of 5 levels is good enough for most WordPress websites.
If one of your articles becomes popular and gets too many comments, then the comment section will become too long. Users will have to scroll a lot to read the latest comments on the article.
To address this problem, you can check the option to break comments into pages. You can also use the dropdown menu to select whether to show the last or first comment page by default.
The last option is to display your most recent or oldest comments first. If you want to learn more about this, then you can read our guide on how to rearrange comments in WordPress.
‘Email me whenever’ and ‘Before a comment appears’

The next section allows you to receive email notifications whenever a user leaves a new comment on your site or a comment is held for moderation.
As you get more comments, these emails may become annoying, so we recommend turning the comment notifications off.
In the ‘Before a comment appears’ section, the first option is to approve each comment manually. Make sure this box is checked so that no comment can appear on your site without your approval.
Below this, you will see the ‘Comment author must have a previously approved comment’ option.
If this option is checked, then comments from authors with a previously approved comment will appear without explicit approval. Simply uncheck this option to make sure that all comments are manually approved.
Comment Moderation
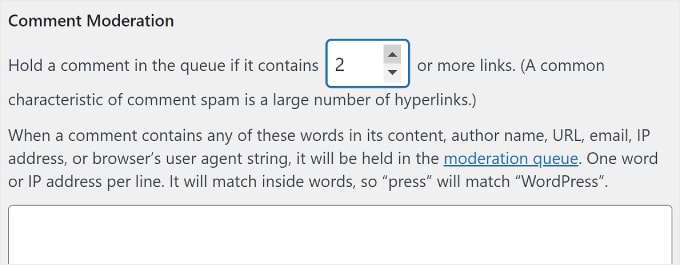
As we’ve discussed before, a common trait among automated spam comments is that they contain a lot of links.
If you have already set your comments to be manually approved, then all your comments will go to the moderation queue regardless of how many links they have. If not, then you can specify to hold a comment in the queue if it contains a certain number of links.
You will also see a larger text area where you can enter words, IP addresses, email addresses, URLs, or browser information that you want to watch out for.
Any comment matching the things you enter here will be sent to the moderation queue.
Again, if you decide to have all comments manually approved, then you don’t need to do anything, as they are all going to the moderation queue anyway.
Disallowed Comment Keys

This setting used to be called the Comment Blocklist in WordPress 5.4. Here, you can set specific words that will automatically move the comment to Trash if used in a comment’s content, author name, URL, email, IP address, or browser information.
Make sure to use this feature carefully because real comments may get removed by mistake.
Avatars
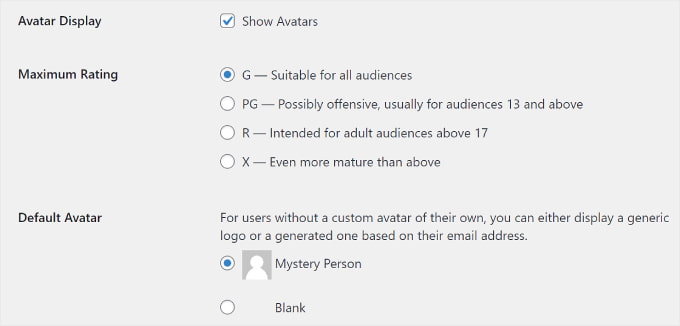
The last section on the Comments Settings screen is Avatars. These are the images that appear next to the comment author’s name on your website.
WordPress uses Gravatar, which is a free service that allows users to use the same avatar on all the blogs they visit. For more details, please see our guide on what Gravatar is.
We recommend checking the ‘Show Avatars’ box to make it easy to identify the different commenters on your post. You can also select the maximum rating of Gravatar that can be displayed on your blog.
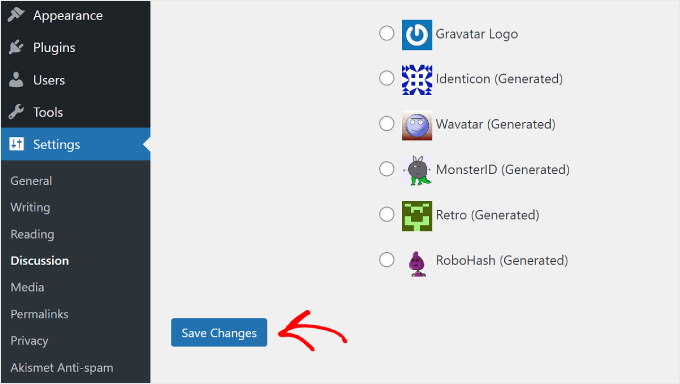
WordPress uses Mystery Person as the default Gravatar when a comment author doesn’t have an image associated with their email address. You can change this by selecting a default avatar from the list or even adding your own custom default gravatar in WordPress.
That’s it! You have configured your comment settings. Don’t forget to click on the ‘Save Changes’ button to store your settings.
The default WordPress comment system is good, but it can be pretty basic. For access to more comment management and engagement settings, you can install a WordPress comment plugin.
These plugins can not only improve comment moderation but also significantly boost your comment engagement. As a result, your visitors can enjoy a more engaging and safe commenting experience.
Thrive Comments is one of the best plugins to keep comments in check for a great user experience while encouraging user interaction.
For example, with the Comment Conversion feature, you can direct commenters to a custom thank-you page, social sharing buttons, or a related post so that they can discover more of your content.

To use Thrive Comments, you can purchase it as an individual plugin or get the complete Thrive Themes Suite. This comes with all Thrive products, including Thrive Ovation, which can turn your comments into testimonials for your web pages in one click.
Once you have completed your payment, you will get a plugin zip package to install on your WordPress site. For more information, read our step-by-step guide on how to install a WordPress plugin.
Once installed, you will now see a ‘Thrive Comments Moderation’ menu under the Comments tab on the admin panel. Here’s what the page looks like:
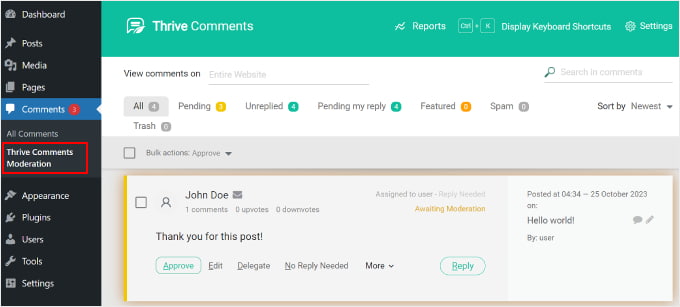
The interface looks similar to the built-in Comments section. However, there are several differences.
This interface now includes the ‘Unreplied’ and ‘Pending my reply’ tabs.
The first tab collects all comments that have not been replied to. Meanwhile, the second tab has all the comments that have been assigned to you by the website admin so that you can respond to them.

Additionally, you can filter comments by page by entering the page name in the ‘View comments on’ field.
If you want to look for specific comments, then you can type in a term from the comment into the ‘Search in comments’ field.
You also get more comment action links. Besides approving, removing, editing, and marking comments as spam, you can click the ‘Delegate’ button to assign a comment to another user.
This feature is handy if you run a WordPress blog with multiple writers.

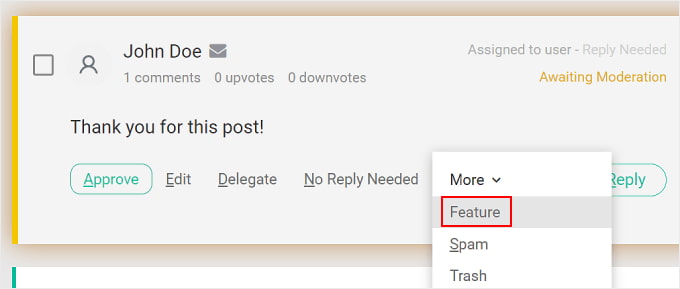
If you click the ‘More’ button, then you will see the ‘Feature’ option. Selecting it will pin a comment to the top of the comment list on a blog post.
This way, important or noteworthy comments stay visible and easily accessible to all readers. All pinned comments can be found in the ‘Featured’ tab.
For more details, you can see our guide on how to feature or bury comments in WordPress.
If you want to look at your entire comment activity, then just click the ‘Reports’ button at the top of the page.
You will be redirected to the Comments graph, which is a handy tool for evaluating your user engagement.

Here, you can see a timeline overview of all the comments you’ve received, approved, replied to, featured, marked as spam, and removed.
This is what the graph looks like on our testing site:
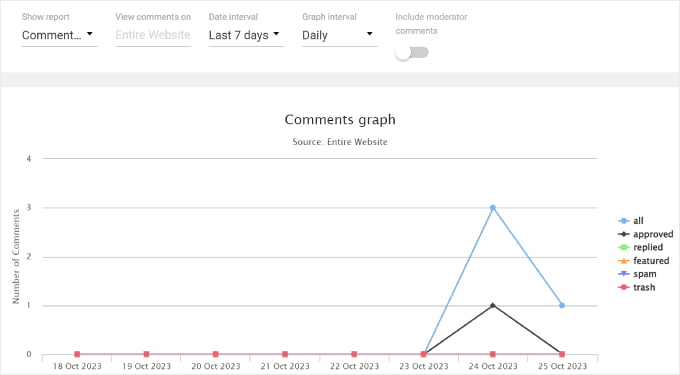
You can also filter the comment activity using the options at the top. With ‘Show report,’ you can check out different types of reports. Or fill out the blog post title in the ‘View comments on’ field to see a comment graph from a specific post.
With the ‘Date interval’ option, you can change the time period of the graph. On the other hand, the ‘Graph interval’ setting lets you see the graph from a Daily, Weekly, or Monthly perspective.

Let’s say you work with a team to run your WordPress website, and you get a lot of comments every day. In this situation, you may want to grant comment moderation access to certain user roles only.
Doing this will let you assign comment moderation responsibilities to relevant team members best suited for the task, like a community manager.
This method not only helps you manage comments better but also keeps your WordPress site secure by allowing only the right users to access comments.
You can allow specific users to moderate WordPress comments in two ways: with the Thrive Comments plugin and the Comment Moderation Role plugin. Let’s take a look at each method.
Thrive Comments
To access the Thrive Comments’ moderation settings, go to Thrive Dashboard » Thrive Comments on your WordPress dashboard. Then, simply navigate to the ‘Comment Moderation’ tab.
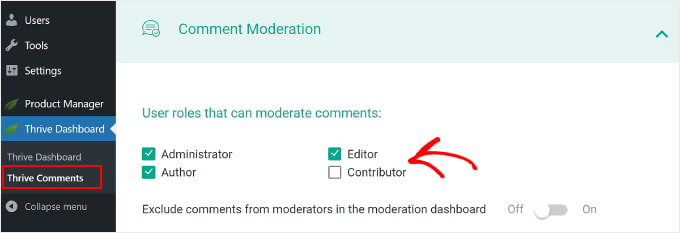
At the top, you can check off which user roles can moderate comments.
Feel free to also turn on/off the ‘Exclude comments from moderators in the moderation dashboard’ setting as well.
Enabling it will make comments from moderators invisible on the Thrive Comments dashboard. This can help maintain a clear overview of user comments.
The rest of the settings in this tab are the same as the ones you will find on the Settings » Discussion page. If you make changes to these settings in this menu, then they will also be reflected in the default WordPress comment settings.
Comment Moderation Role
WordPress doesn’t offer a default user role that’s dedicated to moderating comments. For this, you can use the Comment Moderation Role plugin.
The plugin is created by our team at WPBeginner, and it allows you to give certain users the role of ‘WPB Comment Moderator.’ Then the assigned user will only see the comment moderation screen in WordPress.
You can assign the WPB Comment Moderator role to existing and new users. For more details, please see our guide on how to allow blog users to moderate comments in WordPress.
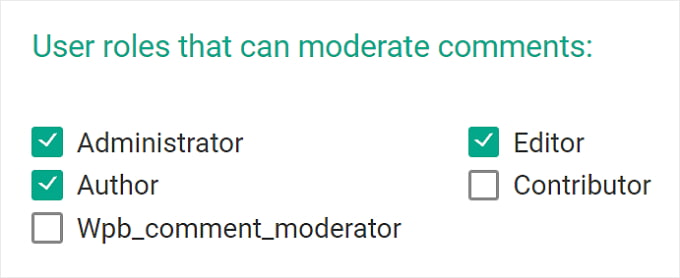
If you use Thrive Comments, then you will also see the WPB Comment Moderator role in the Comment Moderation tab, like so:
If you want to close comments on certain posts, then WordPress lets you disable them.
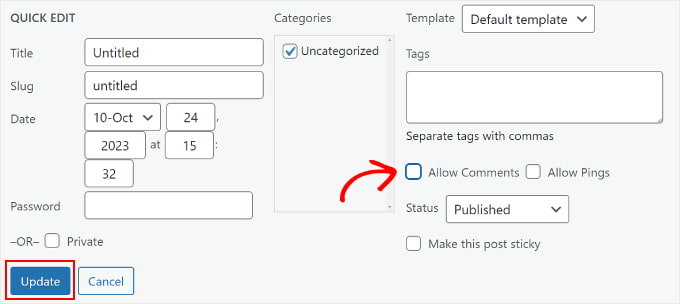
On your WordPress dashboard, simply go to Posts » All Posts. Then, click the ‘Quick Edit’ button for any blog post.
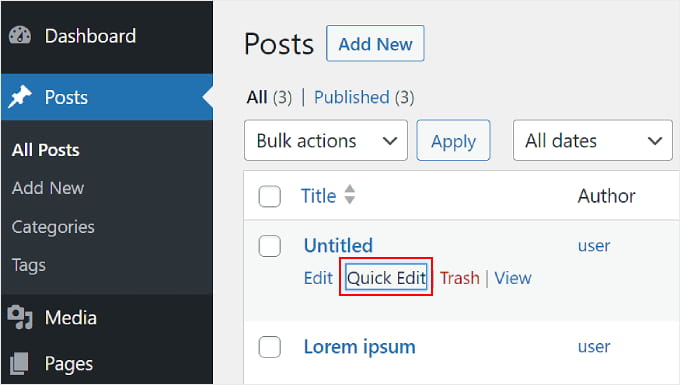
After that, just uncheck the ‘Allow Comments’ option.
Then, click ‘Update.’ The comment section will no longer be visible on the blog post.
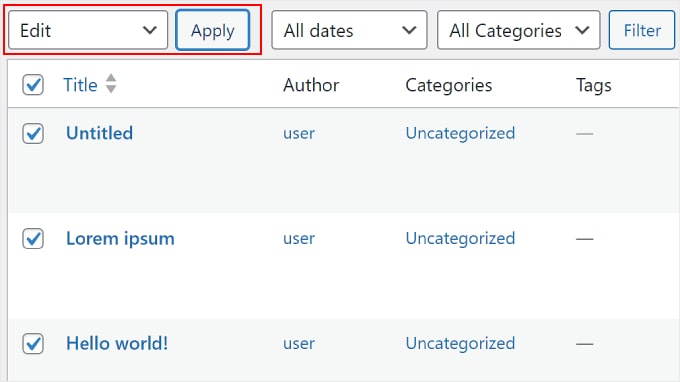
It’s also possible to disable comments on multiple posts simultaneously. All you need to do is check the blog posts and select ‘Edit’ in the ‘Bulk action’ dropdown menu.
Then, go ahead and click ‘Apply.’
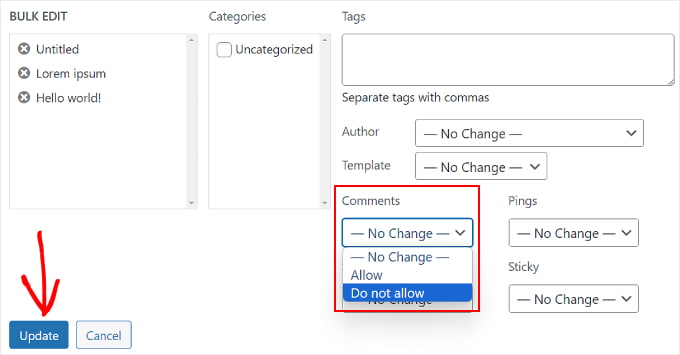
From here, you can change the Comments option to ‘Do not allow.’
After that, simply click the ‘Update’ button.
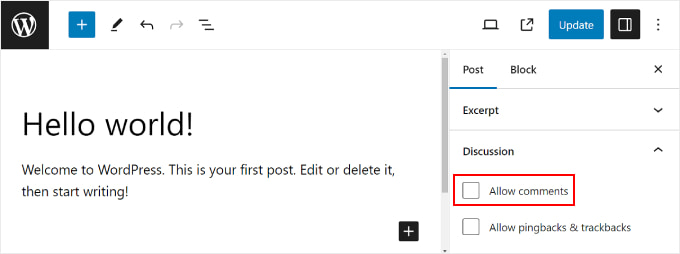
Finally, you can close the comment section while editing a blog post in the WordPress Block Editor. Simply go to the ‘Discussion’ box from the ‘Post’ settings menu on the right panel.
If you have done that, you can uncheck the ‘Allow comments’ box.
If you want to remove the comment section for good, then just see our guide on how to completely disable comments in WordPress.
To filter spam comments on your WordPress website, you can use Akismet. It’s a spam-filtering WordPress plugin developed by Automattic. This anti-spam plugin usually comes installed with your WordPress installation.
For more details, you can check out our guide on what Akismet is and why you should use it.
Once you mark a comment as spam, Akismet will learn to catch similar comments in the future.
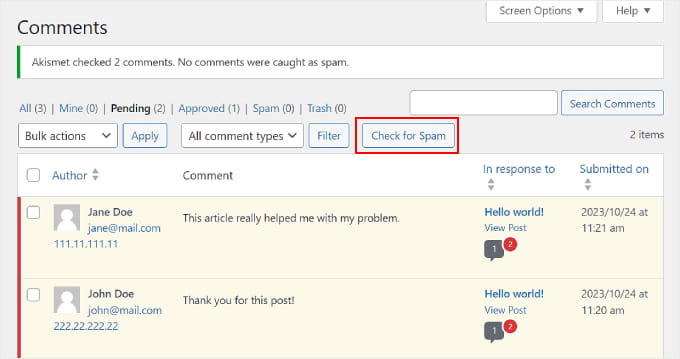
If, for some reason, you have hundreds of spam comments in the ‘Pending’ tab, then simply click on the ‘Check for Spam’ button.
This will trigger a spam check on existing comments on your website, and Akismet will move the spam comments from Pending to Spam.
One way to combat spam comments further is by removing the URL field in the comment form. To do that, you can read our guide on how to remove the website URL field from the WordPress comment form.
We hope this article helped you learn how to moderate comments in WordPress. You may also want to check out our guide on how to make blog post comments searchable and our expert pick of the best WordPress plugins to grow your website.
If you liked this article, then please subscribe to our YouTube Channel for WordPress video tutorials. You can also find us on Twitter and Facebook.
این خبر را در ایران وب سازان مرجع وب و فناوری دنبال کنید
