به گزارش “ورزش سه”، لیونل مسی در مسابقه بامدادی امروز چهارشنبه تیم ملی آرژانتین در نیمه نهایی کوپا آمهریکا مقابل کانادا موفق به گلزنی شد تا تعداد گلهای ملی خود را به عدد 109 برساند و با رکورد علی دایی برابری کند ولی او همچنان در رتبهبندی، پایینتر از اسطوره فوتبال ایران قرار میگیرد.
فوق ستاره فوتبال جهان در حالی با گلزنی مقابل کانادا به رکورد علی دایی رسید که در مدت زمان بیشتری نسبت به مهاجم پیشین تیم ملی ایران توانسته به این آمار گلزنی دست یابد و به همین دلیل پایینتر از او جای میگیرد.
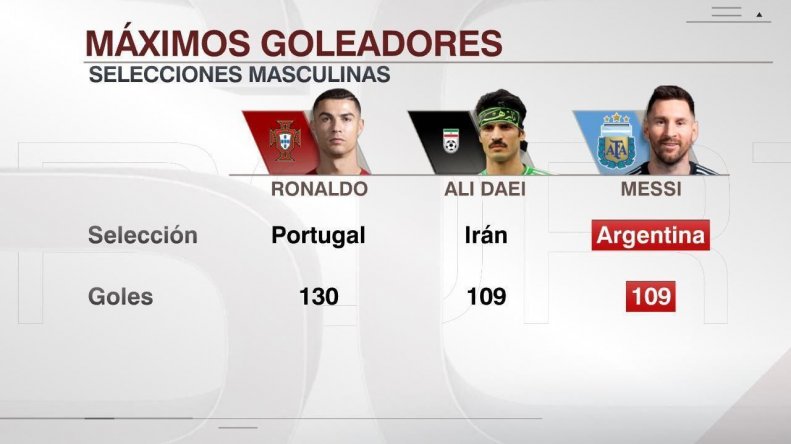
در حال حاضر کریستیانو رونالدو با 130 گل در صدر جدول برترین گلزنان فوتبال ملی جهان قرار دارد و علی دایی و لیونل مسی با 109 گل پشت سر او هستند که کاپیتان آلبی سلسته این شانس را پیدا کرده تا به رکورد فوق ستاره پرتغال برسد.
رتبهبندی برترین گلزنان فوتبال جهان به شرح زیر است:
1- کریستیانو رونالدو (پرتغال): 130 گل / 212 بازی
2- علی دایی (ایران): 109 گل / 149 بازی
3- لیونل مسی (آرژانتین): 109 گل / 186 بازی
4- سونیل چتری (هند): 94 گل / 151 بازی
5- مختار داهاری (مالزی): 89 گل / 142 بازی
6- علی مبخوت (امارات): 85 گل / 114 بازی
7- روملو لوکاکو (بلژیک): 85 گل / 118 بازی
8- فرانس پوشکاش (مجارستان): 84 گل / 85 بازی
9- رابرت لواندوفسکی (لهستان): 83 گل/ 152 بازی
10- گادفری چیتالو (زامبیا): 79 گل / 111 بازی
11- نیمار (برزیل): 79 گل / 128 بازی

این خبر را در ارتباط ورزشی دنبال کنید.
نوشته علی دایی هنوز بالاتر از لیونل مسی! اولین بار در ارتباط ورزشی. پدیدار شد.
دیگر رسانه های کشور:
باشگاه خبرنگاران همسونیوز| آموزشگاه رسانه |ارتباط اقتصادی| ارتباط فردا|ارتباط فرهنگی|ارتباط ورزشی|تهران اقتصادی |تهران ورزشی|مرجع وب و فناوری|پایگاه خبری شباب |همسونیوز