It’s no secret that live streaming took off during the COVID-19 pandemic lockdown.
It proved a valuable tool for forging and maintaining human connections as I saw personally hosting webinars and virtual meetups at my last company — and it hasn’t slowed down.
![→ Download Now: The Marketer's Guide to Facebook Live [Free Ebook]](https://cdn.iranwebsazan.org/iranwebsazan/2024/10/50e05b61-09a3-4ce8-8671-e2efbc735218.png)
Market Research Future predicts that the live-streaming market in the United States will grow from about $90 billion in 2024 to nearly $560 billion by 2032.
Facebook Live is the second most popular platform for live streaming in the United States.
Want to learn how to livestream on Facebook? In this post, I’ll explain how in detail and share valuable tips on how to get the most out of your videos.
Table of Contents
- What is Facebook Live?
- Facebook Live Tips
- Why are marketers so excited about Facebook Live?
- How to Livestream on Facebook using Facebook Live
- Facebook Live Tools
- How to Analyze Your Facebook Live Video Performance
- Tips and Tricks for Getting the Most Out of Facebook Live
As a marketer, one of the things I like best about Facebook Live videos, is that they are public. This means viewers can watch on any device with access to Facebook, even without an account.
But not everyone can stream. Users with personal profiles can go live on Facebook from their timeline, a group, or an event using a computer or mobile device.
However, I recently discovered that Pages (in other words, businesses and marketers) face more red tape.
As of June 2024, Facebook Pages can only go live when they have been up for over 60 days, and they have at least 100 followers.
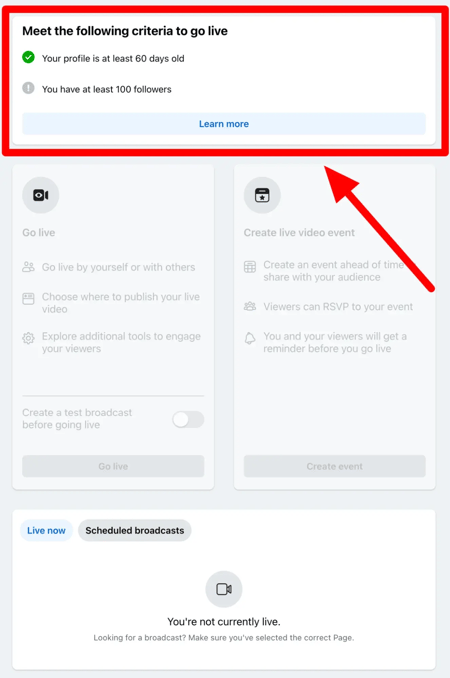
Facebook made this change to help combat spam and ensure that those posting content are legitimate. So, if you haven’t already met this minimum, make sure to check out this guide to help you grow your business page following.
Why are marketers so excited about Facebook Live?
The Benefits of Facebook Live
Well, for one, Facebook has the largest audience of any social media platform, welcoming over 3 billion active users. This makes the potential reach of Facebook Live immense.
In addition, Facebook is really prioritizing video on the platform, which means Facebook Live is more likely to be served in the newsfeed and in front of your audience than other static mediums.
This means increased brand awareness and visibility.
Live streaming is also just a fun, memorable way to communicate your brand stories and build authentic relationships with fans and followers.
Marketers can go live on Facebook to make company announcements, host interviews, field questions, run demonstrations or tutorials, expand the reach of in-person events (like HubSpot did below), and, overall, engage audiences in a more personal, human way.
Plus, it’s all free of cost.
While a fairly simple concept, Facebook Live has a lot of little nuances marketers need to learn to get the most out of the platform.
This guide will help you learn the best tricks for making a difference in how many people see your live broadcast, how they engage with it, and how it performs.
How to Livestream on Facebook using Facebook Live
Facebook Live started as a mobile-only broadcasting feature, but now, it’s available on mobile devices and desktop computers as well. In the sections below, we’ll go over how to go live on Facebook across multiple devices and apps.
(After you’ve met the criteria we discussed earlier, of course.)
Note: These instructions were made based on the iOS mobile apps. The exact steps and user interface in the Android apps may vary.
How to Go Live on Facebook via the Facebook Mobile App
Step 1: Go to the profile, Page, group, or event where you want to go live.
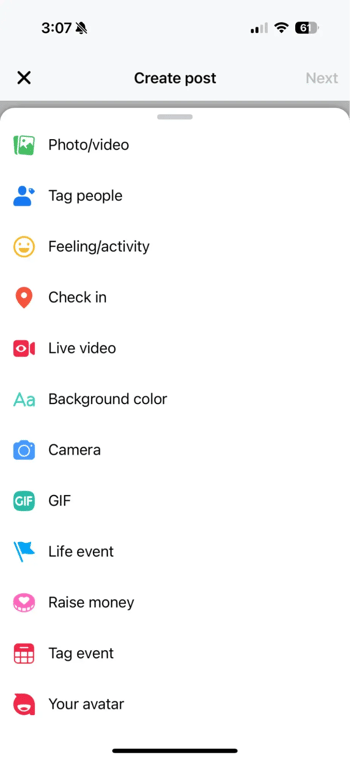
Step 2: Click “What’s on your mind?” to open post options.
Step 3: Click “Live video” in the post options.
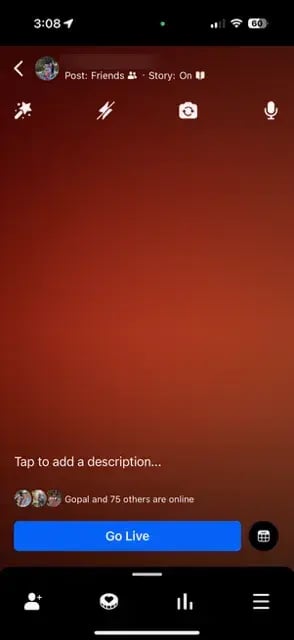
Step 4: Tap where it says “Tap to add a description” to add information about the video. You can also tag friends or other pages, a location, or a feeling/activity.
Note: By default, the video will go to the Facebook Story, but this can be changed to a group when acting as a Page.

Step 5: Tap “Go Live.” After you’re done, tap “Finish” to end the live stream.
How to Go Live on Facebook via Meta Business Suite Mobile App
The Meta Business Suite app is another option for going live from a Facebook Page. This app cannot be used to broadcast on personal profiles.
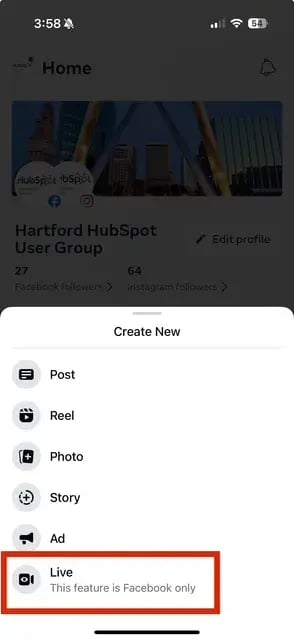
Step 1: In the Meta Business Suite app, select the Page you want to go live on by clicking the logo/photo next to home on the app home screen.
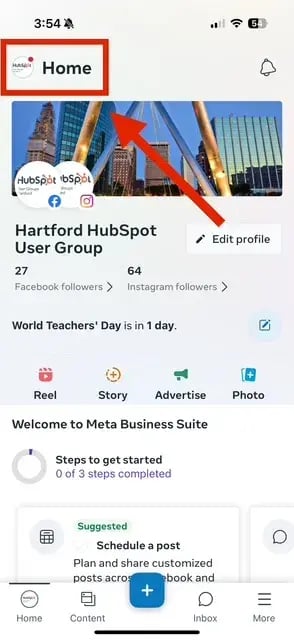
Step 2: With that selected, click the blue plus (+) sign button at the bottom of the screen to open your post options.
Step 3: Select “Live.”
Step 4: Add a description to your video. You can tag friends or other pages, location information, or a feeling/activity.

Step 5: Tap “Go Live.” When you’re done, tap “finish” to end your broadcast.
How to Go Live on Facebook from a Web Browser
You go live from a web browser using your computer’s built-in camera or an external camera and streaming software (also called an encoder like Restream).
Follow these steps:
Step 1: On your Facebook homepage, you should see a “Live” or “Live Video” option. If you are on a profile, it will be under “What’s on your mind?” The icon is a red camera.

Step 2: Choose to “Go live.” You can also “Create live video event” for the future on this page.
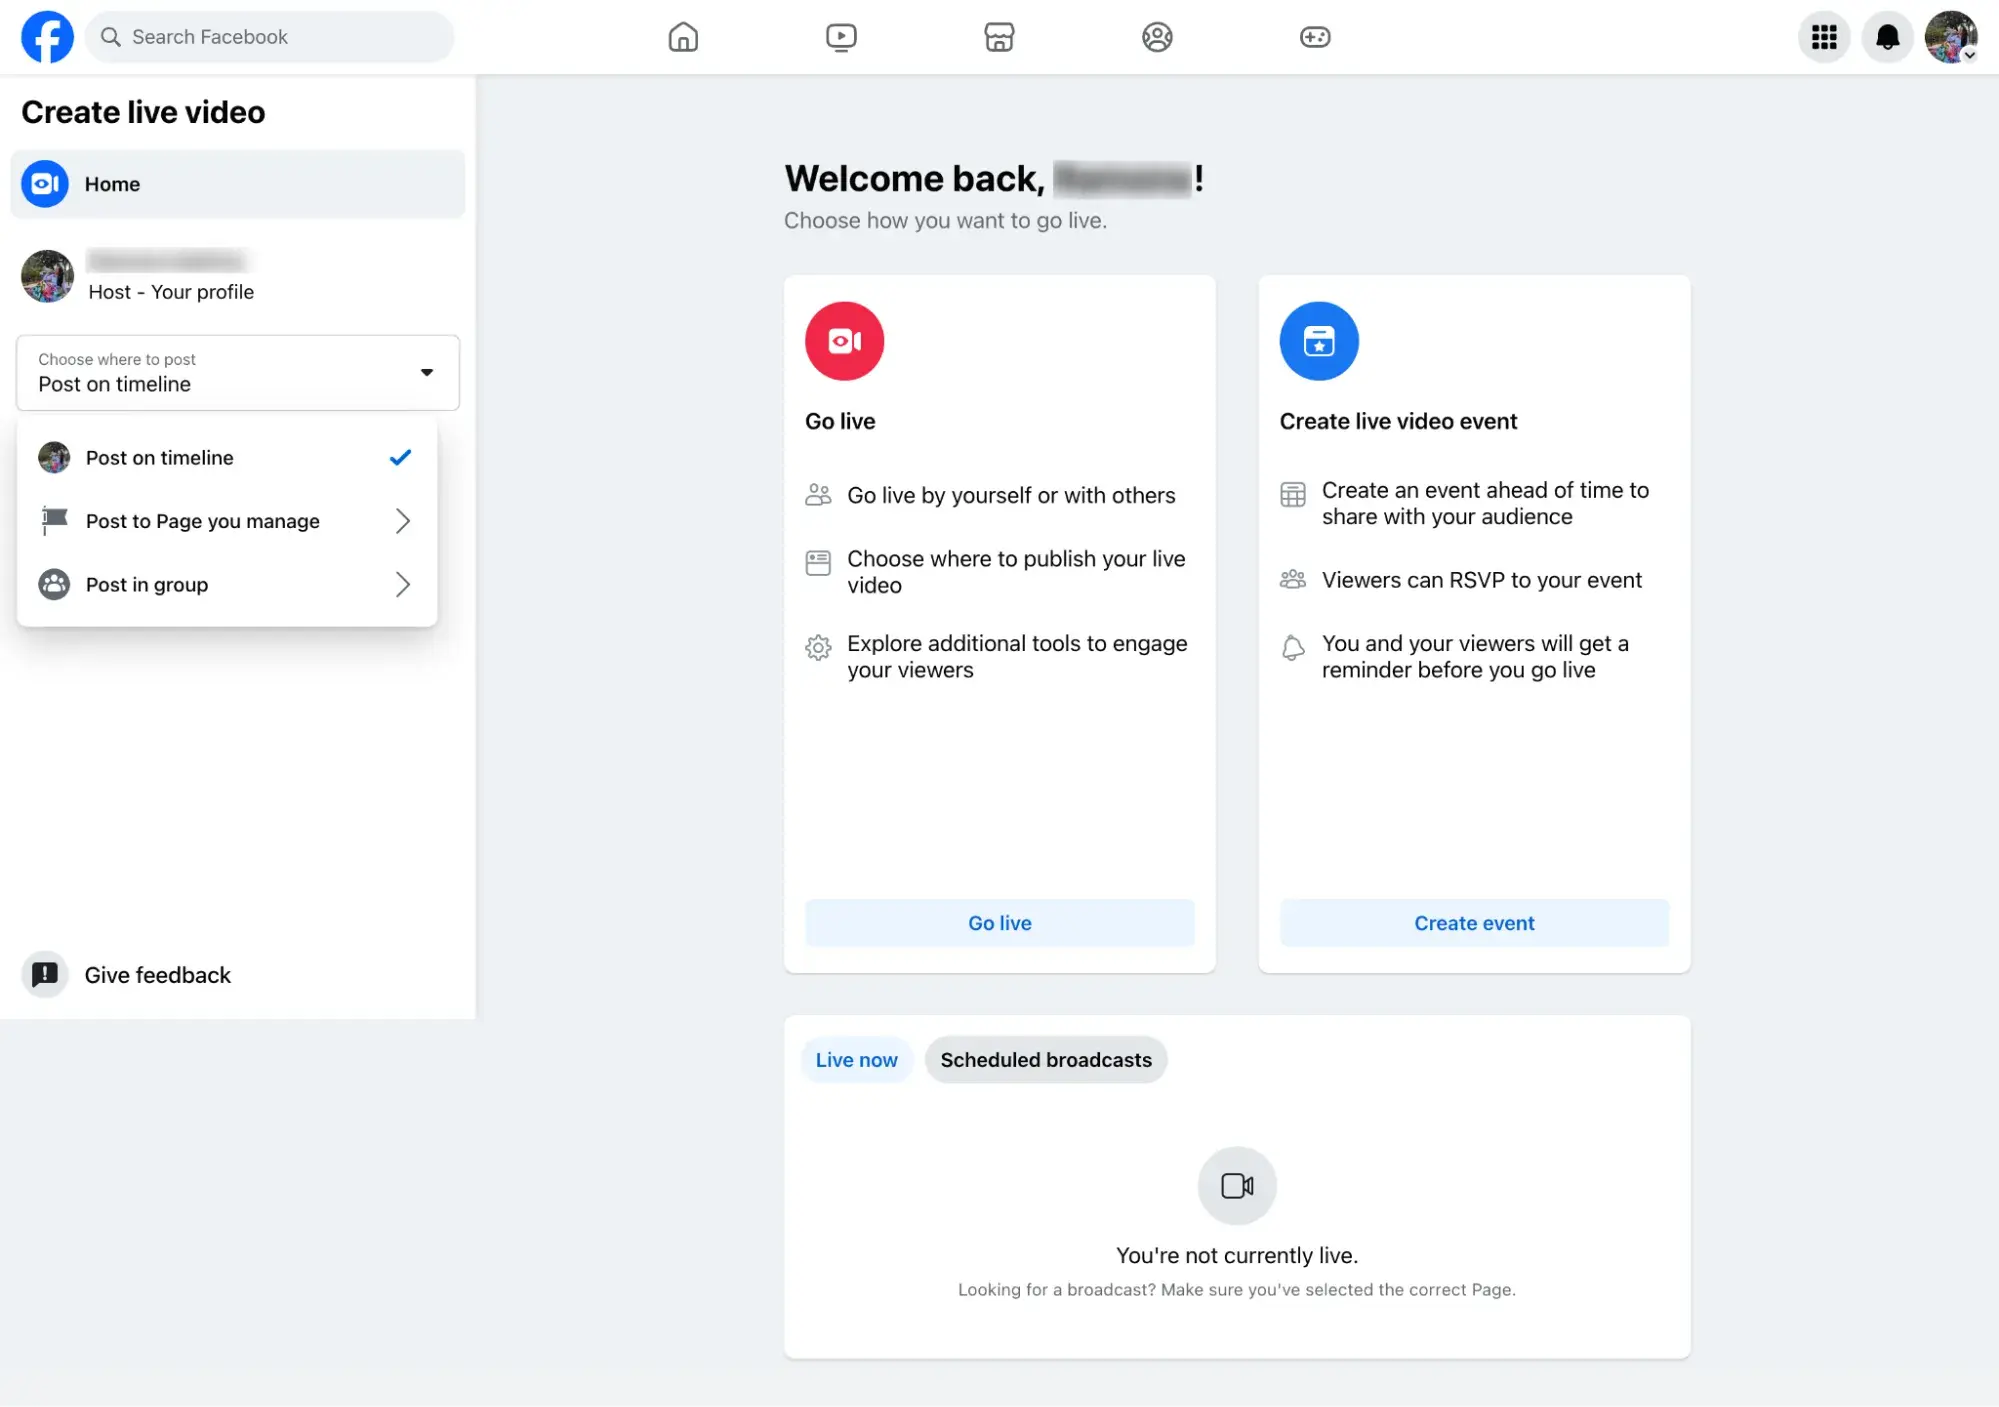
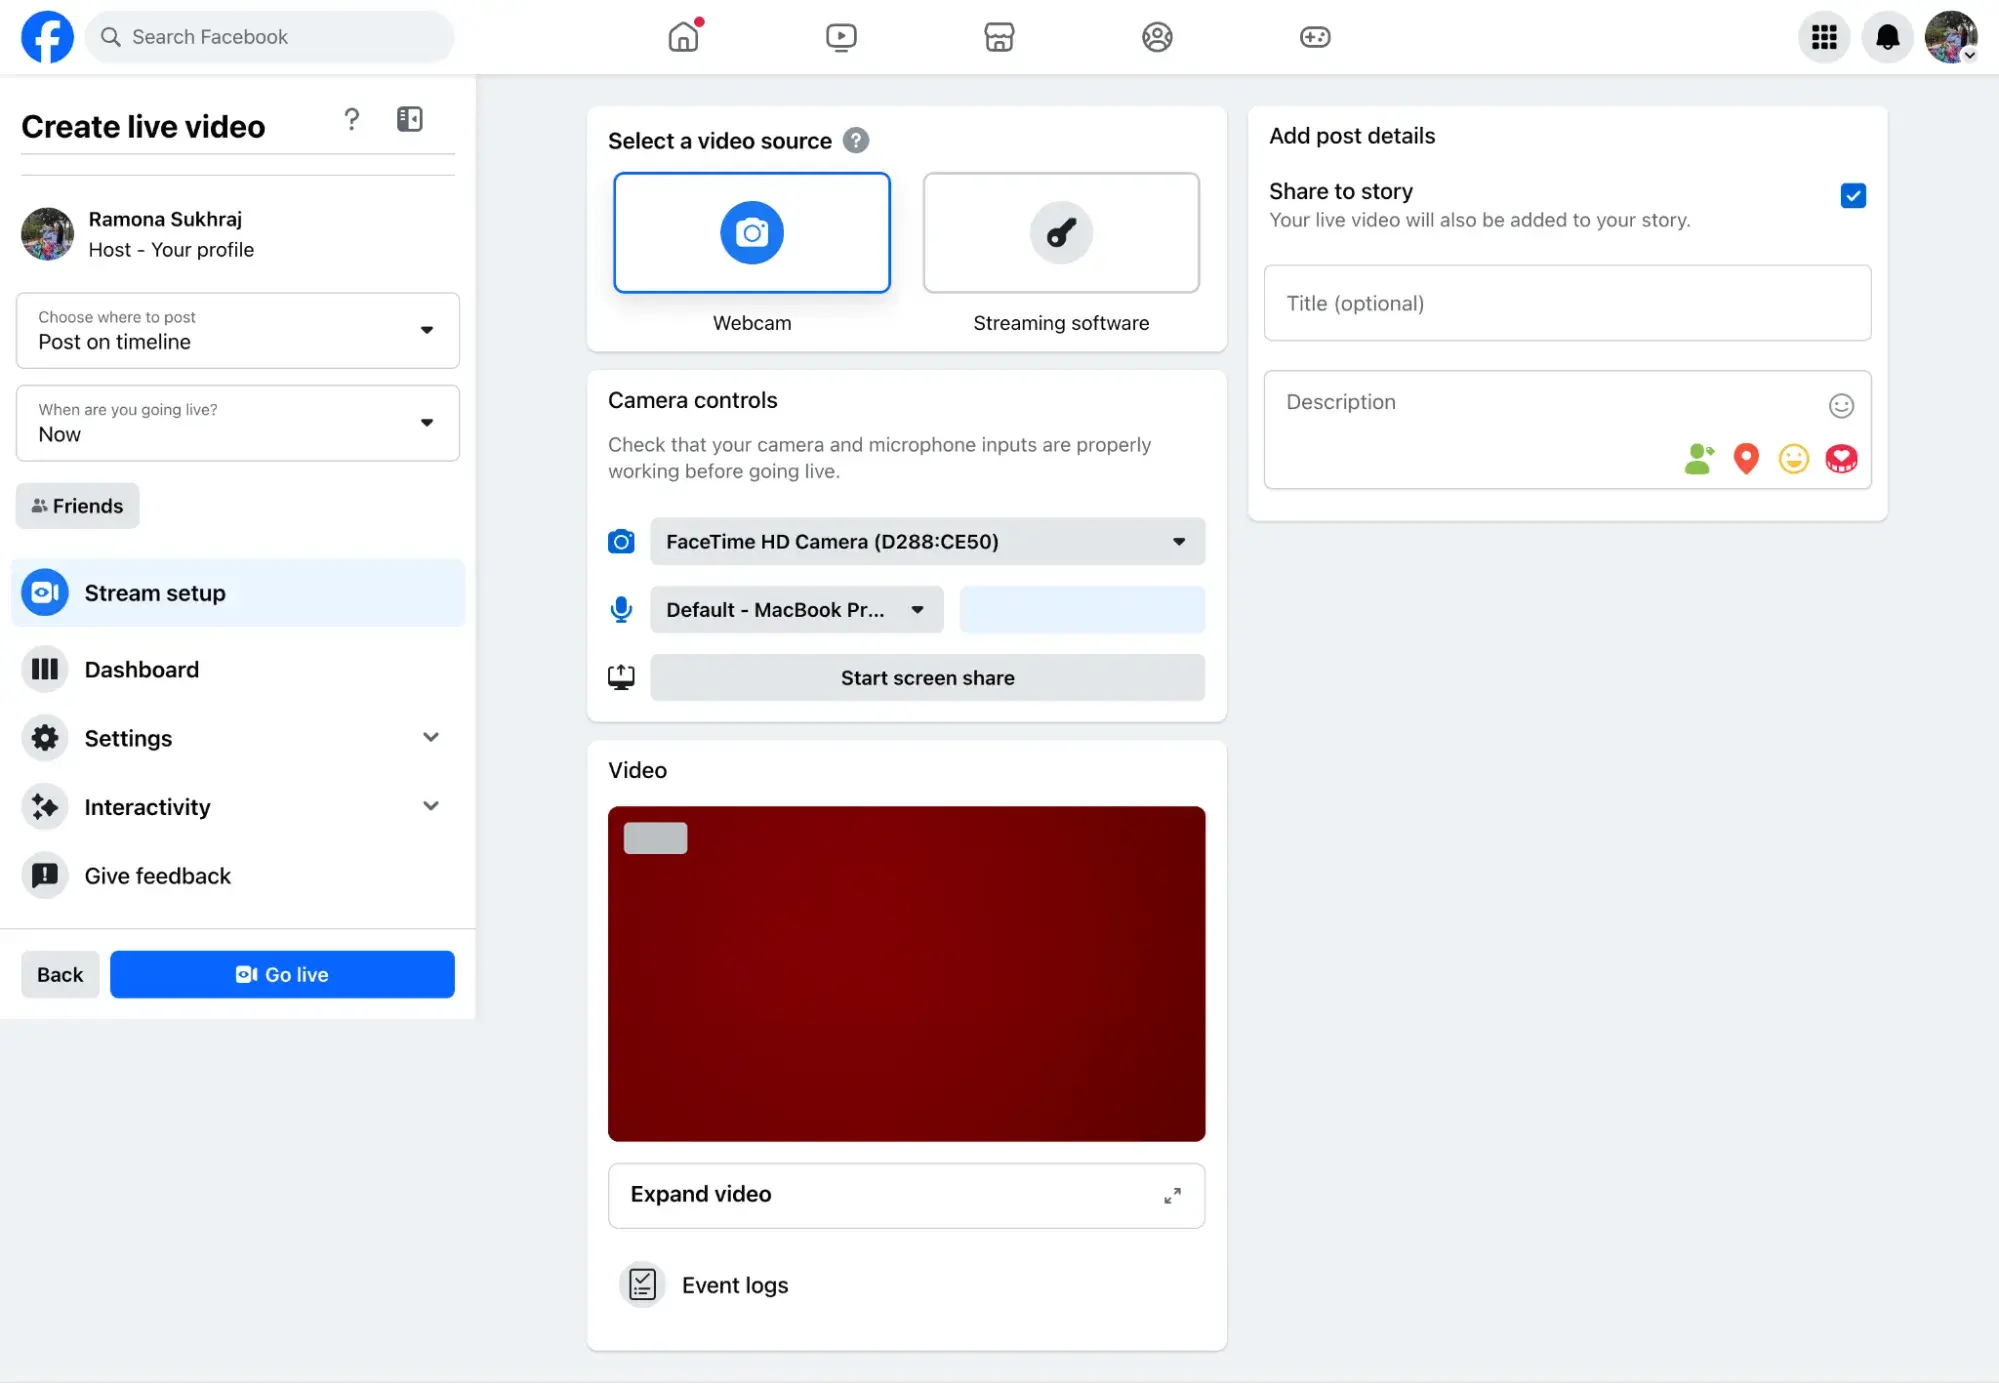
Step 3: Fill out the details for your video.
If you’re using your webcam, this includes what video and audio tools you’ll use as well as your video title and description. It’s also where you select where you want your video to be posted. You can choose from:
- Your timeline
- A Page you manage
- A Group you’re in
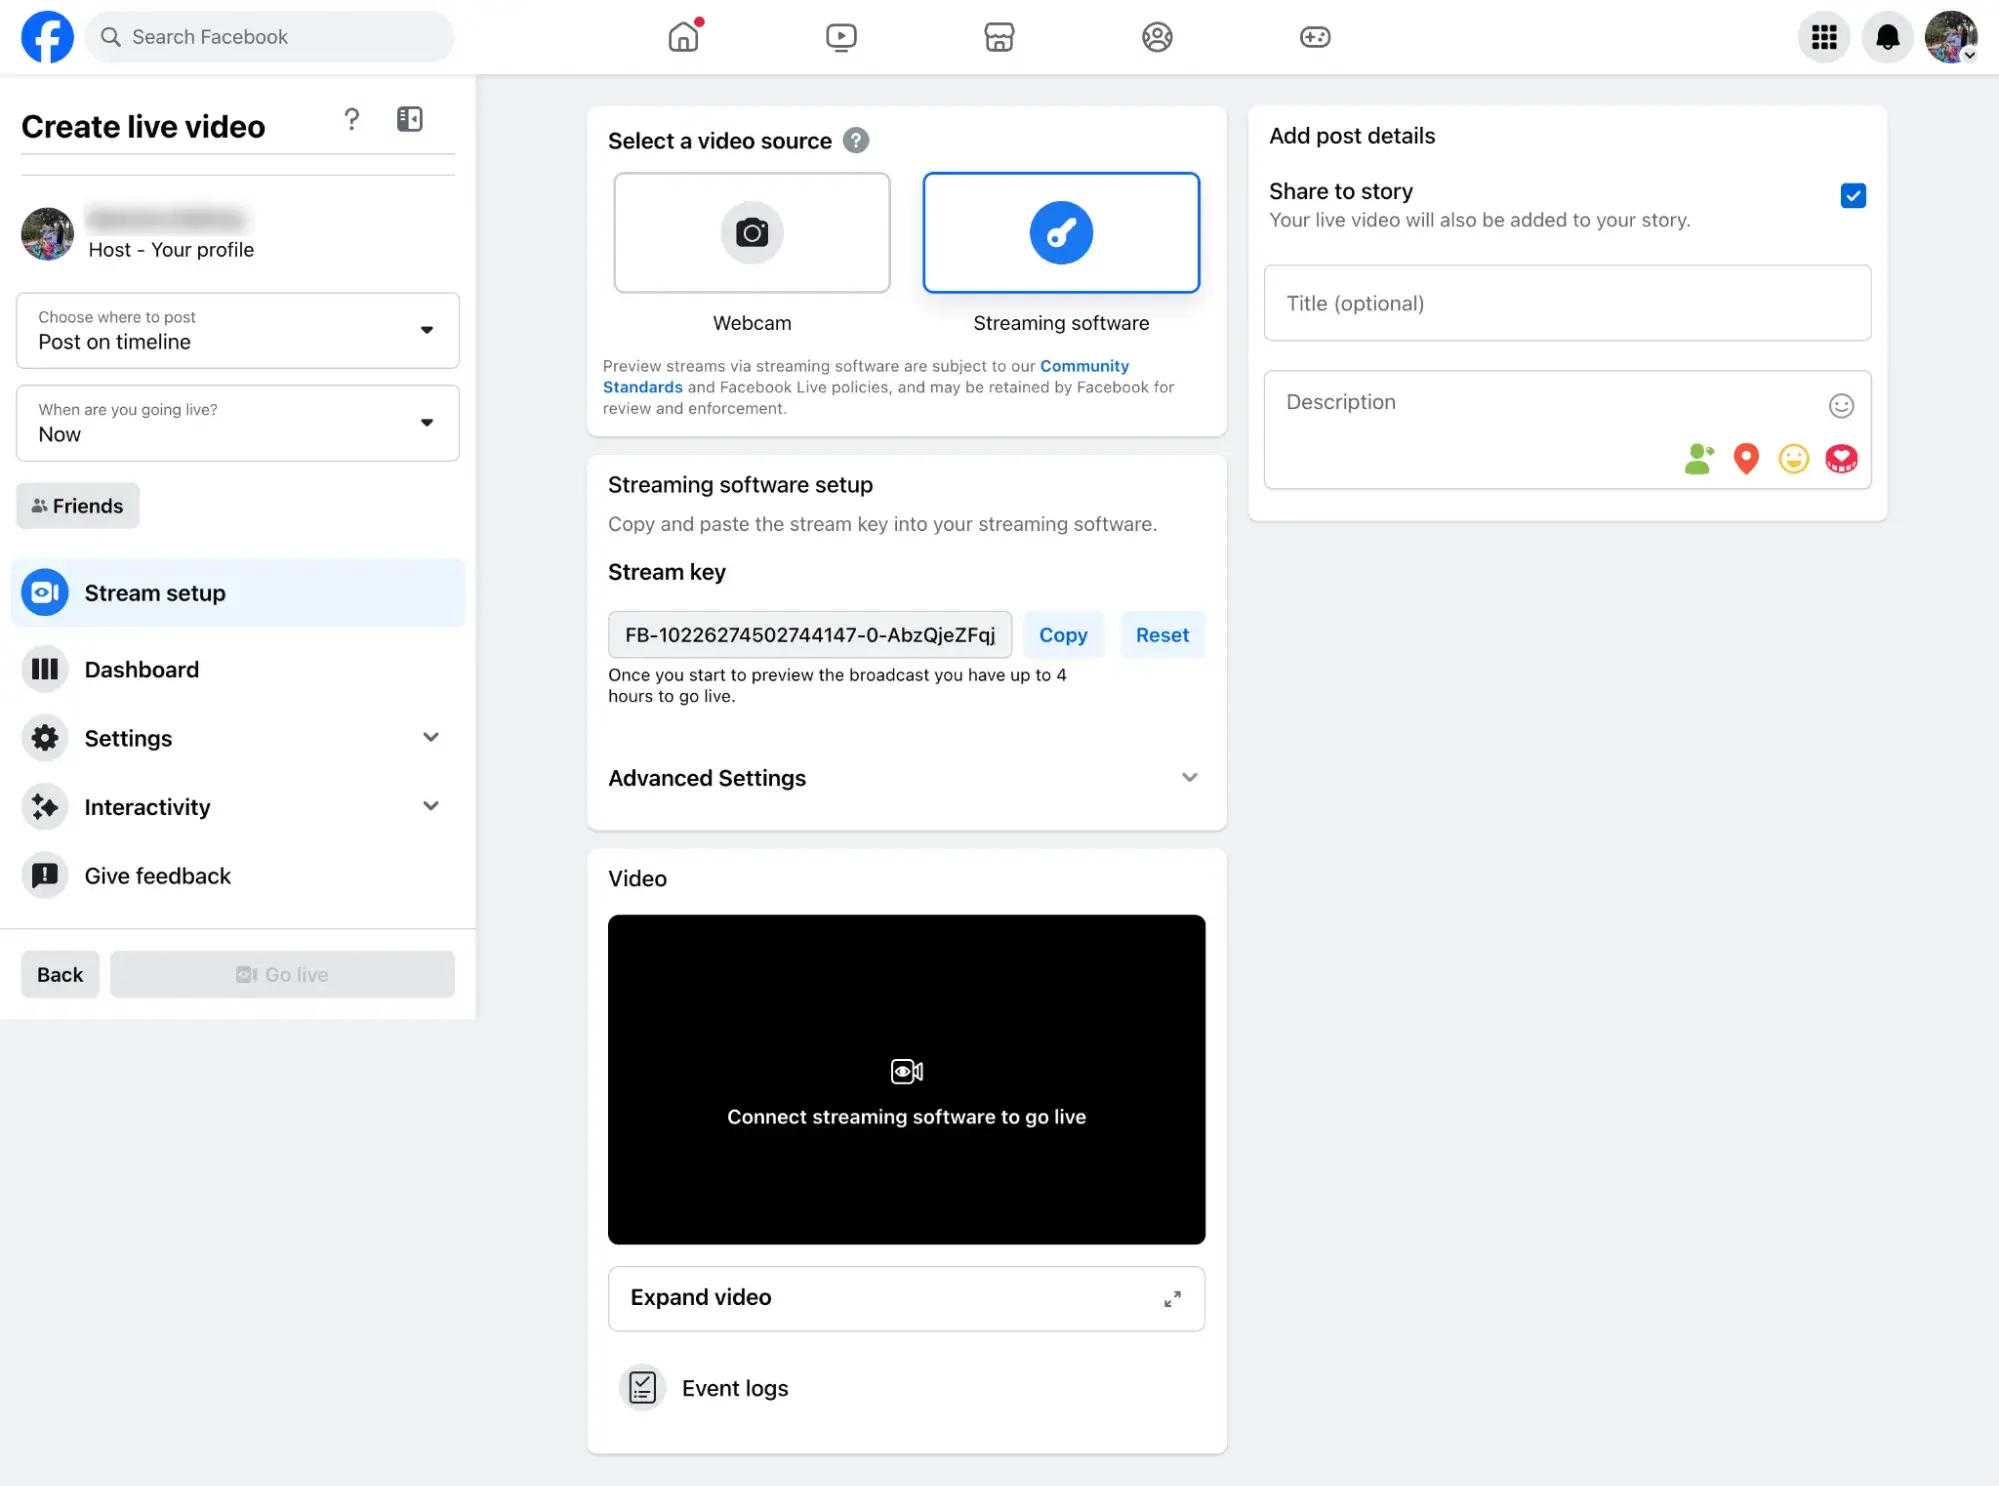
If using a streaming service, you’ll fill out your title, description, and location, but Facebook will provide you with a streaming key to use in your encoder. Take this key back to your streaming service and complete the necessary setup steps there using it.
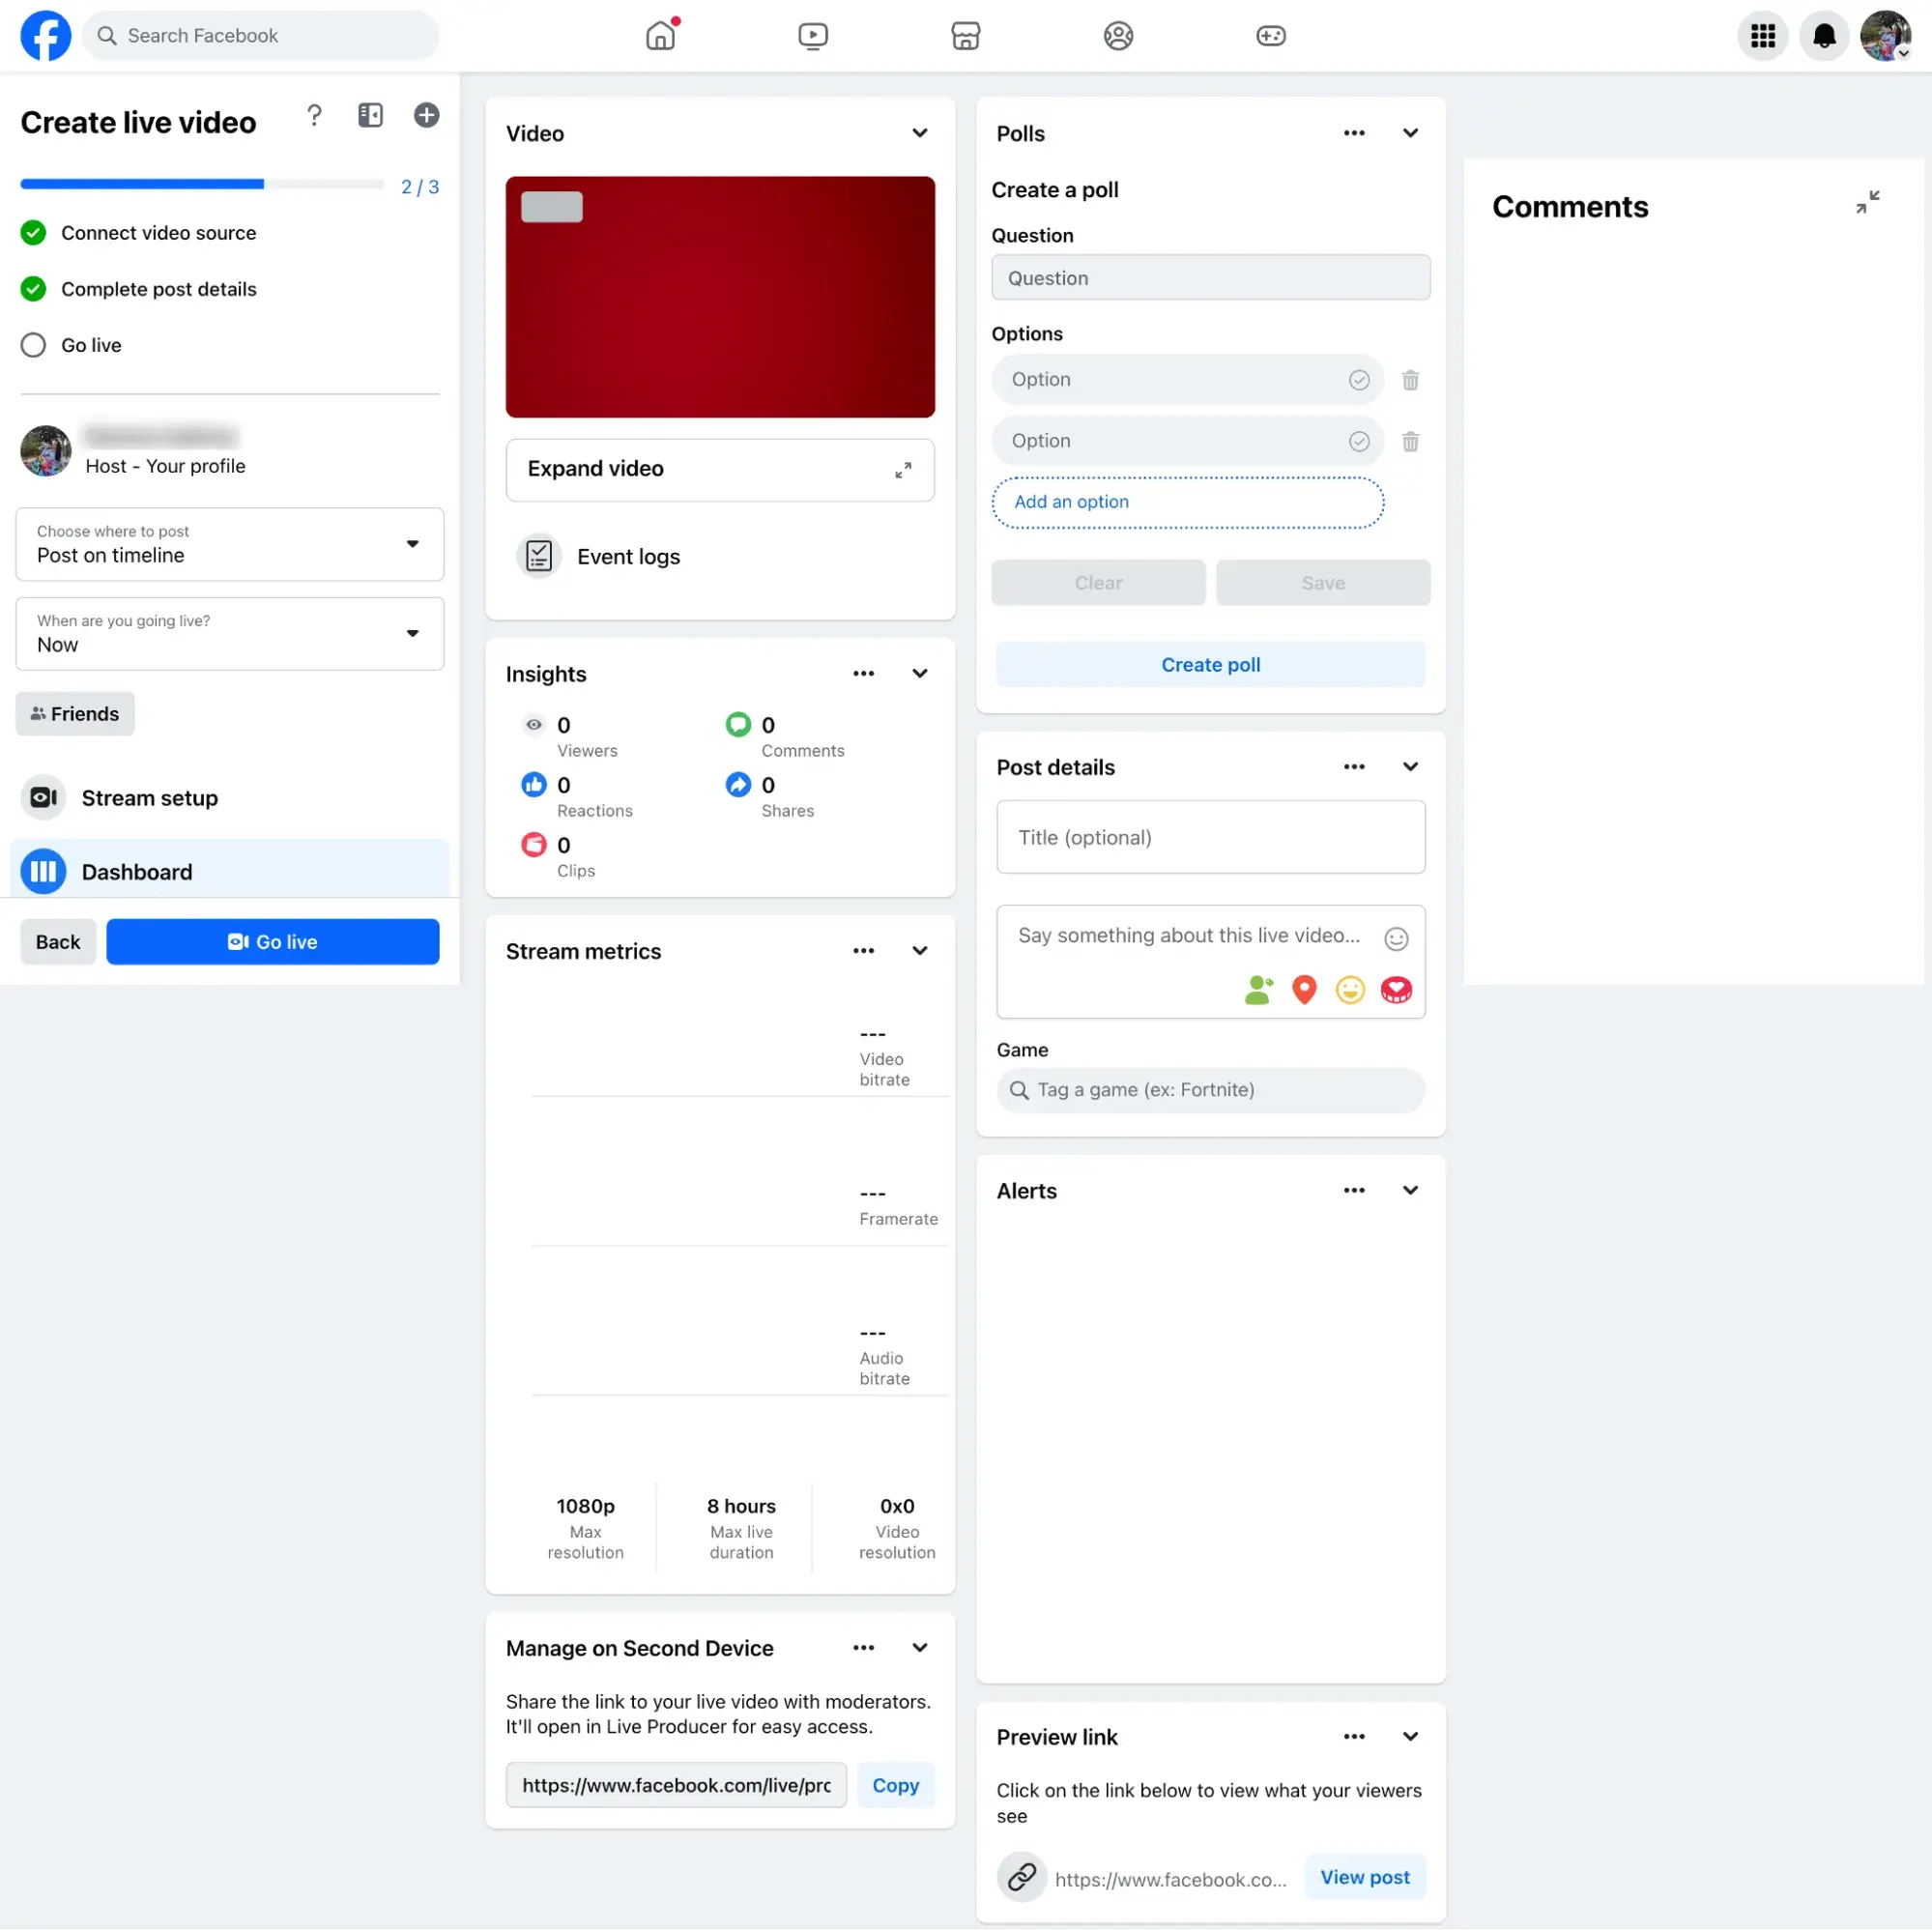
Step 4: Click “Go Live” in the bottom left corner when you are ready.
Pro tip: During your broadcast, you can use the “dashboard” page to create polls for viewers, view and respond to comments, and overall manage and enhance your engagement.
Real-time engagement like this is what makes live content exciting and different, so don’t shrug it off.
I know that whenever I’ve gone live on Facebook, audiences have loved hearing responses to their questions or comments verbally on the broadcast. (And I can’t lie; I’ve loved hearing them during broadcasts I’ve watched.)
More on the tools Facebook has available to make your broadcast more engaging in our next section.
Facebook Live Tools
Facebook offers many features for you to further connect with your audience during your broadcast.
Utilizing these tools will help boost engagement and create the best possible experience for your viewers. You can mix and match them to serve your stream in the best way for your business.
- Live Polls: You can create a live poll beforehand to share when you go live. Then, you can see your audience’s responses in real time during the stream and use results to spark live discussion.
- Featured Links: Adding one or multiple featured links to the stream to promote your website or other sources.
- Live in Stories: These allow you to share your streams directly to Facebook Stories to reach more of your audience.
- Live Comment Moderation: Manage the conversation in your live stream’s comments. With this feature, you can limit who can comment and how frequently. You can even choose a specific viewer to moderate comments on your behalf.
- Front Row: This feature allows you to highlight your top fans in a special section of your stream. You can give them a special shoutout to show appreciation for them while you’re live.
- Badges: These are a measure of how much your fans are engaging with your content. Fans can earn badges by interacting with your content, whether it’s sending “Stars” or tuning in to your Facebook Live videos.
- Donations: Qualified pages in certain locations can add a “Donate” button to their live video. Nonprofits using Facebook’s payment platform don’t have to pay a fee, so they get 100% of the donations.
- Live With: This is a co-broadcasting feature that allows you to host your Facebook Live video with multiple guests.
- Live Shopping: If you have products for sale on Facebook, this feature allows you to add product listings to feature during your livestream.
- Messenger Rooms broadcast: You can turn your Messenger Rooms into co-hosted Facebook Lives with up to 50 people.
- In-stream Ads: In-stream ads are automatically added to the streams you upload as a way to monetize your content.
- Subscriptions on Live: Your audiences can subscribe to your content and get exclusive benefits as part of their subscription.
For more help with going live on Facebook, check out our video:
Remember that a live stream recording is also published to the property where you went live. That content is great because you can download and repurpose it for further use.
How to Analyze Your Facebook Live Video Performance
Facebook Live video insights help you learn how people interact with your live streams so you can optimize your live strategy for maximum impact.
The performance analytics available for Facebook Live videos are similar to those of normal videos on Facebook, with some neat additions.
- Video performance: An overview of your total video views and engagements (likes, shares, comments, etc.), minutes viewed, and net new followers. ;
- Benchmarking: A comparison of your Live metrics to other creators and businesses in the same industry
- Audience: An overview of audience demographics (biographical information) and other stats like growth rate, number of follower video views, and non-follower video views.
- Loyalty: These are stats for your number of returning viewers, the videos that inspire people to return to your page, and the number of engaged followers on your Live.
- Retention: You’ll learn where your viewers are coming from, the traffic sources that drive the most watch time, and how long people watch (by 3-second, 15-second, and 1-minute views).
- Earnings: These stats show how much you earn during your videos from in-stream ads, CPM, RPM, monetizable 1-minute views, and money earned from Stars given by subscribers (if applicable).
The most comprehensive performance data for your Facebook Live videos can be found in Meta Business Suite:
But I wouldn’t blame you if it gets a little overwhelming; there is a lot of information there.
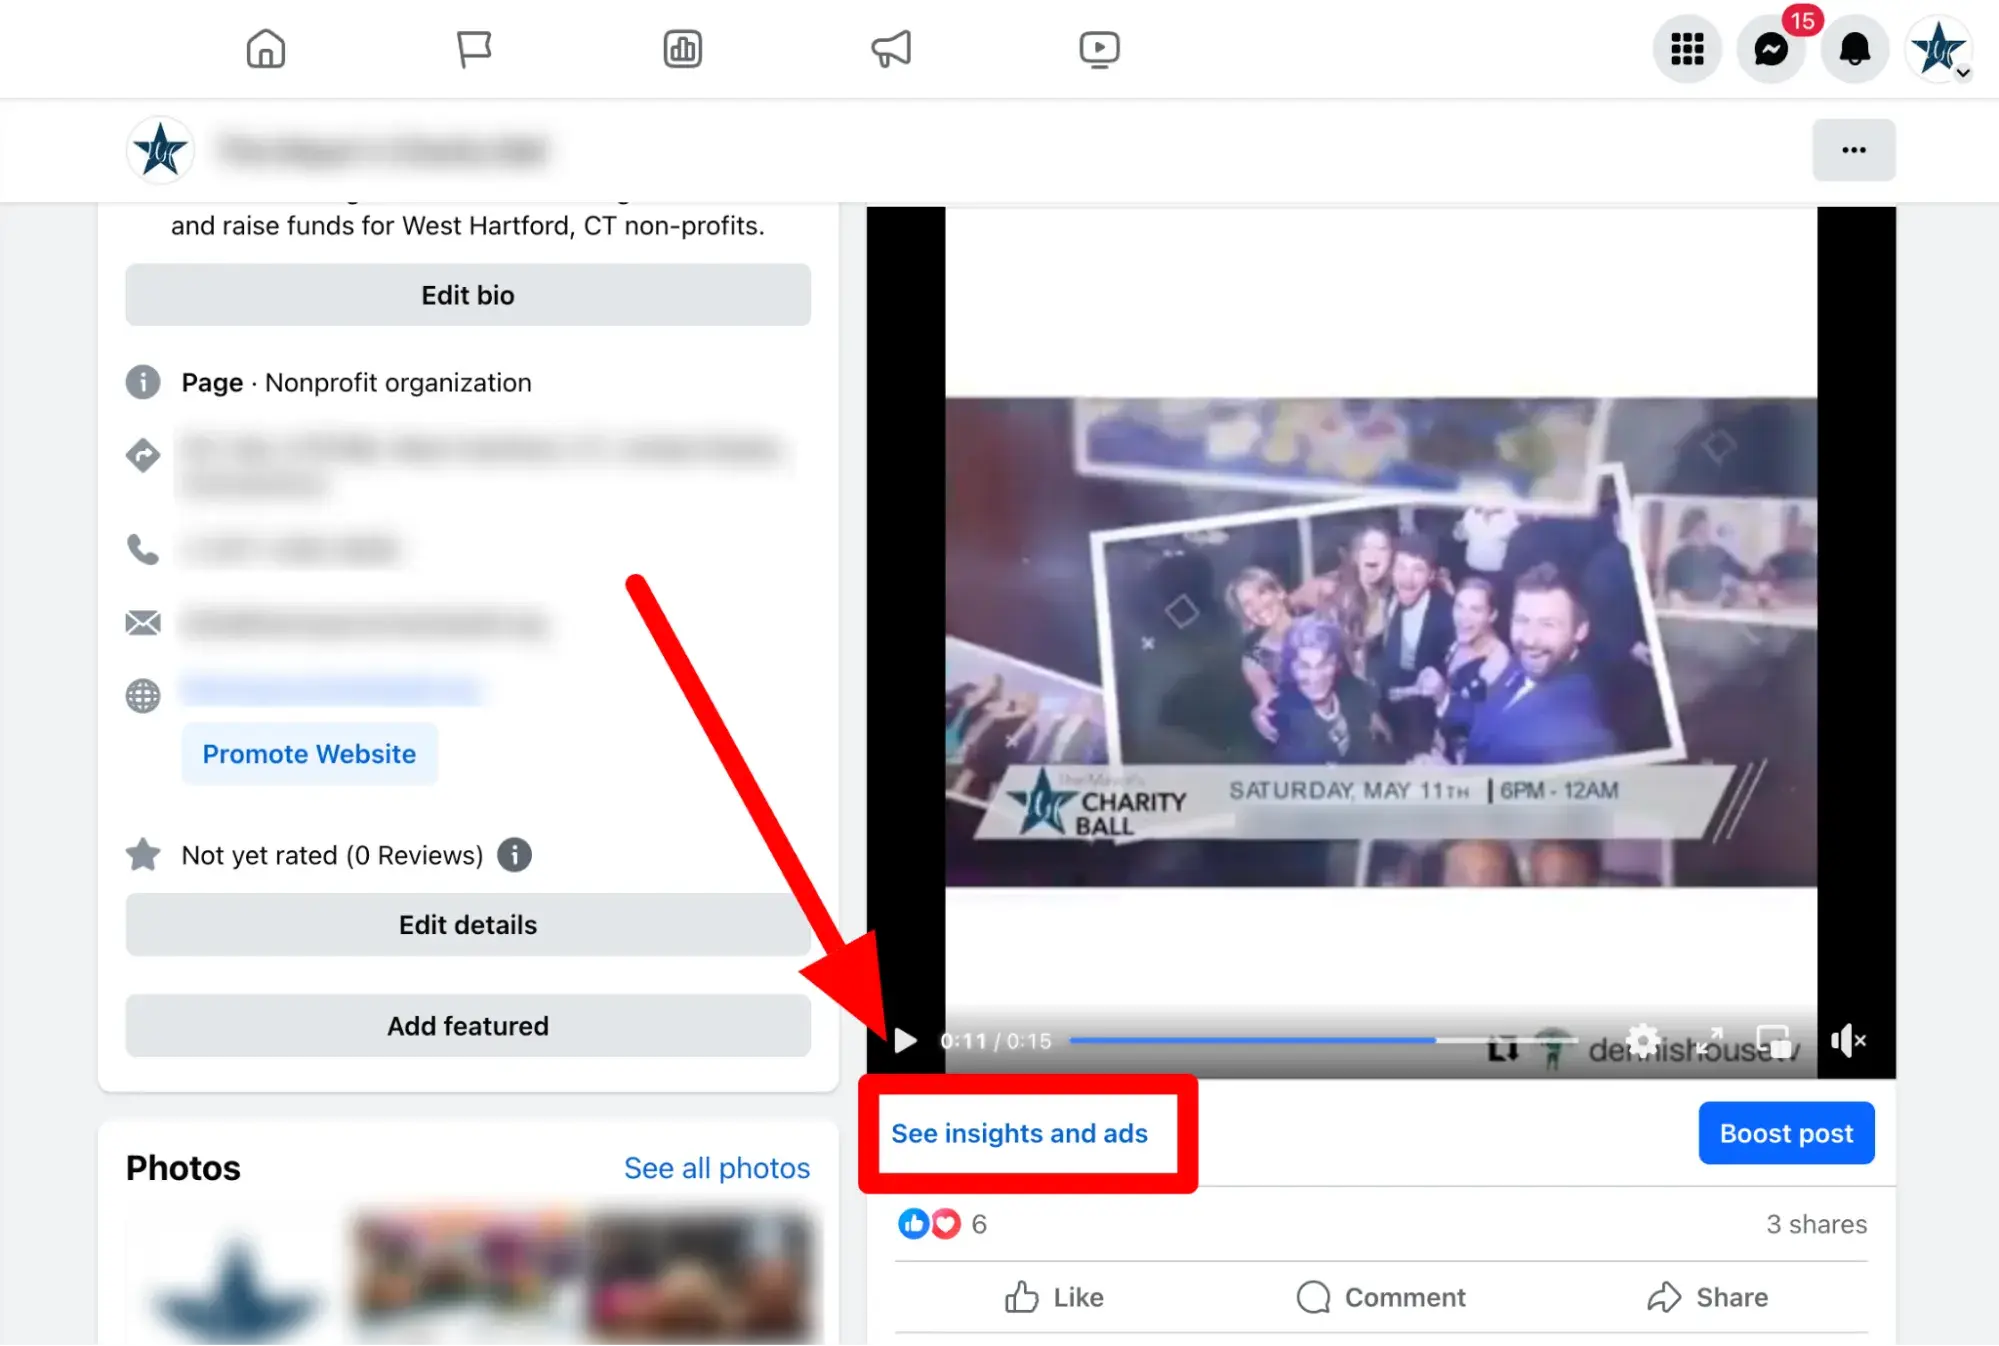
For a quick pulse on how my content is doing on Facebook, I usually click the insights button below individual posts.
How to Access Video Analytics on a Facebook Business Page
Step 1: Head to the left-hand column of your page and select Meta Business Suite.
Step 2: Select Insights from the left-hand side menu.
Step 3: Click, “content,” then set your media type to “video”
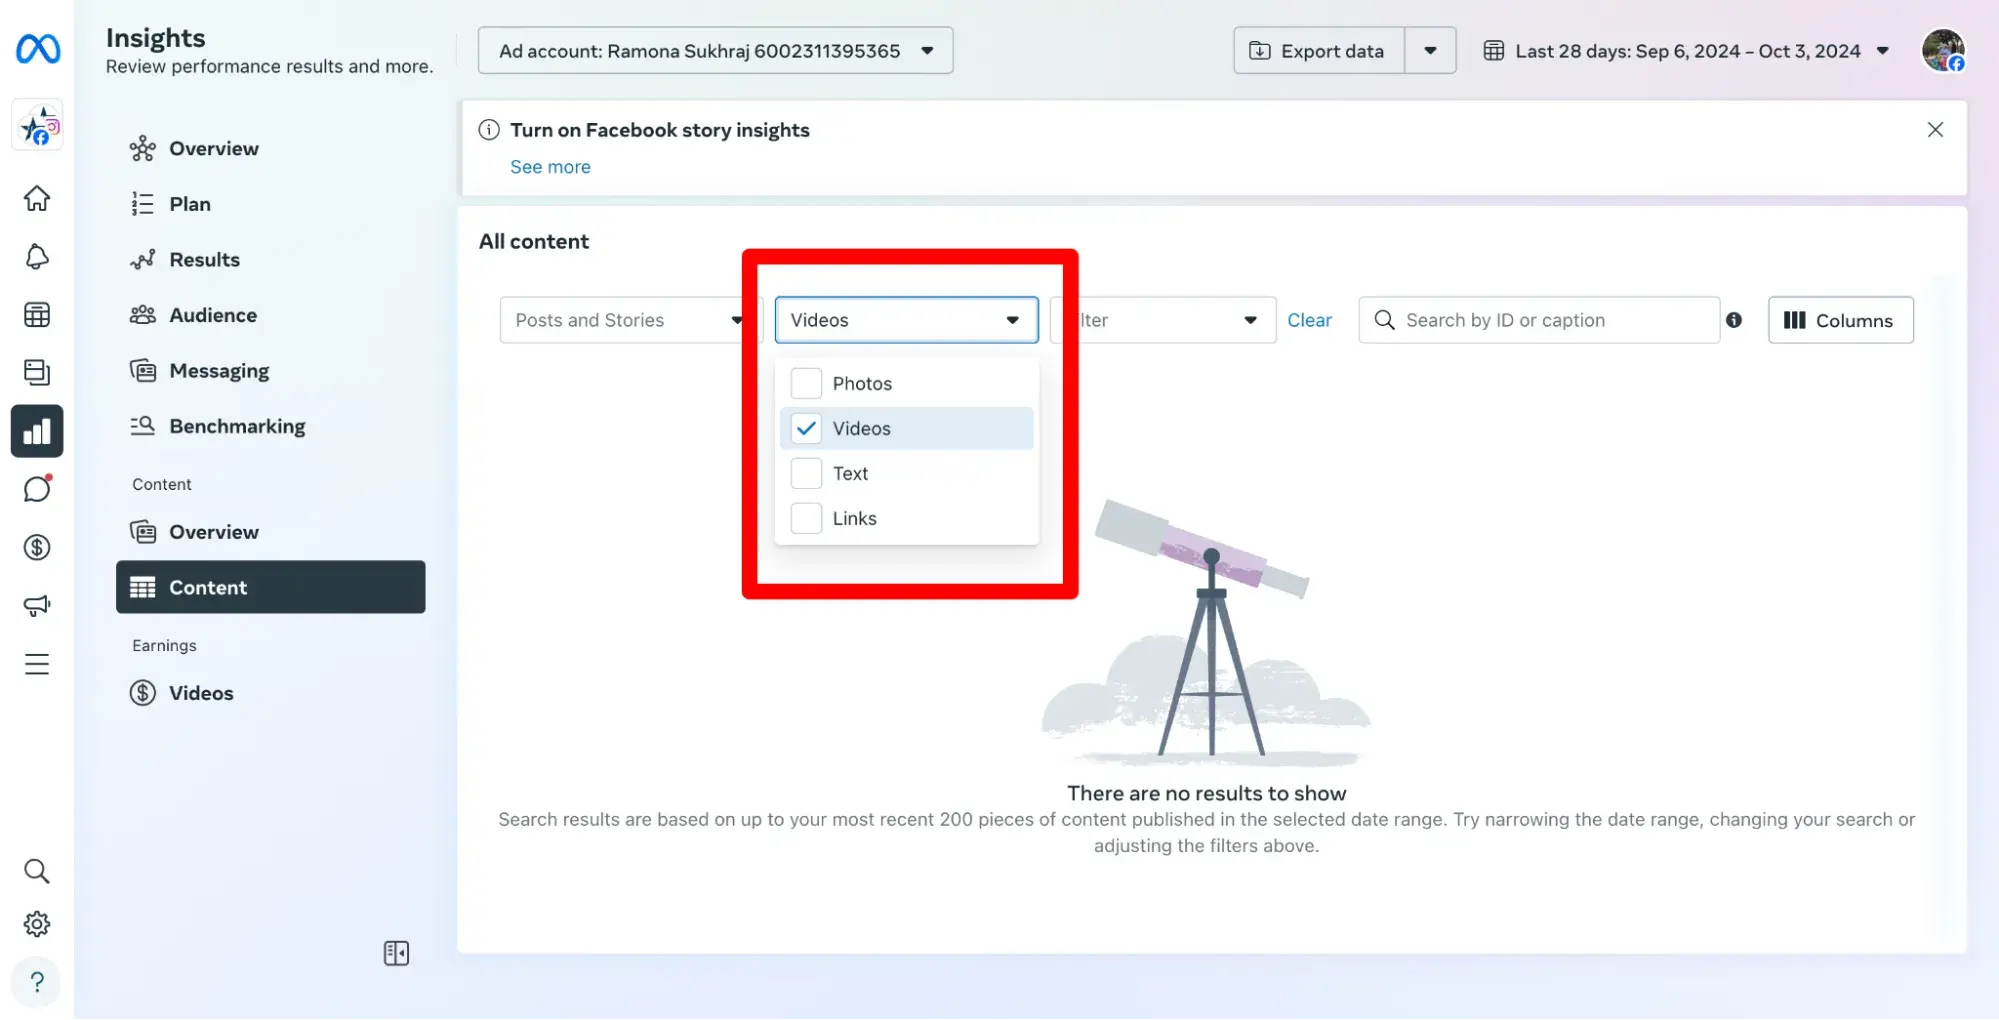
Step 4: Dive deeper into your insights by selecting filters and scrolling down the page. (Note: We didn‘t have any videos posted to the page we used in this example. If you do have videos, you’ll see them appear here.)
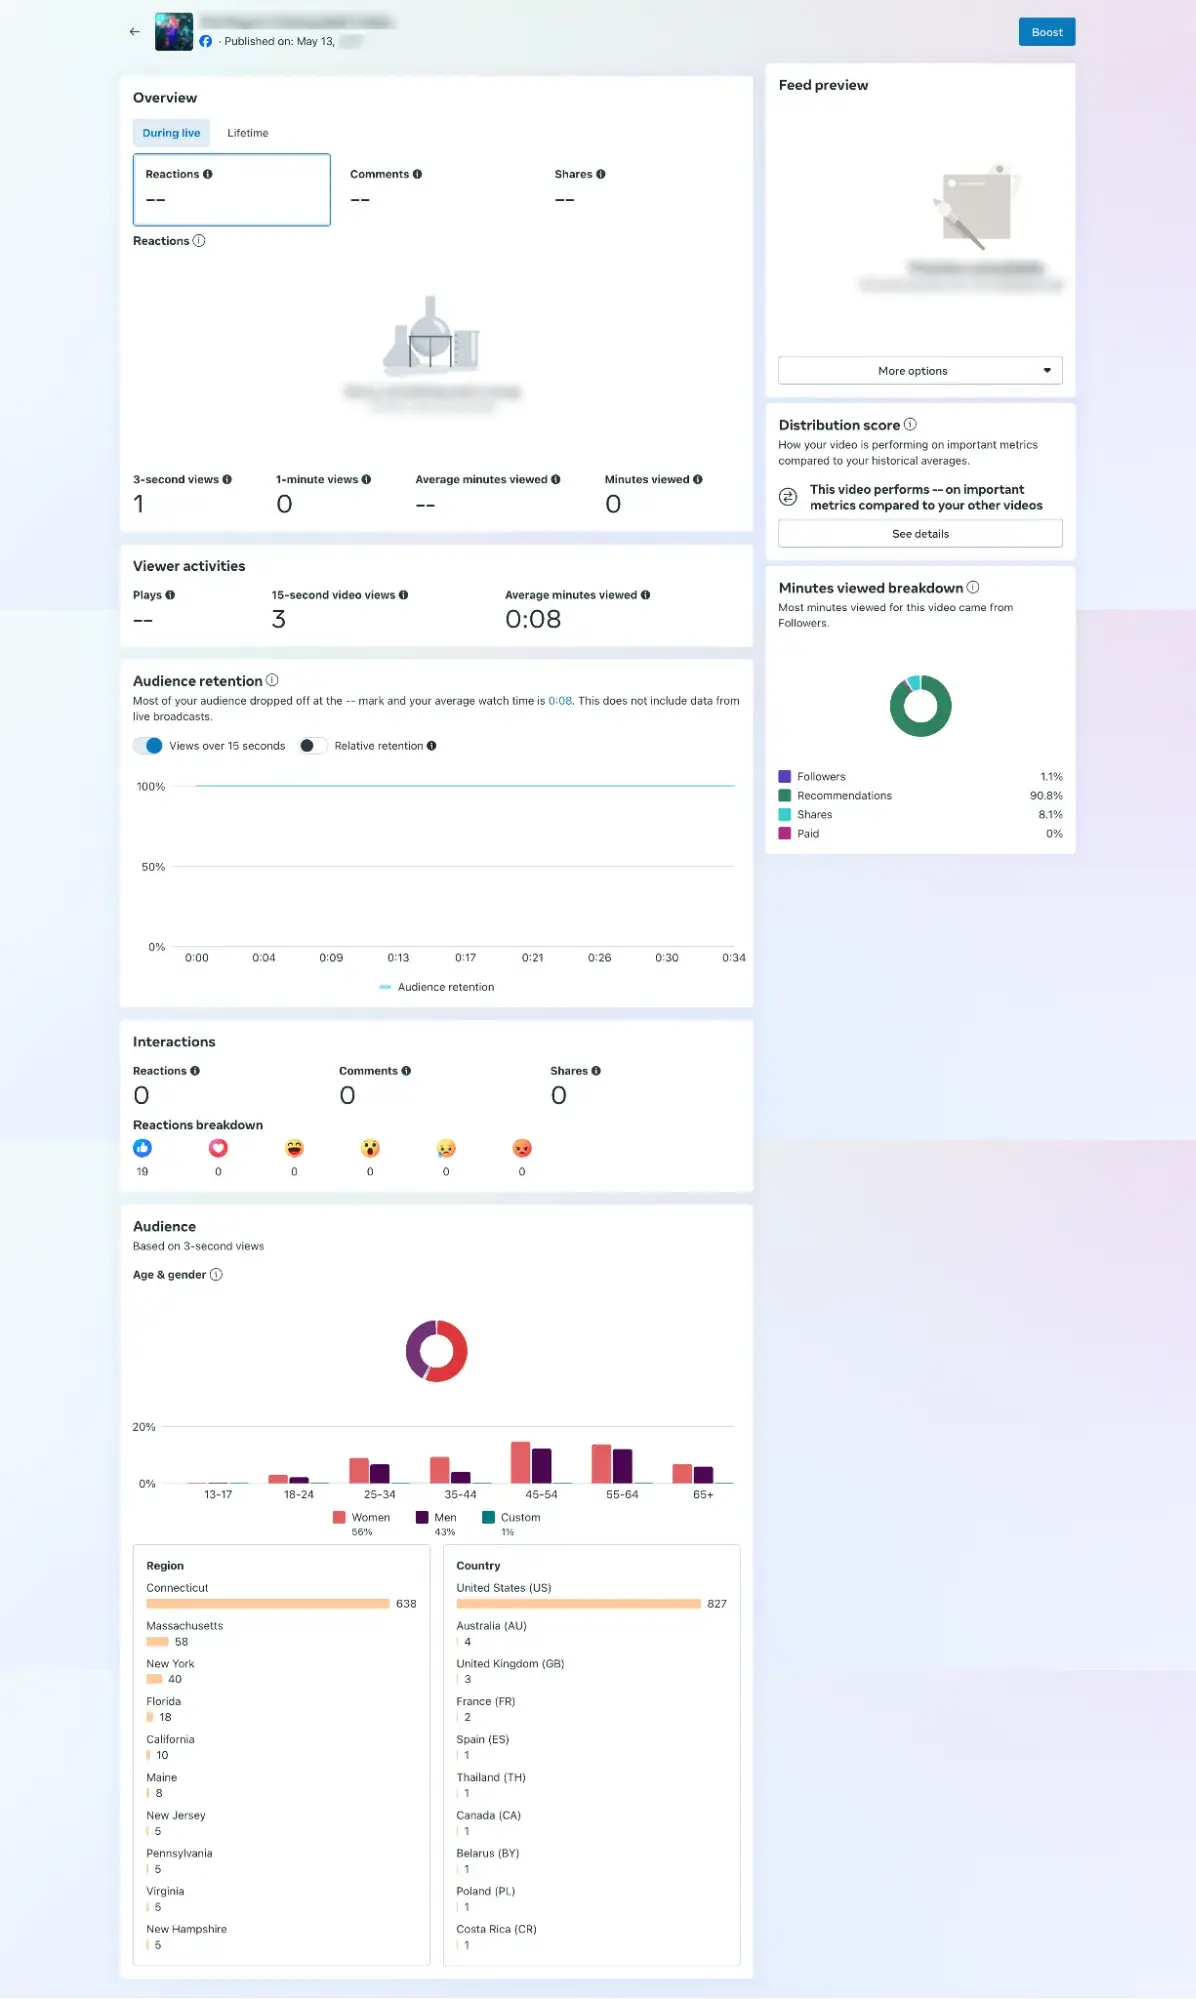
Step 5: To view insights for a specific video, click on the video title in your content list. From here you can view metrics from when the broadcast was live as well as over its entire lifetime.
Tips and Tricks for Getting the Most Out of Facebook Live
Now that you‘ve mastered how to livestream on Facebook, let’s discuss some tips and tricks on making your live content the best it can be.
The last thing you want is to start a live video and freeze up. When you’re live, there are no do-overs or chances to start over. So, prepare yourself or your host as much as possible.
Outline what you want to communicate in the video, then follow the rest of the tips below.
Need some inspiration? Check out these great examples of Facebook Live videos to help get your creative juices flow.
1. Brush up on Facebook Live best practices.
Marketers have so much opportunity to reach a wider audience on Facebook Live, so it’s worth committing to learning how to run a Live effectively.
In our detailed Marketer’s Guide to Facebook Live, we cover essential best practices on how to plan, run, and analyze the results of a business-run Facebook Live. Download our free eBook to brush up on these best practices.
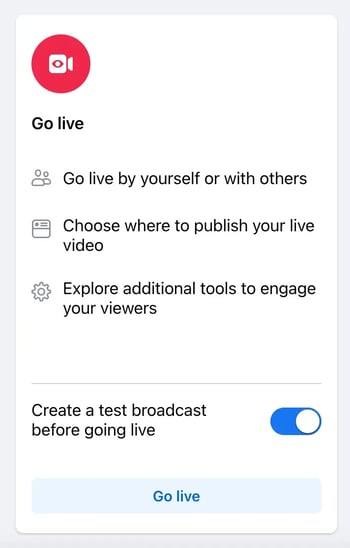
2. Test out live video before broadcasting live.
If you want to experiment with live broadcasting without sharing it with anyone else, you can create a test broadcast by adjusting the audience to be just you or a colleague or friend.
To do this, toggle Create a test broadcast before going live into the on position after you start the process of creating a live video, outlined here in Step 2.
3. Don’t go live too frequently.
The art of organic reach on Facebook has changed over time, but it does still exist. Live video can be a powerful tool in organic reach, as users can be notified of the content.
But don’t abuse this. Only go live when you’re prepared to offer true value to viewers.
If you go live too frequently with nothing to show, people will begin to tune you out or, worse, unfollow you.
4. Keep reintroducing yourself.
When you first start the video, take a minute to introduce yourself and what the video’s about, but don’t do it just once.
When you first start live streaming, you may have zero people watching. Even a few seconds in, you could only have a handful of viewers.
As people find your video on their newsfeeds or see the notification in the app, they‘ll join in gradually. So, to catch people up, you’ll want to reintroduce yourself a second, third, and even fourth time.
Cosmetics brand Benefit does a great job with this for the first few minutes of its broadcast:
5. Lean into popular topics.
Not sure what to talk about it when you go live? According to Statista the most popular types of live streaming videos in the United States are those related to breaking news.
As a business, you can monitor industry news and respond or add to the conversation on Facebook Live.
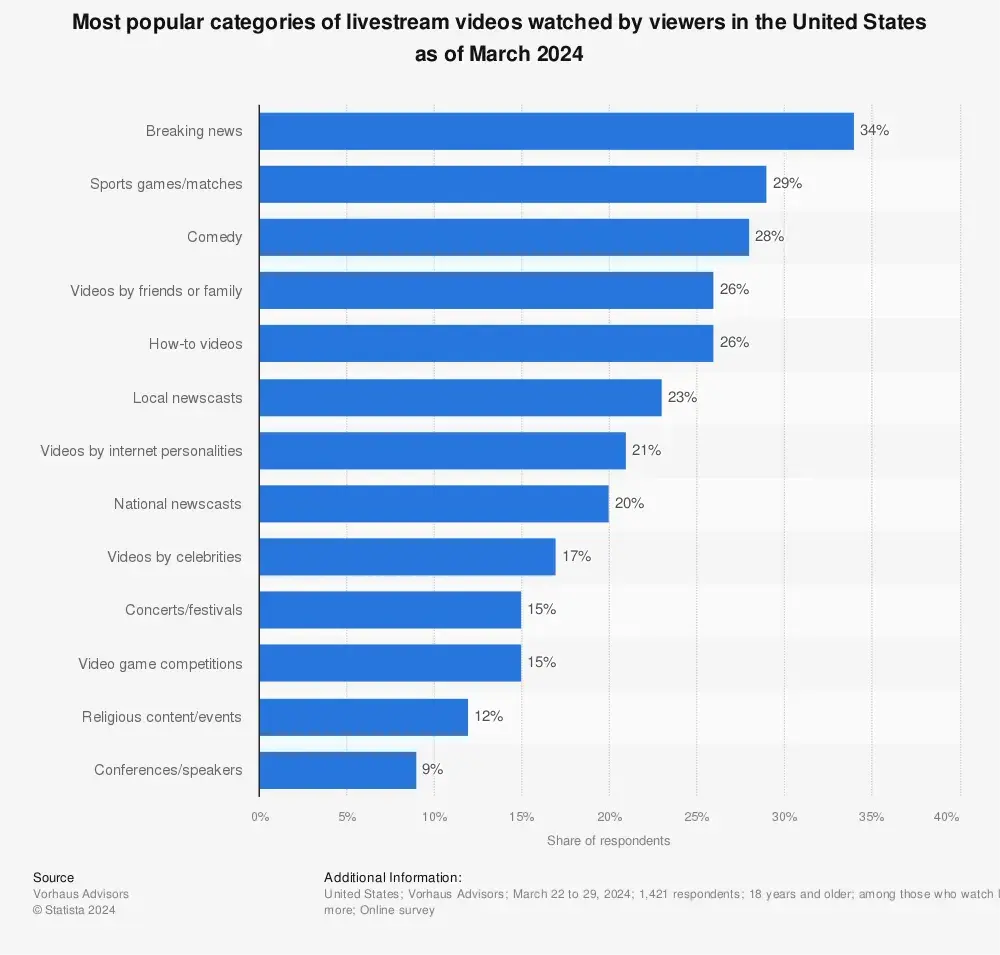
Other popular options include humorous videos and how-to’s.
6. Make the video visually engaging.
You have to be visually engaging — not just at the very beginning of your broadcast (although that’ll be important for when folks view the video later), but throughout the video as more and more people join in.
It should be no surprise that Martha Stewart is a master of that.
I love the colorful graphic she starts her video with (which also acts as its thumbnail) and the stylish set on which the broadcast takes place. She uses a variety of props and angles to keep the video interesting.
The more visually engaging you can be, the more you can entice people to stick around and really focus.
Facebook started monitoring signals of video engagement — like turning on the audio, switching to full-screen mode, or enabling high definition — interpreting that as users enjoying the video.
If your video engagement is good, Facebook is more likely to show it in more newsfeeds.
7. Roll with the unexpected.
What makes a live video special? The spontaneous, interactive nature of it.
People love the ability to interact and even impact what happens in a live broadcast.
These moments make live video special and differentiate it from scripted, edited, or otherwise pre-recorded videos.
So, embrace the platform. Plan your main talking points, but don’t run off a script and be ready to pivot with the unexpected.
That said …
8. Don’t worry about mistakes or stutters.
Listen, we’re all human. When humans and technology mix, there can sometimes be technical difficulties.
Honestly, that’s one of the positives I think came out of lockdown. With remote work and virtual meetings from home, we all became a little bit more comfortable with little interruptions or mishaps.
If you‘re recording a live video, things might go wrong — your equipment could malfunction, you could lose your train of thought, or you could get photobombed by a random passerby.
If things happen, you can’t call “cut” — you have to roll with them and keep filming and talking.
The good news? These things help keep your broadcast human and real.
If your phone wobbles while filming, laugh and call it out. If you forget what you were saying, make a joke.
The key is to keep the broadcast like a fun conversation, so if mistakes happen, keep it light and keep the lines of communication open with your viewers.
9. Encourage viewers to “Like” and “Share” the video on air.
One of the primary ways Facebook‘s algorithm ranks a post is by how many people “Like” and “Share” it. The more people who do, the more it’ll show up in people’s newsfeeds.
When people are watching a video, they may be more distracted from “liking” and “sharing” than they would be with a static post.
That’s actually something the folks at Facebook noticed about video content early on, so don’t be afraid to mention it verbally during your broadcast or even display the message on the screen.
10. Engage with commenters and mention them by name.
The number of comments on your broadcast is another way to get Facebook to give it a higher relevancy score — another great way to get into newsfeeds.
So, encourage your viewers to comment by asking questions like Tastemade does in this video:
Engage with people who are commenting by answering their questions and calling them out by name. Not only will it get more people to comment, but it’s also a fun way to include your viewers in the live experience and make it more memorable.
11. Work with a moderator.
When you‘re the one on camera for a Facebook Live video, it’s really hard to pay attention to all the comments popping up on the screen.
If the comments are coming in fast, it‘s especially easy to lose sight of them as they disappear below the fold. Plus, you’re probably occupied by recording and entertaining viewers.
Because of this, it’s always a good idea to have an additional person logged into the primary account to monitor the comments on a desktop computer.
That way, they can take care of responding so the person recording the video can concentrate on creating a great experience.
12. Subtitle your broadcast in the comments section.
Your viewers may be tuning in and out to watch your video during the work day, or they might simply be watching your video without sound. Some people may even have hearing limitations.
Whatever the reason, periodically subtitling your Facebook Live video in the comments section is a great way to keep people engaged and make your content more accessible.
This also allows people who are tuning in late to catch up on what’s going on.
Tools like Verbit can help.
13. Ask viewers to turn on Facebook Live notifications.
In addition to asking for likes, shares, and comments, ask viewers to subscribe to live notifications. You can also ask them to “like” your brand on Facebook if they haven’t already done so.
This increases the likelihood of their being notified of your next live broadcast.
14. Broadcast for at least 30 minutes.
As soon as you begin recording your live video, you‘ll slowly but surely show up in people’s newsfeeds.
The longer you broadcast — especially as likes, comments, and shares start coming in — the more likely people are to discover your video and share it with their friends.
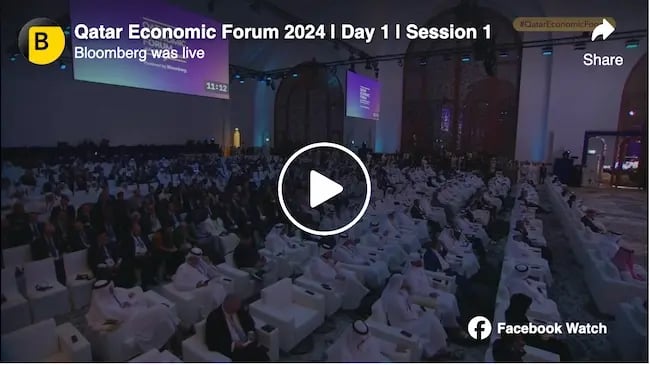
Because timing is such an important factor for engagement in these live videos, Facebook suggests going live for at least 30 minutes. However, you can stay live for up to 4 hours using the Facebook mobile app and 8 hours using a desktop.
Bloomberg Business regularly goes live on Facebook for hours at a time:
15. End with next steps
Before you end your live broadcast, be sure to finish with a closing line, like “Thanks for watching” or “I’ll be going live again soon.” This keeps your live video friendly and conversational.
While you’re at it, give the viewer guidance on their next step. What should they do with the information they just got from your video? Do you want them to subscribe? Make a purchase? Now’s the time to share that call to action.
16. Add a link to the description later.
Once you’ve finished the live broadcast, you can always go back and edit the description, change the privacy settings, or delete the video, just like you would any other post.
You can add a trackable link to the description in the post, which can direct future viewers to your live video series page, the site of whatever campaign you’re using the video to promote, or somewhere else.
We hope this has been a helpful guide. We’ll keep you posted with any new developments and tips for connecting with your audience in other cool ways.
17. Repurpose your live video content.
To maximize the reach of your streams, you can save your videos and then upload them to your profile. You can also repurpose the videos by sharing clips as profile highlights and creating short videos to share on other channels like Instagram Stories or even TikTok videos.
Pro tip: Short on time? AI can help you repurpose. For example, OpusClip can help during any video into bite-sized clips for social media. Or you can transcribe using ChatGPT then use HubSpot’s Content Remix to create social media posts and blog articles among other things.
Use Facebook Live to its full potential.
Social media may have been invented for fun, but it’s grown into an essential business tool. Facebook as a social network is especially valuable for the ways it lets you connect to an audience, and Facebook Live is a great extension of that.
Use it to the benefit of your business as a way to promote your product, build brand awareness, or grow your audience.
Editor’s note: This post was originally published in May 2020 and has been updated for comprehensiveness.
![]()
این خبر را در ایران وب سازان مرجع وب و فناوری دنبال کنید
جهت دانلود و یا توضیحات بیشتر اینجا را کلیک نمایید