Podcasts are a popular media format that is growing rapidly. During last year alone, 220,786 new podcasts were launched, which is a 9% increase since 2022.
However, many beginners find it technically challenging to start a podcast.
There is too much information about hosting media files, buying equipment, and recording good-quality audio. It is enough to overwhelm and discourage users who are less tech-savvy.
Here, we will try to make it easy for you by showing you how to start a podcast, step by step. We will also show you how to start promoting your podcast and, more importantly, how to monetize and turn it into a profitable business.
Here is an outline of everything that we will cover in this guide:
Ready? Let’s get started.
What Is a Podcast? And How Do Podcasts Work?
A podcast is an episodic series of audio files that users can subscribe to, download, and listen to.
There can also be video podcasts, but they are less common.
For your podcast to work, you need to have an audio file and an RSS Feed that users can subscribe to stay updated and download new episodes when they come out.
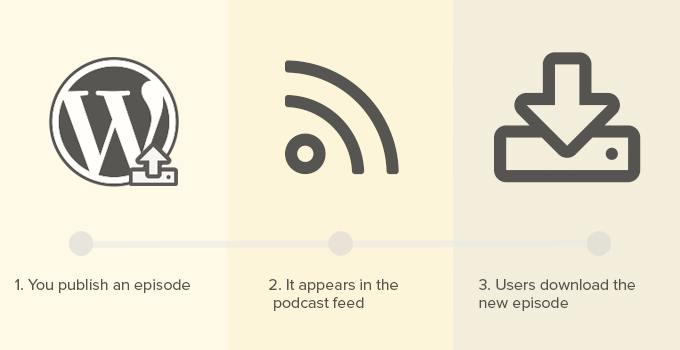
Because WordPress has a built-in RSS feed system for blogs, many podcasters use WordPress as their podcast website platform.
You can connect your podcast website with podcasting apps like iTunes to make it easier for millions of users to listen and subscribe. We will cover this later in the article.
Now that you know what a podcast is and how it works, let’s take a look at how to find ideas to make a successful podcast.
Finding Podcast Topics and Niche
Around 27,557 podcast episodes are published every day (source: PodcastIndex).
In order to compete, you need to find the topics you will cover in your own podcast.
Here are some tips that may help you narrow down the topics and find your niche.
- Follow your passion – Choosing topics that excite you will help you create better content that is engaging for your target audience as well.
- Pick a lane – Instead of podcasting about random things, try to stick with topics within a defined subject area. This will help you more quickly establish expertise and authority while finding a target audience. It will also help you with monetization and sponsorships in the future.
- Think like your audience – You can build an audience persona based on the topics you choose. Who is your audience, and what other things do they like? What are their pain points that you can address in your podcast?
- Research your competition – Look at what other podcasters in your niche are doing. Can you build on that with your unique perspective and voice?
- Choose your podcast format – Would you like to do interviews, solo commentary, or something different? Choose a format that suits your topic and your strengths.
Now that you have made up your mind about what you want to say, let’s take a look at the things you will need to make all this happen.
Things You Need to Set Up Your Podcast
For a professional podcasting setup, there are a few things that you will need to get started.
The first thing is a website or a blog where people can learn more about you and your podcast.
The second thing is the equipment to record your podcast episodes.
Lastly, you need to have the right tools to publish your podcast on the internet so you can get maximum subscribers and reach.
We will walk you through the whole process, step by step.
Step 1. Website Setup: WordPress Hosting and Domain Name
The most important step in building a website is to choose the right platform.
We recommend using WordPress.org, also known as self-hosted WordPress, for setting up your podcasting website.
WordPress is free to use. You can install plugins, customize your site design, and, most importantly, make money from your site without any restrictions (See the difference between WordPress.com vs. WordPress.org).
Why We Recommend WordPress:
- WordPress is open source and gives you full control and ownership of your podcast content.
- WordPress has thousands of plugins, which are like apps for your website. These plugins help you connect your site to any third-party tool, service, or payment gateway you need.
- WordPress is beginner-friendly, and you can set up your podcast website without hiring a developer.
Setting Up WordPress
To get started, you will need a domain name and a website hosting account.
A domain name is your website’s address on the internet. This is what people type to get to your website. For example, google.com or wpbeginner.com.
Web hosting is your website’s house on the internet. This is where all your files and images are stored. Every website needs web hosting.
The typical cost of web hosting is $7.99 per month, and a domain name usually costs around $14.99 per year.
This is a lot for someone just starting out. Thankfully, Bluehost has agreed to offer our users a free domain name and up to 61% off on web hosting.
In real numbers, this means you can start your podcasting website for only $2.75 per month.
We recommend using Bluehost because they are one of the official WordPress-recommended hosting providers and one of the largest web hosting services in the world.
Other hosting companies we recommend: Hostinger ($2.69 /month, free domain included) and SiteGround ($2.99/month, free domain included).
For more hosting recommendations, see our guide on how to choose the best WordPress hosting.
After signing up for WordPress hosting, you can follow the instructions in our complete step-by-step WordPress installation tutorial to get started.
Choose a Podcast WordPress Theme
Once you have installed WordPress, your website will use a default WordPress theme. It is quite basic, and you may want to change it.
Themes control how the front end of your website looks to the visitors.
Luckily there are thousands of WordPress themes to choose from. However, not all of them are made specifically for a podcast website.
Don’t worry. We have got you covered there as well. Our expert team has curated a hand-picked list of WordPress themes for podcasters.
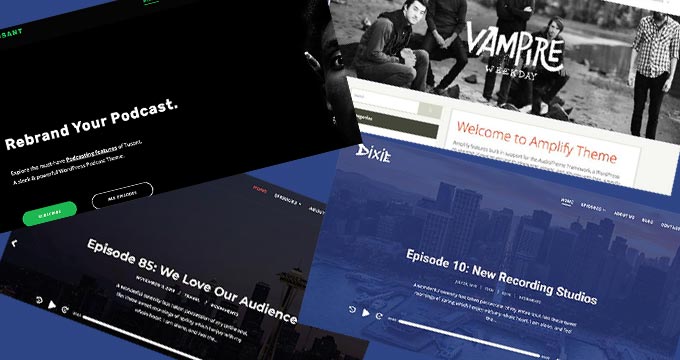
All themes in this list are made specifically for podcasting websites or are well-suited for podcasting.
Need help setting up your theme? See our tutorial on how to install a WordPress theme.
Step 2. Setting Up a Media Hosting Service
The next thing you will need is a good media hosting service.
Podcast episodes are large audio files. Serving them from your web host will consume a lot of server resources, making your website slow and often unresponsive.
For the best user experience, we recommend that you use a podcast-specific media hosting platform like Blubrry.
Most smart podcasters use a separate podcast hosting service to serve their podcast files. It is the smartest and most efficient way to run a podcast.
Why we recommend Blubrry:
- Blubrry is optimized for podcasting using WordPress. They offer a powerful plugin called Blubrry PowerPress, which makes it easy to manage your podcast from the WordPress site.
- It comes with a large user community made up of many successful podcasters. If you need help, join the forums to learn from others who have been podcasting for a long time.
- Blubrry has great tools like ID3 tagging, iTunes optimization, automatic media artwork management, etc.
- They have a top-tier content delivery network (CDN), which makes your content delivery faster and more reliable.
Step 3. Choosing Proper Podcasting Equipment
As your podcast grows, you will need to invest in new tools to produce higher-quality podcasts.
As a beginner, the most important tool you need is a good microphone.
Please do not use your computer’s built-in microphone to record your podcast. Your users will instantly notice the terrible sound quality.
There are two main types: XLR and USB microphones.
XLR microphones are like professional cameras. They give high-quality audio but need an audio interface or mixer to connect them to your computer. This can be a bit complex for beginners.
USB microphones are like point-and-shoot cameras. They are easy to use, and you can just plug them into your computer and start recording. They are great for beginners. However, the sound quality might not be as good as XLR microphones.
We recommend choosing a USB microphone. They are beginner-friendly and require less technical knowledge to operate.
However, if you are willing to spend extra time and money for better sound quality, then choose an XLR microphone. This is what most professional podcasters use.
There are three popular mic choices among podcasters.
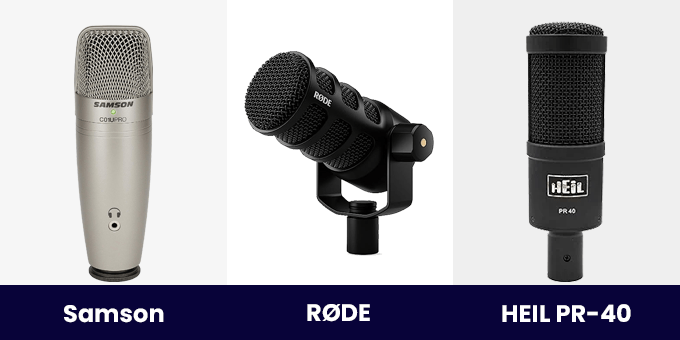
- Samson C01U (USB) – Entry-level Microphone
- Røde Podmic (USB) – Best USB mic
- Heil PR-40 (XLR connection, not USB) – This is what the pros use. You will need to buy an audio mixer as well.
Here is some other equipment that you probably want to purchase: a mic arm, shock mount, and a pop filter.
For WPBeginner’s audio/video setup, we use the Rode Podcaster kit with a mic arm and shock mount.
You will also need a decent headphone. We are using Sony MDR7506.
Once you have the right podcasting equipment, you will be ready for the next step: planning and recording your first podcast episode.
Step 4. Planning Your First Few Podcast Episodes
You need to plan your podcast episodes before you sit down to record them. There are several important decisions that you need to make.
1. Episode content
What will be the topics for your first few episodes? You can plan your content in an orderly fashion, work on the content by creating an outline, and then digging into the details.
2. Length of Episodes
Podcasts can be from 20 minutes to over an hour long. The duration of your episodes depends on your content and audience.
There are no strict rules about the ideal length for a good podcast episode. However, episodes between 20-40 minutes tend to do better.
If you have good content, then don’t cut it down just so it can fit the specific length. Similarly, don’t drag content too much so that you can fill the desired episode length.
3. Supporting Media
You will also want to work on intro music, background music, or other sounds you may want to add to your podcast for a dramatic effect.
The following are a few places where you can find license-free music and soundtracks to use in your podcast episodes or as your theme music. Carefully review the licensing terms before using any track in your podcast:
4. Storyboarding and Scripting
You can sit down and record by just looking at a simple outline of your ideas. However, this might give your users the impression that you didn’t do your homework.
You need to actually sit down and write down the script. This helps you stay focused and makes you sound more professional and prepared.
You can still go on and speak off the script during the recording, but having an actual script keeps you on track and results in better-quality content.
After spending some time planning your episodes and giving more thought to your content, it is time to record your first podcast.
Step 5. Recording Your First Podcast
To record your podcast, you will need audio recording software. This software will help you record and edit your audio files.
The best podcast recording software used by most podcasters is Audacity. It is a free, cross-platform, and open-source software capable of recording studio-quality professional podcasts.
After installing Audacity, you need to open it up and create a new project from the File menu.
To record your voice, simply click on the record button.
Now, feel free to record your podcast. Don’t worry about awkward pauses, breaks, coughing, or any glitches you might make while narrating.
You can edit the recording as many times as you want.

You can also import music files from File » Import and set them as background music.
Audacity is a very powerful tool, and it is not possible for us to even cover its basic features in this article. However, TeamAudacity has an extensive Wiki with detailed tutorials.
We recommend that you go through these tutorials. Becoming familiar with the software will take some time, but it’s worth your time and effort.
Once you have recorded your podcast, you need to export it.
Most podcasters export their audio files in the MP3 format because it creates smaller file sizes with good quality.
You also need to be smart about naming your podcast files. Remember, podcasts are episodic series, so it would be best to use a naming practice that uses an episode or serial number in the file name.
Some suggestions would be WPB001.mp3 or WPBep001.mp3.
Then, you need to save the final version of your podcast file to a separate folder on your computer.
Step 6. Publishing Your Podcast With WordPress
After you have created a few episodes and you are satisfied with their quality, it’s time to learn how to publish your podcast with WordPress.
You will need to log in to the admin area of your WordPress site.
The first thing you need to do is install and activate the Blubrry PowerPress Podcasting plugin. For more details, see our step-by-step guide on how to install a WordPress plugin.
Upon activation, you will see a PowerPress menu item in the WordPress admin menu. Clicking on it will take you to the plugin’s settings page.
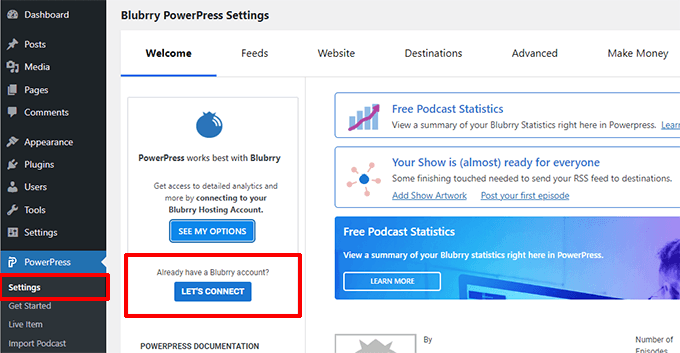
If you are using Blubrry to host your podcasting files, then you need to click on the ‘Let’s Connect’ button to configure the Blubrry statistics and hosting services.
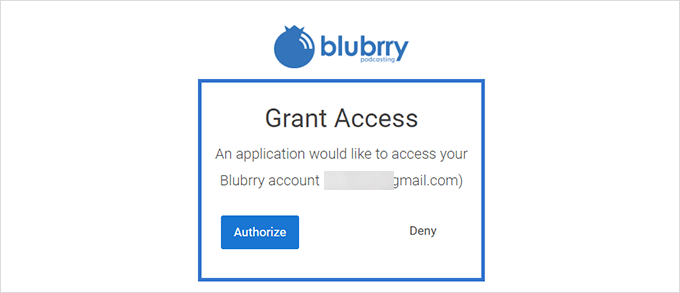
This will bring up a popup, where you will be asked to log in to your Blubrry account and give the plugin permission to access your account.
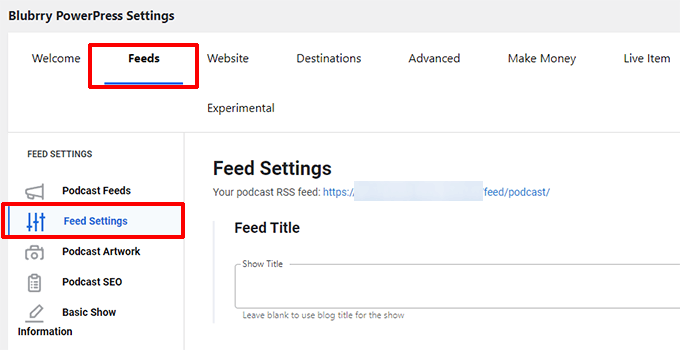
Next, you will need to fill out the rest of the information on the settings page.
Start by providing a title for your feed in the ‘Feeds’ tab.
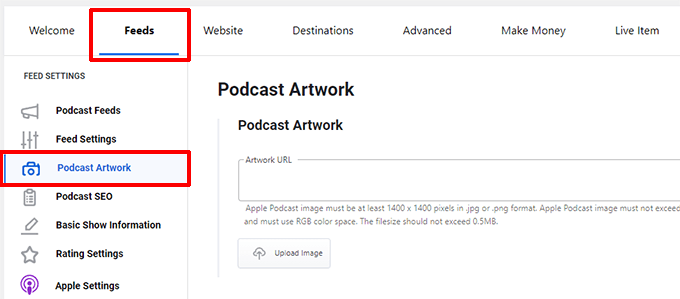
After that, you can upload the artwork by switching to the ‘Podcast Artwork’ tab.
This will be the square thumbnail displayed next to your podcast in podcast listening apps. Make sure that it represents your podcast branding.
The rest of the plugin settings are quite self-explanatory, and the default options will work for most users.
We will come back to the Apple iTunes settings later in this article.
Don’t forget to click the ‘Save Changes’ button to store your settings. Your WordPress website is now ready to publish your podcast.
Step 7. Upload Media Files to Blubrry
Before you can publish a podcast episode with WordPress, you first need to upload the podcast file to your media hosting service, Blubrry.
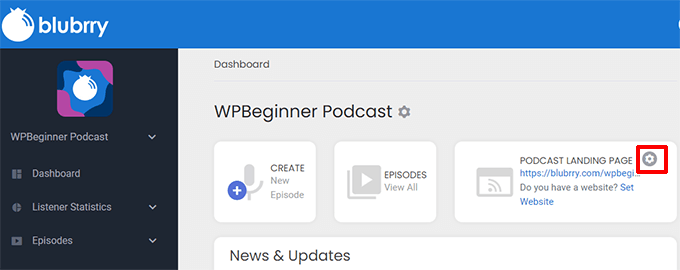
Log in to your Blubrry hosting account and then click on the ‘Set Website’ option in the dashboard.
On the next screen, choose ‘I already have a website’.
Below that, you must provide the URL of your WordPress website.
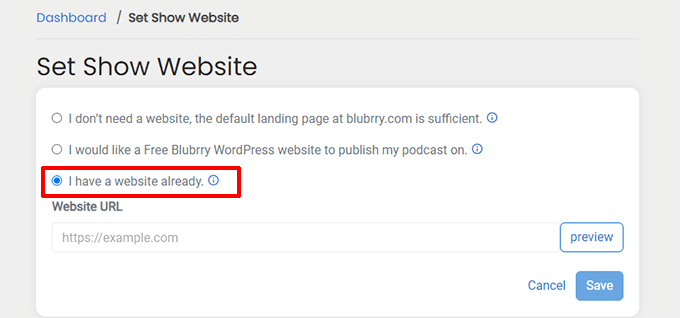
Click the ‘Save’ button to store your changes.
Next, go to the Episodes » Publish New page. Here, simply provide a title and description for your podcast episode.
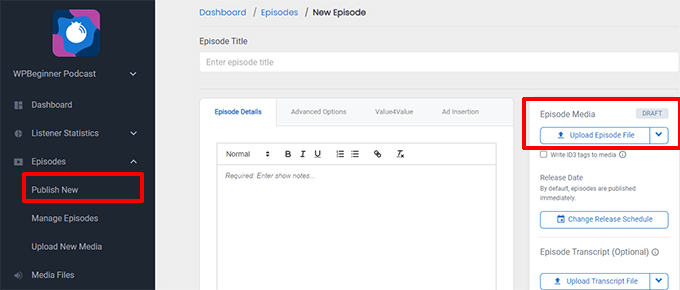
After that, click on the ‘Upload Episode File’ button to upload the podcast episode you recorded earlier.
Below that, you can schedule the release date and time. This allows you to schedule episodes to be released at a preferred time. Not choosing a date and time will make your episode available immediately.
Optionally, you can provide a transcript for your episode if you have one.
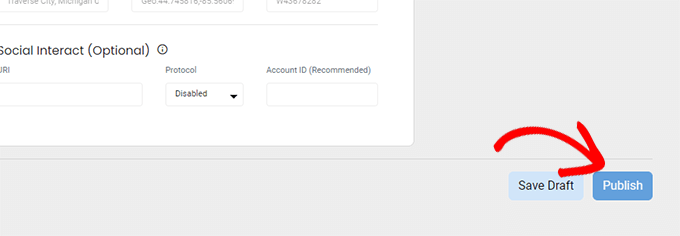
Once you are finished, go ahead and click on the ‘Publish’ button to save your changes.
Step 8. Adding Your First Podcast in WordPress
Everything is now in order, and you are ready to add your first podcast in WordPress.
To publish your first podcast, you need to go to the Posts » Add New page.
It is highly recommended that you create a separate category for your podcast episodes.
This will allow you to keep your podcast episodes separate from the rest of your content. You will also be able to publicize your podcast feed more easily later on.
After that, you need to scroll down to the bottom of the page, and there you will see the ‘Podcast Episode’ box.
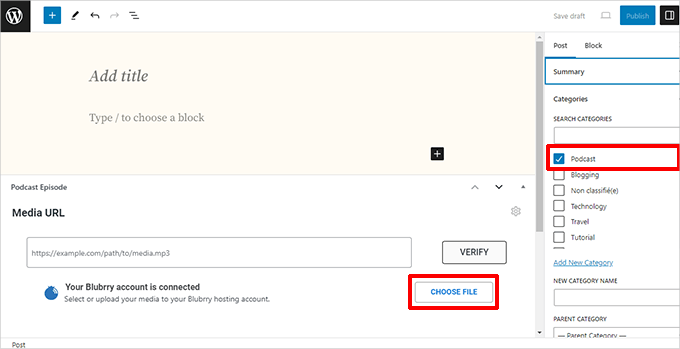
From here, click on the ‘Choose File’ button to select the file you uploaded to Blubrry.
If your podcast media file is not hosted on Blubrry, then you can just paste the media file URL here. Then, you need to click the ‘Verify’ button to ensure you have put the correct URL.
Now, you need to scroll back up to the post editor section. Give your blog post a suitable title and add a description for this podcast episode.
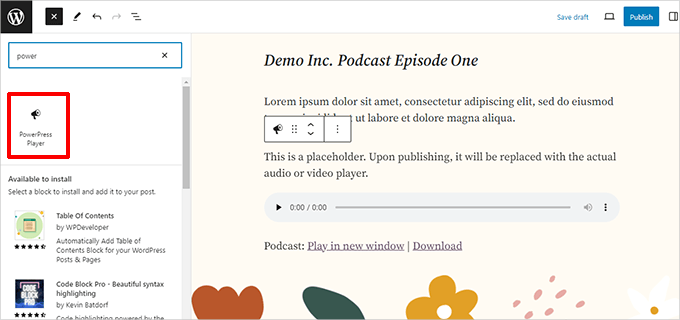
After that, you need to add the PowerPress Player block to the content area where you want to display the podcast player.
That’s all. You can now publish and preview your blog post, and you will see your podcast episode live with a beautiful player.
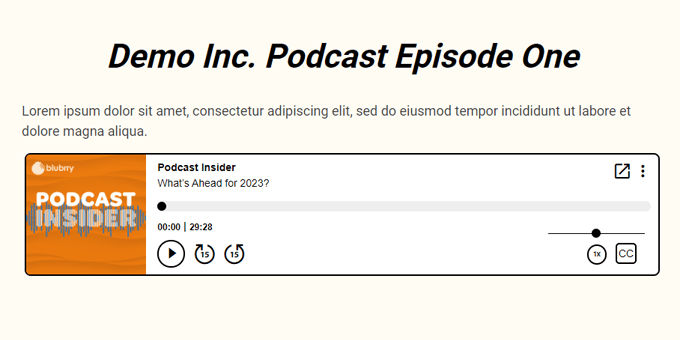
Congratulations, your WordPress podcasting site is ready to go live.
Step 9. Previewing Your Podcast With iTunes
Now that you have set up your podcast website with WordPress, it is time to submit your podcast to iTunes and get more subscribers.
Before submitting it to iTunes, you might want to check to see how your podcast will look on iTunes. To do this, launch iTunes, go to File » Subscribe to Podcast and enter your feed URL. Your feed URL will look like this:
http://www.example.com/feed/podcast
Don’t forget to replace example.com with your own domain name.
Once you enter the URL in iTunes, it will fetch the feed and display it. As you can see in the screenshot below, it fetched the artwork, description, subtitle, and more.
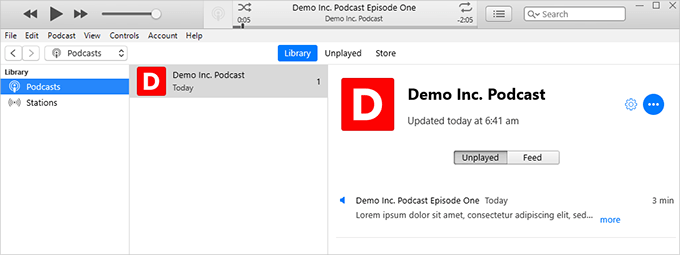
If everything looks good, then this means you are ready to submit your podcast to iTunes.
Step 10. Submitting Your Podcast to iTunes
To submit your podcast to iTunes, you need to download and install the latest version of iTunes on your computer. Next, launch iTunes and click on the iTunes Store button in the top right corner of the screen.
iTunes will now access the iTunes Store. Click on the ‘Podcasts’ menu, and then scroll a little to find the Podcasts Quick Links section. There, you will see a link to ‘Submit a podcast’.
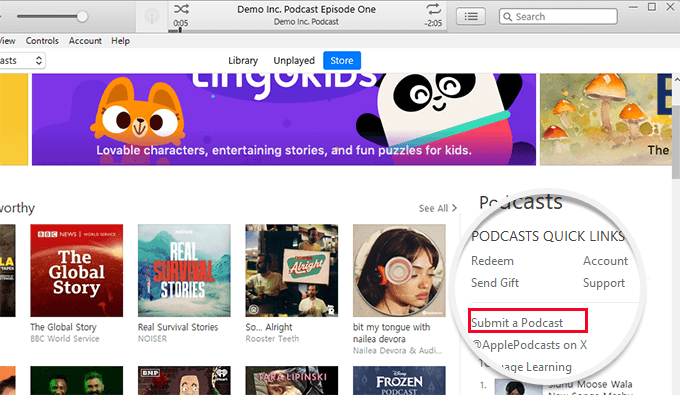
This will open the podcast submission process. You will need an Apple ID to submit your podcast to the iTunes directory. If you are not already signed in, then iTunes will prompt you to log in.
The first thing you will need is your podcast feed URL. Your podcast feed URL will be like this:
http://example.com/feed/podcast
Don’t forget to replace example.com with your own domain name.
Since you are using PowerPress, your feed will already include the tags required by the iTunes Store for podcasts.
Upon submission, your podcast feed will be submitted to the iTunes review queue. After approval by the iTunes review staff, it will be added to the iTunes directory, and you will be notified via email.
Podcasting Resources to Help You Grow
Congratulations on starting your podcast with WordPress! If you want to make your podcast successful, then we recommend you join:
Podcasters’ Paradise by John Lee Dumas
John is a good friend of ours, and he is an inspiration for most new podcasters. In just a few years, he has taken his podcast from $0 to 7 figure annual income. If you are thinking of starting a podcast, then you want to learn from him.
Plus, here are some actionable tips to drive traffic to your new WordPress site.
Plugin Recommendations to Grow Your Podcast
We recommend installing some must-have plugins on your WordPress website to extend its functionality and grow your podcast. Here are the most often recommended top plugins you can install right away:
- All in One SEO for WordPress – The best WordPress SEO plugin on the market. It enables you to optimize your podcast website SEO to get more free traffic from search engines.
- RafflePress – The best WordPress giveaway plugin that allows you to run viral giveaways in exchange for a podcast subscription, joining your email newsletter, or following you on social media.
- MonsterInsights – Once you start getting listeners to your website, you will want to know which episodes they are listening to or downloading and where they are coming from. MonsterInsights is the best Google Analytics plugin that allows you to track all this data.
Making Money From Your Podcast
It will take a lot of your time and solid commitment to make your podcast successful. To make it all sustainable in the long run, you will need to find ways to monetize your podcast.
We have a detailed guide on how to make money online using your WordPress blog. All the items listed there can also be used on your podcasting website.
The following are some of the top ways to make money from a podcast.
- If you think a business would benefit from sponsoring your podcast, feel free to reach out to them to be a sponsor. You’d be surprised how often this would work out for you.
- Use affiliate marketing to recommend third-party products and services to your audience.
- Sell your own products and services by adding an online store to your website.
- Ask subscribers to support your podcast with donations. You can simply add a payment form on your website where subscribers can make a small donation.
- Make older episodes available only for members. See our guide on how to make a membership website with WordPress.
We hope this article helped you start a podcast with WordPress. You may also want to see our list of must-have WordPress plugins for business websites and our expert picks of the best WordPress themes for podcasters.
If you liked this article, then please subscribe to our YouTube Channel for WordPress video tutorials. You can also find us on Twitter and Facebook.
این خبر را در ایران وب سازان مرجع وب و فناوری دنبال کنید
