Are you looking for a way to sell car parts online on your WordPress website?
If you have an automotive business, then a website is a great way to reach new customers. It can also improve the customer experience by allowing car owners to look through your entire catalog and order auto parts online.
In this article, we will show you how to sell car parts online with WordPress.
Which Is the Best Website Builder to Sell Car Parts Online?
There are many website builders that you can use to sell car parts online, but we recommend using WordPress.
According to our blogging research statistics, WordPress is the most popular website platform in the world. It powers nearly 43% of all websites, including many of the top eCommerce websites.
WordPress is also open-source and free, so you will have bigger profit margins. For more on this topic, see our article on why WordPress is free.
However, just be aware there are two types of WordPress software. First, there is WordPress.com, which is a blog hosting platform. Then, there is WordPress.org, which is also known as self-hosted WordPress.
For a detailed comparison, please see our guide on the difference between WordPress.com and WordPress.org.
For an eCommerce site, we recommend using WordPress.org because it gives you complete ownership of your website and online store. You can also install third-party plugins, including the popular WooCommerce eCommerce plugin.
According to our WordPress market share report, WooCommerce is used by 8.8% of all websites, which makes it more popular than Shopify for online stores and eCommerce sites.
To learn more about why we recommend WordPress to all our readers, please see our complete WordPress review.
We will now show you how to sell car parts online with WordPress. You can use the quick links below to jump to the different parts of the article:
Step 1: Set Up Your Auto Parts Website
To start selling car parts online, you will need a domain name and web hosting.
A domain name is your store’s address on the internet. This is what customers will type into their browsers to reach your website, such as www.carparts.com or www.buyautoparts.com.
Web hosting is where your site lives online. To help you find the right hosting for your business, we have created a complete list of the best WordPress hosting that you can buy.
Although the WordPress software is free, hosting and domain names are where the costs can really start to add up.
A domain name typically costs $14.99/year, and hosting costs start from $7.99/month. This can make it difficult if you are a new business or have a limited budget.
Thankfully, Bluehost is offering our readers 60% off web hosting, plus a free domain name. Bluehost is one of the largest hosting companies in the world and an official WordPress-recommended hosting partner.
They are also offering our users a free SSL certificate. If you want to sell car parts online, then an SSL certificate is essential for keeping customer credit and debit card information safe.
You can click the button below to get started for as little as $2.75 per month.
Once on the Bluehost website, click the green ‘Get Started Now’ button.

This will bring you to the Bluehost pricing page, where you can choose a hosting plan for your auto part business.
We recommend choosing a Basic or Plus plan, as they are the most popular web hosting plans among our readers.
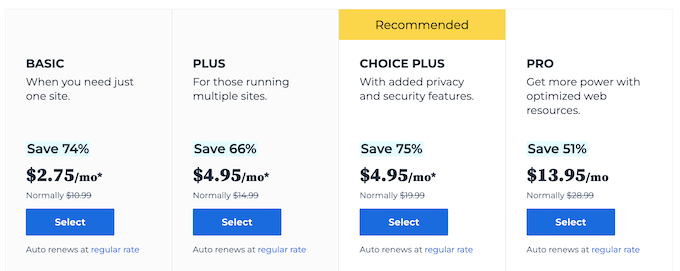
After selecting a plan, click on ‘Continue.’
On the next screen, you will need to choose a domain name.
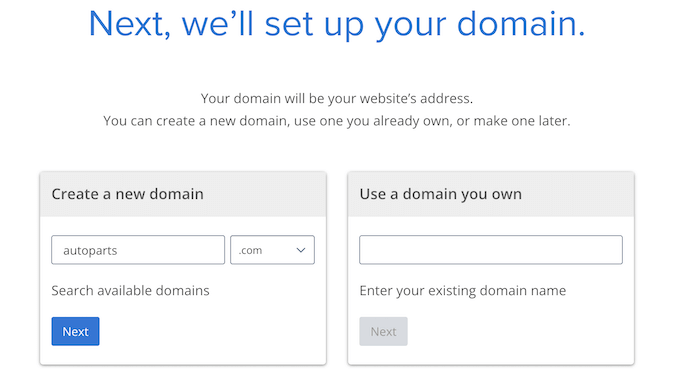
Ideally, your domain name will be easy to pronounce, spell, remember, and relate to your business. The name of your auto parts business is a great place to start, but sometimes that domain may already be taken by another business website.
In that case, you can try extending the domain name by adding your location, what makes your auto parts business unique, or some extra keywords. If you need some inspiration, then check out our guide on how to choose the best domain name.
After choosing a name, click on the ‘Next’ button to continue.
Now you will need to provide your account information, such as your name and business email address. After that, you will also see optional extras that you can buy.
We generally don’t recommend buying these extras straight away, as you can always add them later if your business needs them.
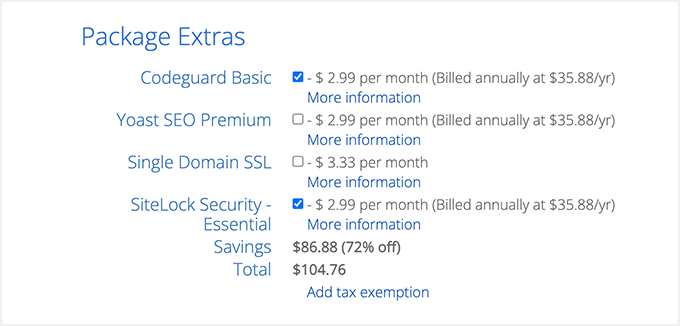
After that, type in your payment information to complete the purchase.
After a few moments, you will get an email with instructions on how to log in to your web hosting control panel. This is your hosting account dashboard, where you can manage your car parts website, including setting up email notifications and asking for WordPress support.
It’s also where you will install the WordPress software, so let’s do that now.
Step 2: Create a New WordPress Website
If you sign up with Bluehost using our link, then Bluehost installs WordPress on your domain name automatically.
If you want to create a different WordPress website, then go ahead and click on the ‘My Sites’ tab in the Bluehost dashboard.
After that, you need to click on the ‘Add Site’ button and select ‘Create New Site.’
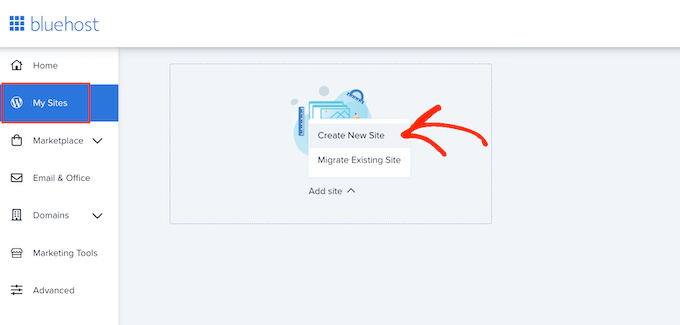
The Bluehost wizard will now walk you through the setup process.
First, you will need to type in a site title and an optional tagline.
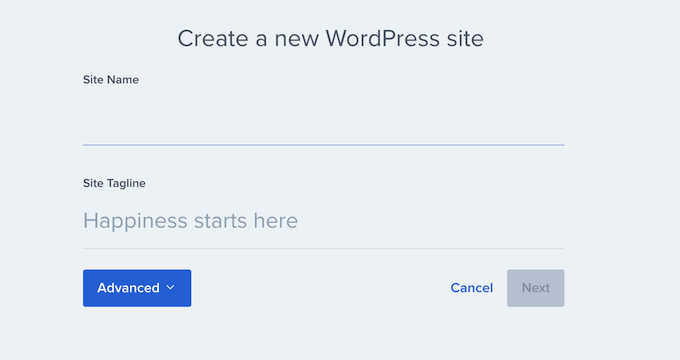
When you are ready, just click on the ‘Next’ button to continue.
After that, Bluehost will ask you to choose a domain name and path for your car parts website. If you already own a domain name, then go ahead and select it from the dropdown menu.
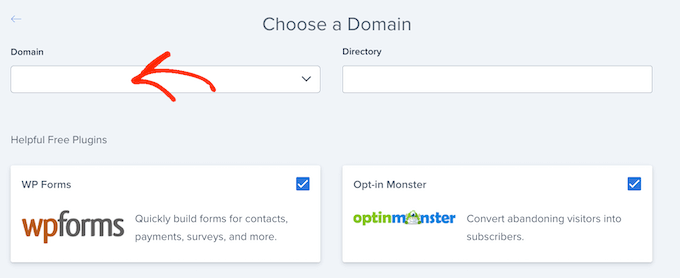
If you don’t have a domain name, then you can buy one by visiting the ‘Domains’ page inside the Bluehost dashboard.
After choosing a domain name, you can leave the directory path blank and let Bluehost fill it in for you.
The installer will also show a few plugins that you may want to install on your car parts website, including WPForms. Many of these are must-have WordPress plugins that can help you grow your business and get more sales, so we recommend installing them.
When you are ready, click on the ‘Next’ button, and the installer will set up your car parts website. Once it’s finished, you will see a ‘WordPress installed successfully’ message with information about your new website.
You can now go ahead and click on the ‘Log into WordPress’ button, which takes you to your site’s admin dashboard.
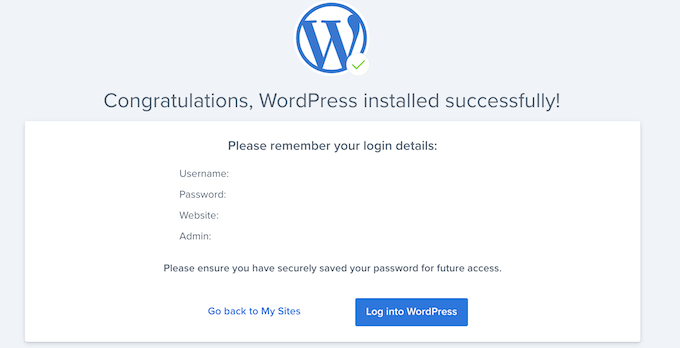
You can also log in to the WordPress dashboard by going to yoursite.com/wp-admin/ in your web browser.
If you are using a different WordPress website host, such as SiteGround, Hostinger, HostGator, or WP Engine, then you can see our complete guide on how to install WordPress for all the top hosting providers.
Now that you have successfully set up WordPress, you are ready to start building your automotive parts website.
Step 3: Choose a WordPress Theme
WordPress themes are professionally-designed templates that change how your automotive website looks and acts.
By default, each WordPress site comes with a basic theme. If you visit your website now, then you will see something like the following image.
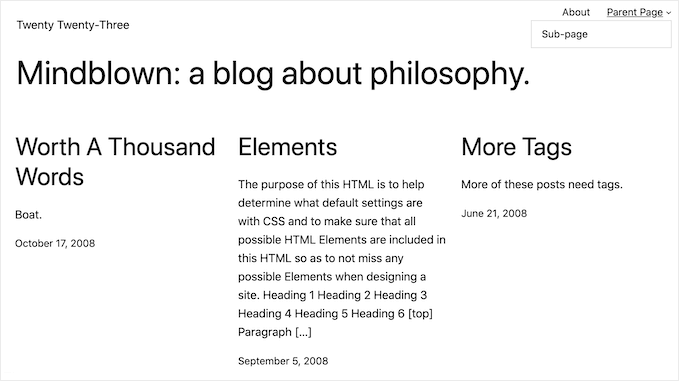
If you want to make a great first impression with customers and get more sales, then it’s a good idea to replace the default WordPress theme.
There are lots of different premium and free WordPress business themes to choose from. You can generally categorize these as niche industry themes or multipurpose WordPress themes.
Your typical automotive website needs special features, like the ability to show listings, support for popular eCommerce plugins, and a VIN decoder tool.
With that in mind, it makes sense to look for a theme that’s designed for the car industry. To help you out, we have collected the best WordPress themes for car dealerships and the best themes for auto repair.
You can also use a website and landing page builder plugin like SeedProd.

SeedProd is the best drag and drop WordPress page builder and comes with built-in templates that you can use to create a professionally-designed car parts website.
It even has a template that’s designed specifically for the car industry.
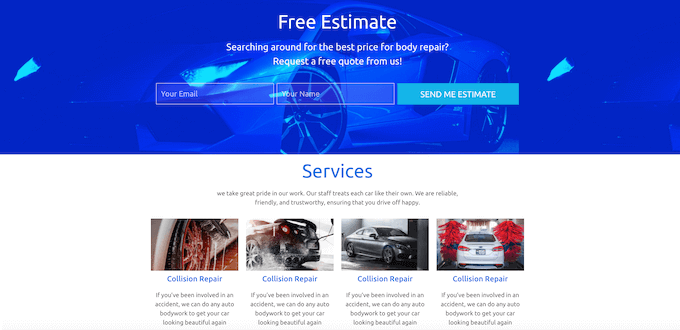
Once you have chosen a theme, check out our step-by-step guide on how to install a WordPress theme. After installing your theme, you can customize it by going to Appearance » Customize in the WordPress dashboard.
This will open the theme customizer, where you can fine-tune the theme settings and see your changes instantly, thanks to the live preview.
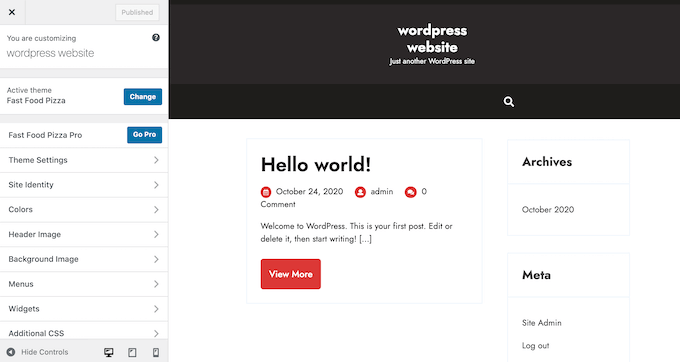
If you are using one of the newer full site editing themes, then you can customize your theme by going to Appearance » Editor. This launches the full site editor, which uses blocks similar to the content editor.
Pro Tip: No matter which theme you are using, you can’t edit it by default using advanced drag and drop. For that reason, we recommend using a page builder like SeedProd instead.
Step 4: Create a Custom Home Page
WordPress has two default content types called posts and pages.
You will typically use posts to create articles and blogs. By default, the home page will show these posts in reverse chronological order, so the newest content appears at the top of the home page.
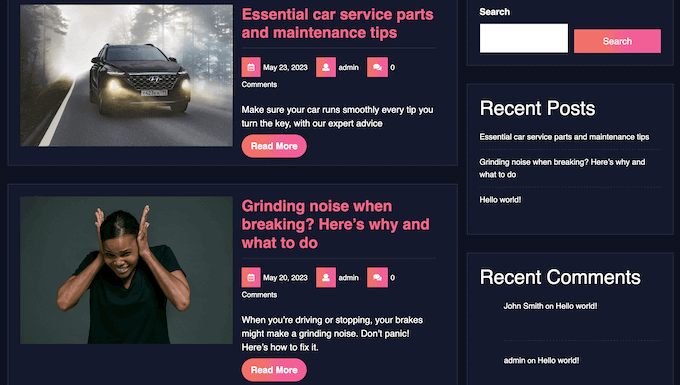
Blogging can help you build a stronger relationship with your customers, improve your WordPress SEO, and get more traffic to your automotive website.
For example, you might share tips on how to diagnose common car problems or blog about the latest industry trends.
However, even if you plan to blog, you typically don’t want to show those posts on your automotive website’s home page. Instead, we recommend creating a custom home page that introduces your car parts business to potential new customers.
For step-by-step instructions on how to create an attention-grabbing auto parts home page, please see our guide on how to create a custom home page in WordPress.
Once you are happy with how the page looks, it’s time to set it as your home page. To do this, head over to Settings » Reading in the WordPress dashboard.
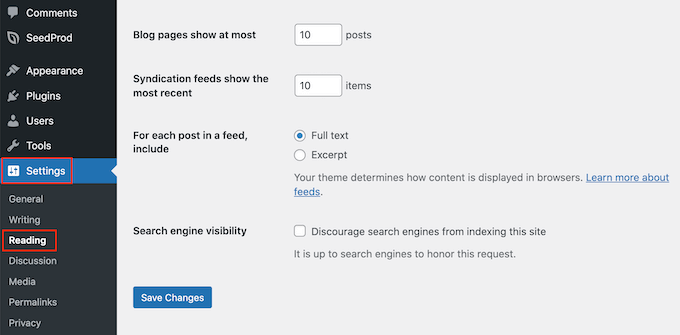
On this screen, you need to scroll to ‘Your homepage settings’ and select ‘A static page.’
With that done, just open the ‘Homepage’ dropdown and choose the page you want to use.
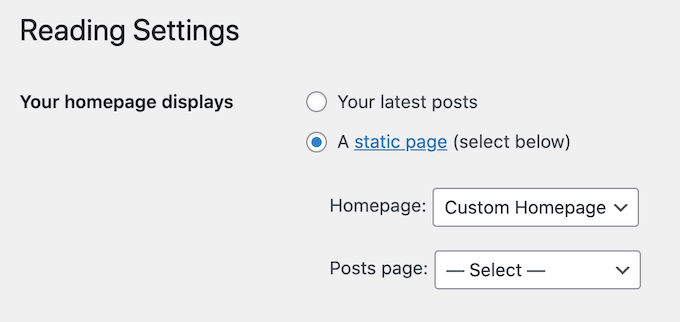
After that, scroll to the bottom of the screen and click on ‘Save Changes.’ Now, if you visit your auto parts website, then you will see the new home page in action.
If you are going to write blogs, then you should also make sure to create a separate blog page to show your posts.
Step 5: Set Up an eCommerce Plugin
WordPress doesn’t have eCommerce features by default, so you will need a plugin to sell car parts online. The easiest way to sell physical products is by using WooCommerce.
WooCommerce is the most popular eCommerce plugin in the world and has everything you need to sell car parts online.
First, you will need to install and activate the WooCommerce plugin. If you need help, then please see our guide on how to install a WordPress plugin.
Upon activation, you will see the WooCommerce setup wizard. The first thing you will need to do is type in your store’s location.
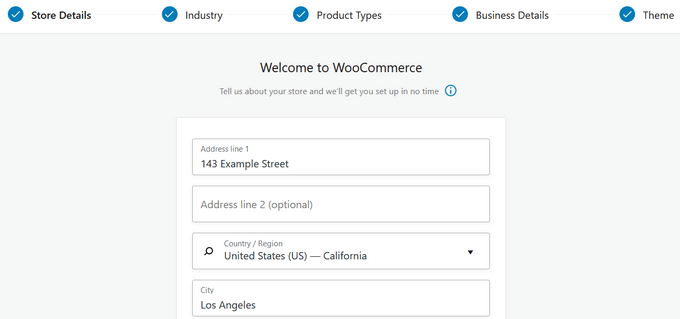
After that, click on the ‘Continue’ button.
On the next screen, you can select your industry. Since you are going to sell car parts online, you will typically want to check the box next to ‘Other.’
After that, type your industry into the ‘Description’ field.
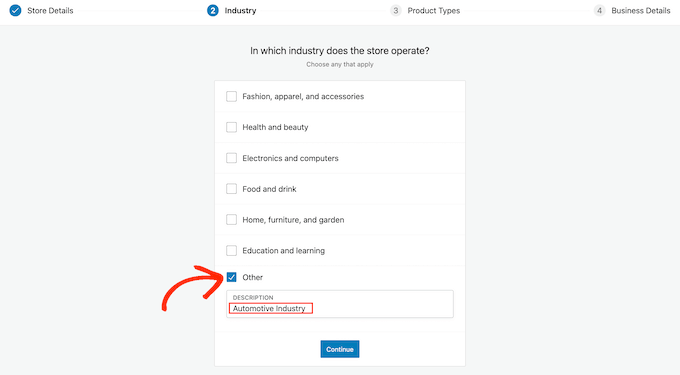
With that done, click on ‘Continue.’
You can use WooCommerce to sell all kinds of products, including digital downloads, bookings, and WooCommerce subscriptions.
However, since you are selling automotive parts, make sure to check the ‘Physical products’ box.
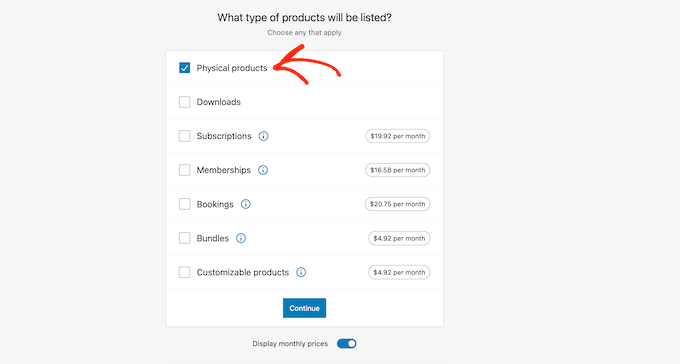
When you are happy with the information you have entered, click on ‘Continue.’
With that done, you can choose how many products you plan to sell and whether you are currently selling anywhere else.
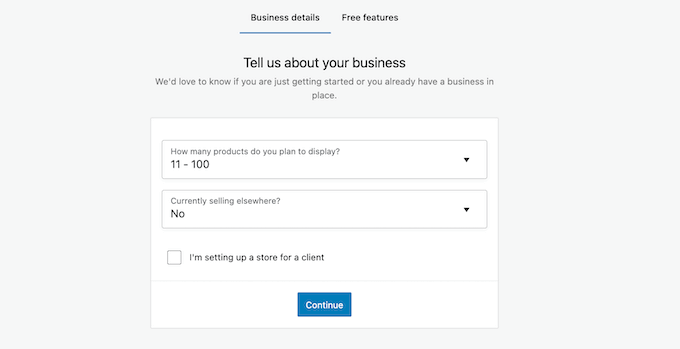
After entering this information, just click on the ‘Continue’ button.
The setup wizard will now recommend some business features that you can add to your online store. These features are free, so we recommend selecting the following checkbox ‘Add recommended business features to my site.’
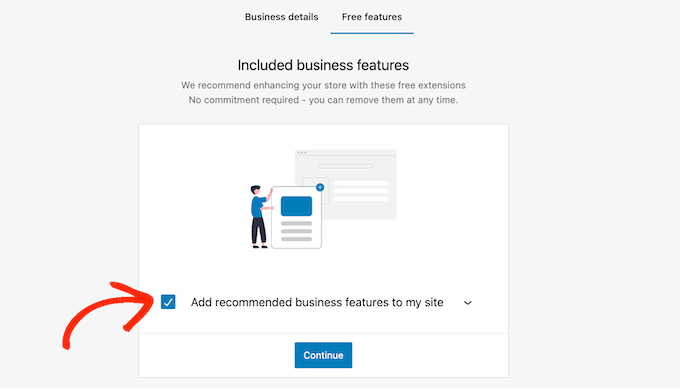
When you are happy with the information you have entered, simply click on ‘Continue’ to set up your online store.
Step 6: Set Up Shipping for Your Car Parts
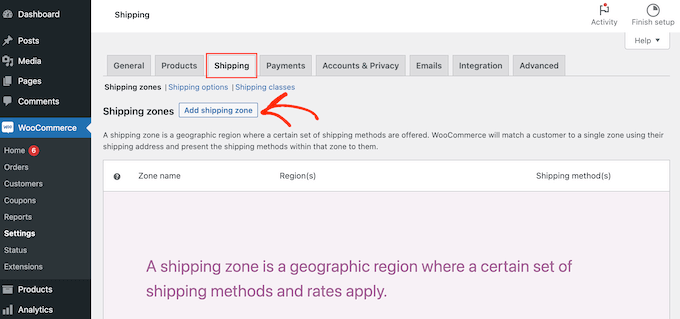
Next, you can add shipping options by going to WooCommerce » Settings.
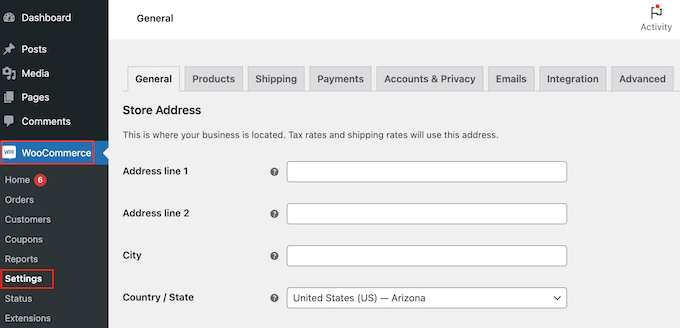
Here, you need to click on the ‘Shipping’ tab.
With that done, select ‘Add shipping zone.’
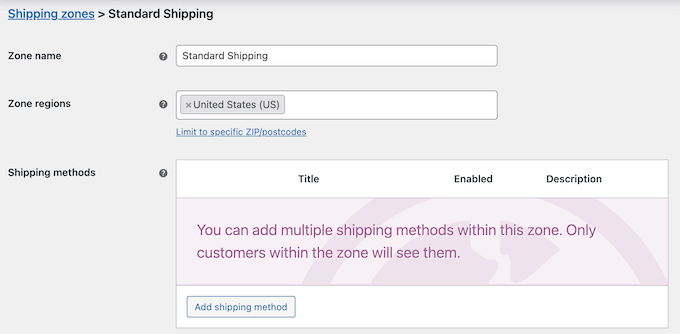
On the next screen, type in a name for the zone and select one or more regions from the dropdown menu.
Once you have done that, simply click on the ‘Add shipping method’ button.
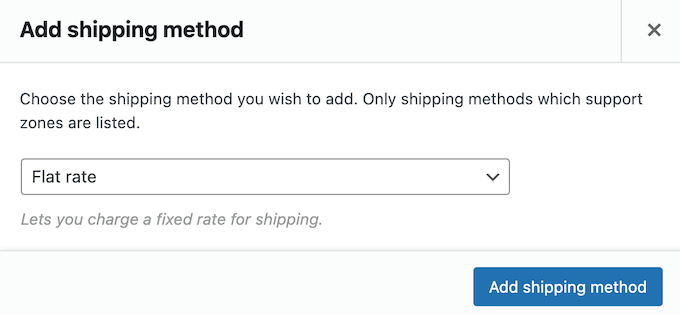
Now, you will see different shipping methods in the dropdown menu. You can choose between a flat rate, free shipping, or even offer local pickup.
Select your preferred shipping method and click ‘Add shipping method.’
WooCommerce will now add your chosen shipping method to the shipping zone.
To configure the shipping method, simply hover over it and then click the ‘Edit’ button.

You will see a popup with more settings you can use.
The settings will vary depending on the shipping method you choose. For example, if you select ‘Flat rate’, then you can change the method title, add a tax status, and enter the total shipping cost.
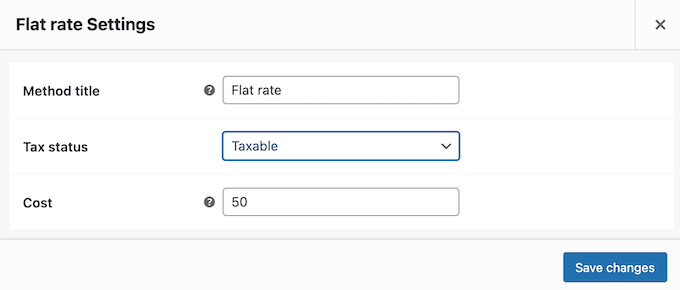
After entering this information, go ahead and click on ‘Save changes.’
You can create as many shipping zones as you want by repeating these steps.
Step 7: Set Up Payments for Your Car Parts Business
Next, you need to add payment options so that customers can buy your car parts online. To get started, head over to WooCommerce » Settings and select the ‘Payments’ tab.
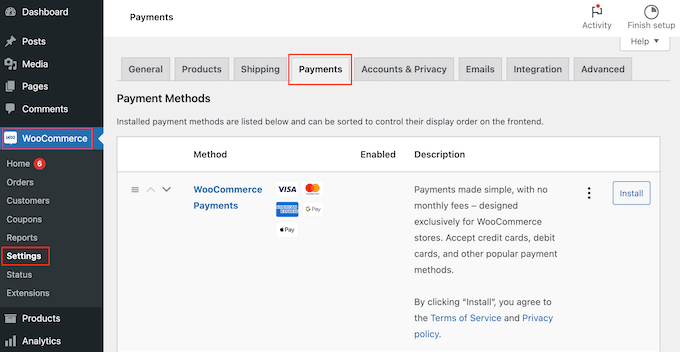
This opens a screen with all the different payment methods and WooCommerce payment gateways that you can use.
Simply find the method you want to enable and click on its ‘Finish set up’ button.
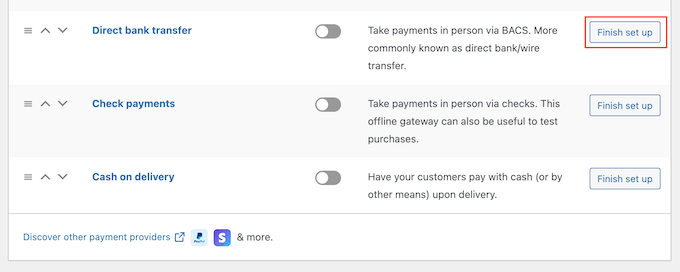
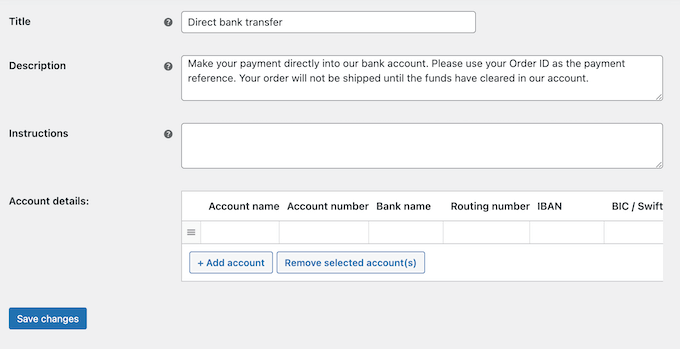
You can now set up this payment method by following the onscreen instructions.
When you are finished, don’t forget to click on the ‘Save changes’ button.
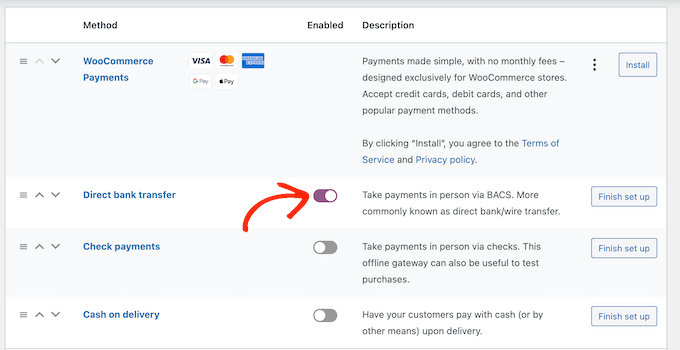
To make the payment method live on your site, click on the ‘Payments’ tab.
Then, simply click on the method’s toggle so it turns from grey (disabled) to purple (enabled).
To get more sales in your online store, you may want to offer multiple payment methods. For example, you might accept credit card payments on your WordPress site, plus cash on delivery.
To add more payment methods, simply follow the same process described above.
Step 8: Create Product Attributes and Attribute Terms
By default, WooCommerce creates each product as a ‘Simple Product.’ However, you will probably want to offer the same car part for multiple models or brands.
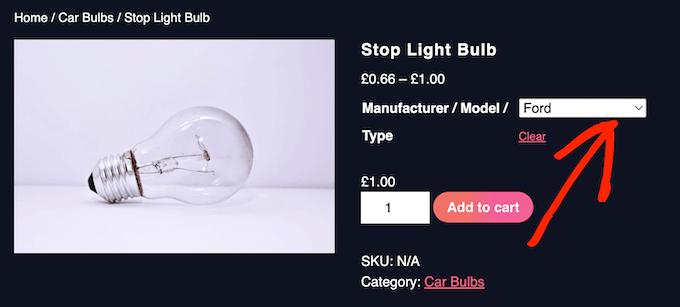
The easiest way to do this is by creating a variable product. This allows customers to visit a single product listing and then choose the right product variation for their car, as you can see in the following image.
To create variable products, you will first need to set up attributes and attribute terms.
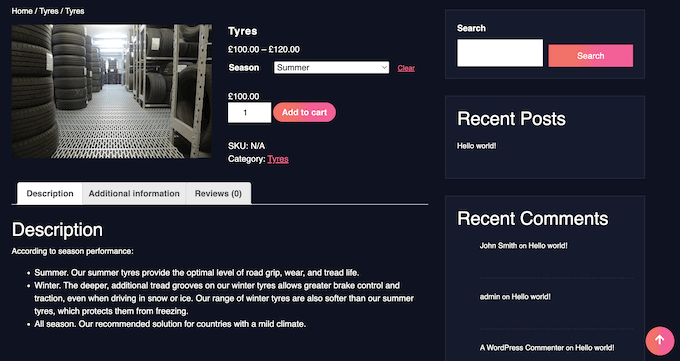
For example, if you are selling tires, then you might make a ‘Season’ attribute and then add ‘Winter’ and ‘Summer’ as the attribute terms.
This will allow customers to choose between winter tires and summer tires.
You might also create a ‘Model’ attribute and then add each car model as an attribute term.
By adding attributes and attribute terms to your online store in advance, you will find it easier to create variable products later.
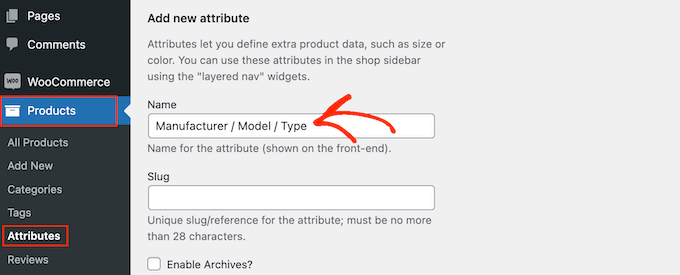
With that being said, head over to Products » Attributes. You can now type a title for the attribute into the ‘Title’ field. This will appear on your product pages, so make sure you use something descriptive.
For more on this topic, see our guide on how to add product attributes to WooCommerce.
When you are happy with the information you have entered, click on ‘Add attribute.’
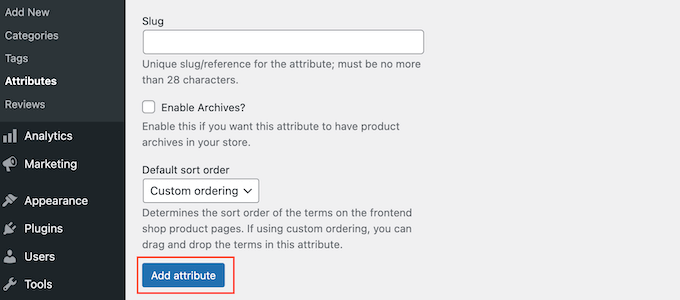
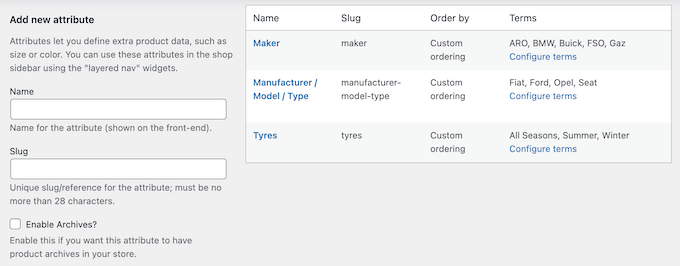
This attribute will now appear towards the right of the screen.
Next, go ahead and click on the ‘Configure terms’ link.

This brings up a screen similar to the main attribute screen, where you can start adding attribute terms.
To start, type the term’s title into the ‘Name’ field.
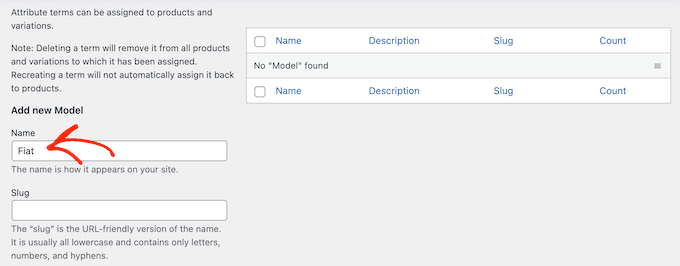
When you are happy with the information you have typed in, just click on the ‘Add new…’ button.
Simply repeat the above steps to create more attribute terms. You can also create as many product attributes as you want and then add unique terms to those attributes.
Step 9: Add Your Car Part Products
After creating some product attributes and terms, you are ready to start adding car parts to your online store. You can add each product manually or import WooCommerce products from a template, CSV file, or another service.
In this guide, we will show you how to add car parts to your store manually, so start by going to Products » Add New.
On this screen, start by typing in the product name. This will appear at the top of the product page, so visitors will be able to see it.
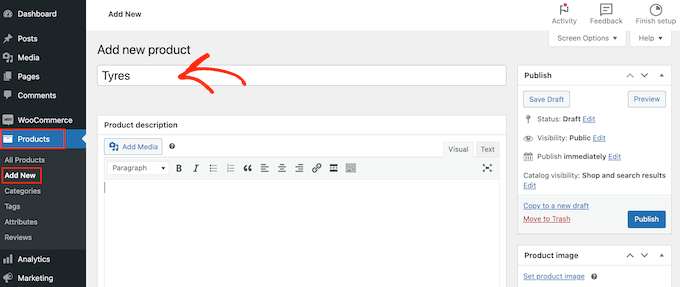
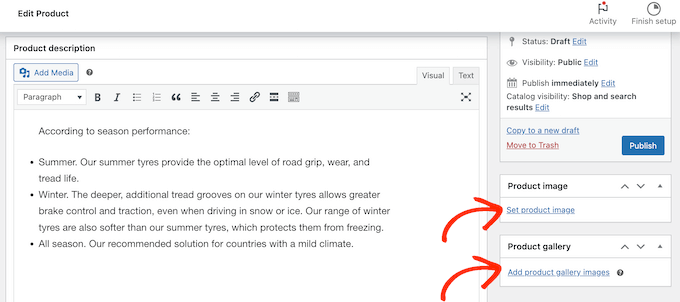
After that, type in a description and add a product image.
If you want to show multiple images, then you can click on ‘Add product gallery images.’ You can even add interactive 360-degree images in WordPress.
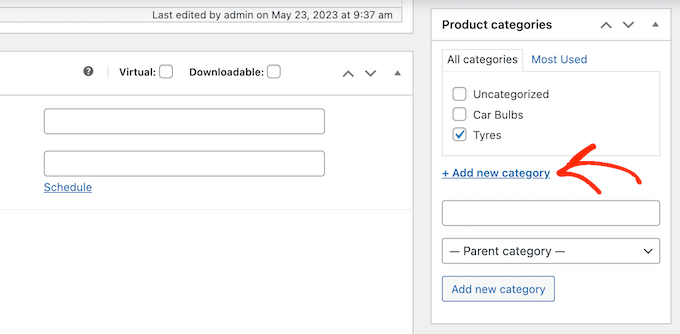
After that, it’s a good idea to add categories and tags to the product. These will help customers find the right products on your car parts site, like categories and tags for WordPress pages.
Simply click on the ‘Add new category’ link and then create a new category for the car part you are adding.
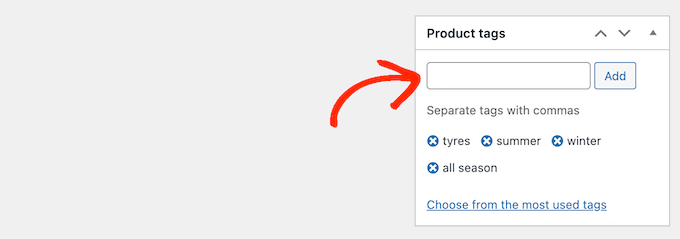
After that, you can type each tag into the ‘Product tags’ box and click on ‘Add.’
To add multiple product categories and tags, simply repeat the same steps described above.
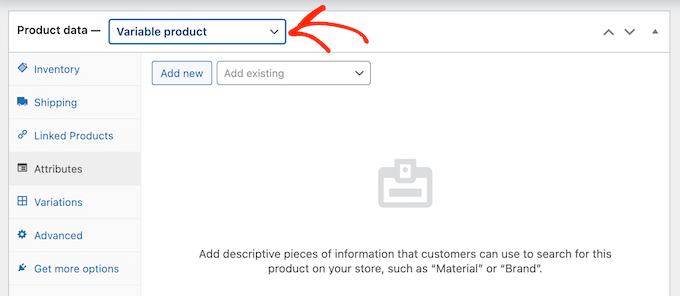
After that, scroll to the ‘Product Data’ box.
To create a variable product, simply click on the dropdown that shows ‘Simple product’ by default. Then, select ‘Variable product.’
You can now select the product type, add pricing, shipping costs, grouped products, and other information.
After entering all this information, you are ready to create variations by selecting the ‘Attributes’ tab. Here, open the ‘Add existing’ dropdown menu.
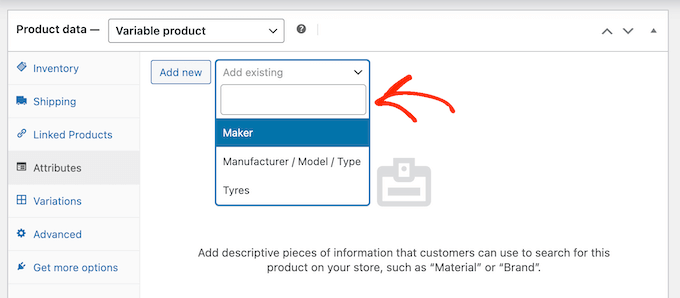
You can now go ahead and select the product attribute you want to use.
In the ‘Value(s)’ field, type in each term you want to use. When the right term appears, click to add it to the product.
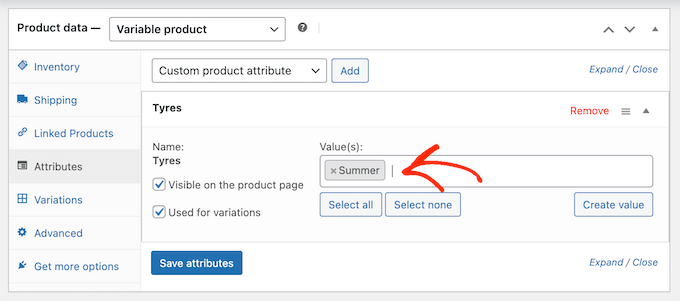
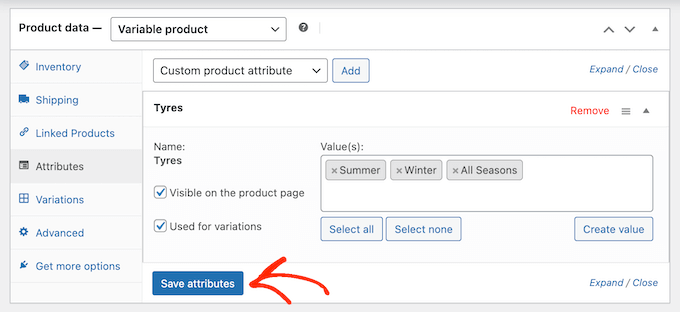
With that done, click on the ‘Save attributes’ button.
To add more product attributes and terms, simply repeat the above steps.
With that done, click on the ‘Variations’ tab.
On this screen, go ahead and click on ‘Generate variations.’
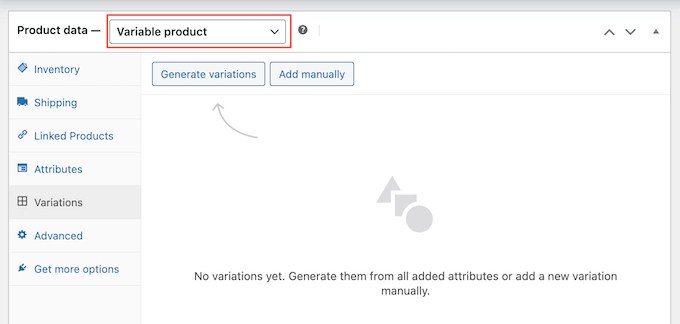
WooCommerce will now create variations using all the attributes you added to the product.
To set up each variation, click on its ‘Edit’ link.
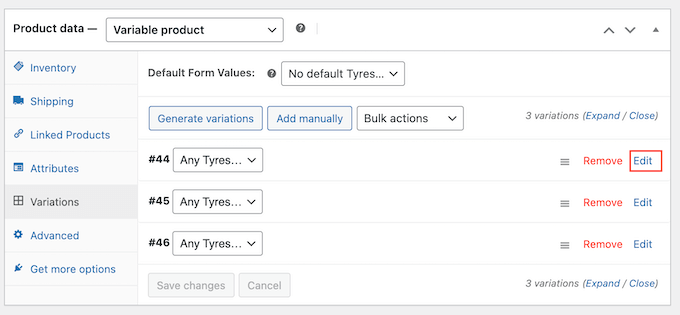
You can now add the variation’s price, upload an image, set the shipping options, and more using the settings in this section.
Simply repeat this process to configure each product variation.
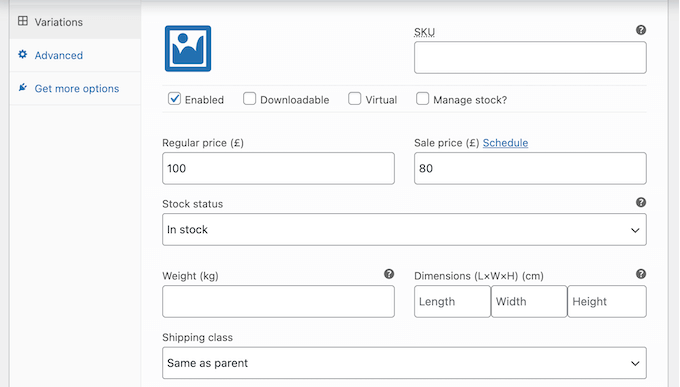
There are lots more settings you can use to fine-tune the variable product. However, this is all you need to add a car part to your online store.
When you are ready to make the product live, go ahead and click on the ‘Publish’ button.
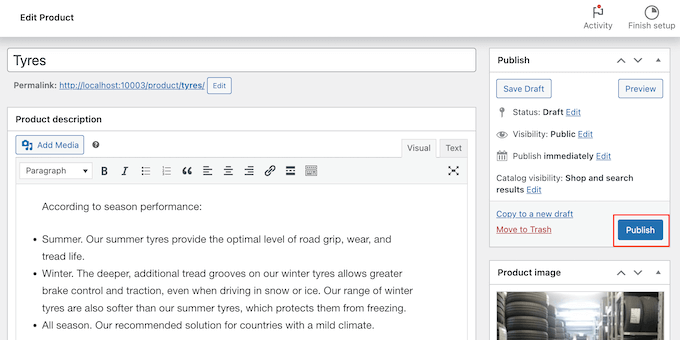
If you visit your online store, you will see the variable product live.
To add more car parts to your online store, simply repeat these steps.
Step 10: Add a Contact Us Form
Customers might sometimes need to talk to you directly. For example, they may want to find out when a particular part will be back in stock or get some advice on a mechanical problem.
While visitors could call your business phone number, it’s still a good idea to add a contact form to your website.
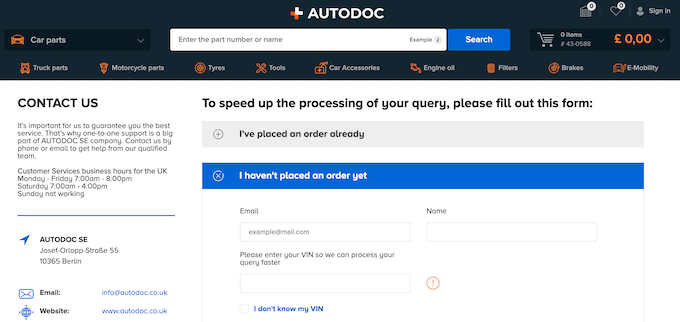
Most of the best contact form plugins come with built-in spam protection, so you won’t get any contact form spam. A form will also collect consistent information, so you will have all the data you need to write a helpful reply.
The easiest way to create a contact form is by using the free WPForms plugin. This plugin has a built-in Simply Contact Form template that you can quickly customize using the drag and drop editor.
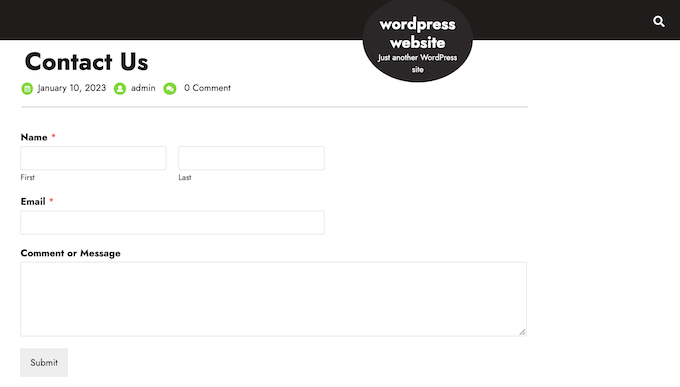
After that, just add the form to any page, post, or widget-ready area using the ready-made WPForms block.
For detailed instructions, see our guide on how to create a contact form in WordPress.
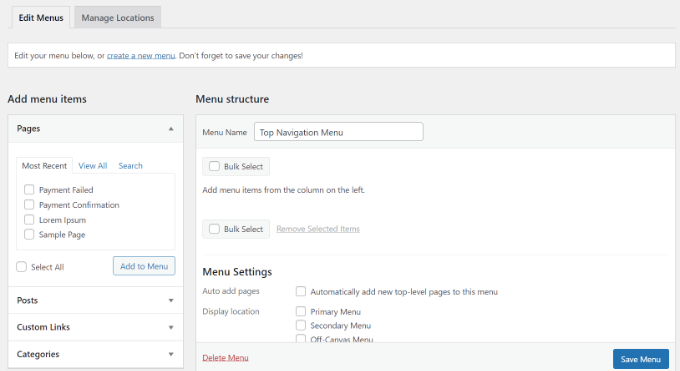
After adding some content to your car parts website, you will want to help visitors find their way around those pages and posts by adding a navigation menu.
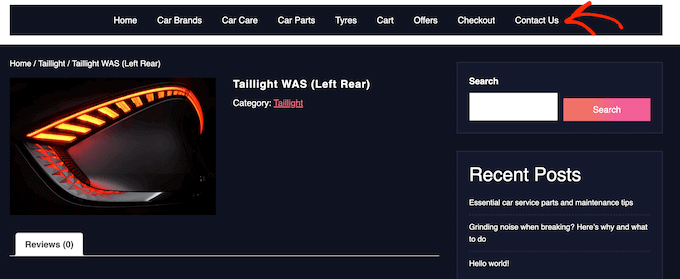
No matter which theme you are using, it’s easy to add menus and sub-menus to your automotive website.
For a complete guide, please see our post on how to add a navigation menu.
Step 12: Create a Smart WooCommerce Product Search
WooCommerce has a built-in search feature, but it’s not very good at finding products. It doesn’t look for matches in product attributes, reviews, custom fields, or product descriptions.
By replacing the default search with a smarter and faster search, you can help customers find the exact car parts they need. This will improve the customer experience and help you get more sales.
The easiest way to create a smart WooCommerce product search is by using SearchWP. SearchWP is the best WordPress search plugin on the market and puts you in complete control of the WordPress search algorithm.
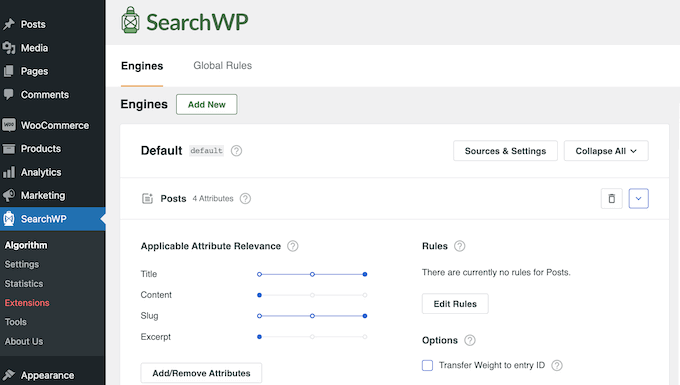
By default, SearchWP will look at the product title, content (description), slug, and excerpt (short description) for matches.
Plus, you can customize the SearchWP settings to look for matches in custom fields, taxonomies, customer reviews, product tags, and more.
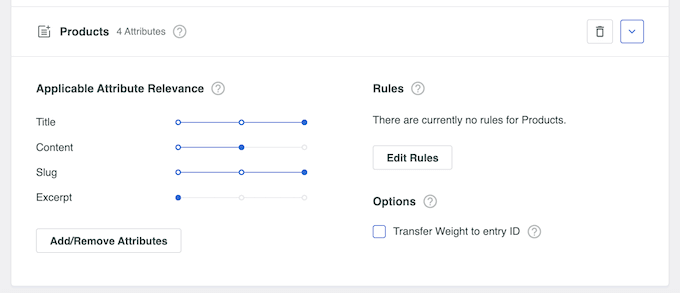
For more information, please check out our guide on how to make a smart WooCommerce product search.
Step 12: Display Customer Reviews
Reviews are some of the best ways to earn customer trust and convince visitors to buy car parts from your website. After all, we are more likely to buy things that we see other people buying, using, or recommending.
If you already have reviews on platforms like Facebook, Yelp, and Google, then it’s easy to display them on your WordPress site using Smash Balloon Reviews Feed Pro.
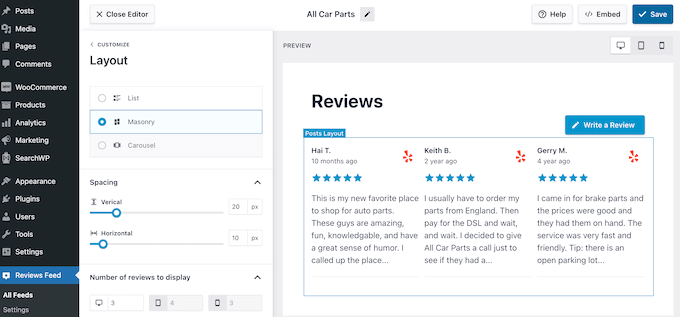
Reviews Feed Pro is one of the best customer review plugins for WordPress that you can use.
It will collect reviews automatically and then organize them into a nice layout on your automotive website. You can also completely customize the review feed so that it perfectly fits with your site.
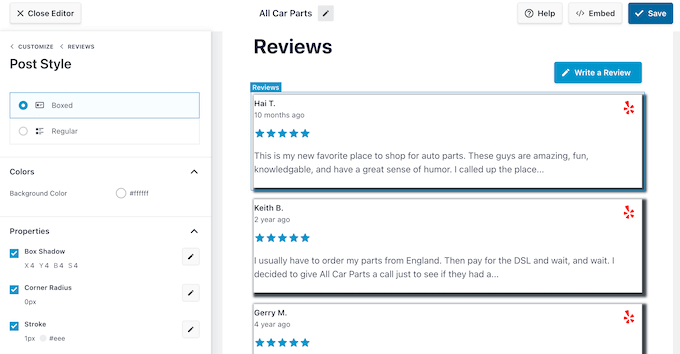
For more details, please see our guide on how to show Google, Facebook, and Yelp reviews.
We hope this tutorial helped you learn how to sell car parts online with WordPress. You may also want to learn how to create a WooCommerce popup to increase sales or check out our list of the best WooCommerce plugins for your store.
If you liked this article, then please subscribe to our YouTube Channel for WordPress video tutorials. You can also find us on Twitter and Facebook.
این خبر را در ایران وب سازان مرجع وب و فناوری دنبال کنید