Do you want to reset your WordPress database to its original settings?
If you are working on a local server or a test site, then you might need to restore your database back to how it was when you first started.
In this article, we will show you how to reset your WordPress database to default settings with just a few clicks.
Here is a quick overview of the steps we will cover in this tutorial:
Ready? Let’s begin.
Step 1: Prepare a WordPress Backup Before Reset
WordPress stores all your website content in a database. This includes your posts, pages, media file data, plugin and theme settings, and more.
If you have been working on a test site on a local server or a staging site, then you sometimes may wish to reset to a fresh install to start over.
Resetting your WordPress database is the fastest way to do this. It deletes all your WordPress data without deleting any files stored on your web hosting server.
However, If you reset your WordPress database, then all the data will be gone forever. It cannot be undone.
We recommend making a complete WordPress backup before you go any further. You can also back up your WordPress database alone if you don’t want to back up your entire website.
Now, we will show you two methods to quickly back up your WordPress database before the reset. You can choose the one that works best for you.
Method 1: Make WordPress Database Backup Using Duplicator
Duplicator is the best WordPress backup plugin on the market. It allows you to easily back up your WordPress website and quickly restore it from the backup.
First, you need to install and activate the Duplicator plugin. For more details, see our step-by-step guide on how to install a WordPress plugin.
Note: There is also a free version of Duplicator that you can use. However, we recommend upgrading to the paid plan to unlock the full potential of the plugin.
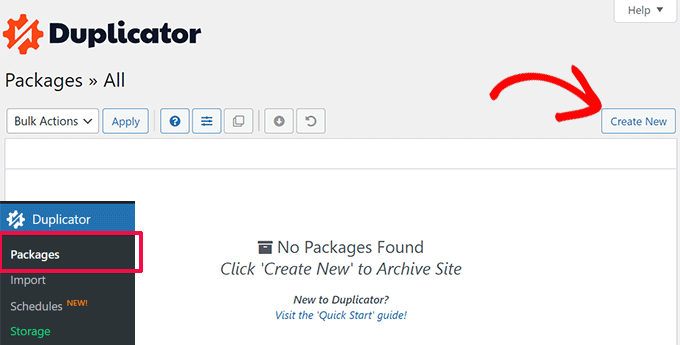
Upon activation, go to the Duplicator » Packages page and click the ‘Create New’ button.

Next, you need to provide a name for your backup.
Click on the ‘Next’ button to continue.

Duplicator will now scan your WordPress website and show the scan results.
It may show some notices, like if you don’t have a WordPress security plugin installed or are using an outdated version of WordPress.
You can ignore these notices. If everything else looks good, then click on the ‘Build’ button to continue.

The plugin will back up your WordPress database and show you the download options.
Simply click on the ‘Download’ and ‘Both Files’ buttons to continue.

Duplicator will now send both the Archive and the Installer files as downloads to your computer.
Method 2: Create a Database Backup Using Advanced WP Reset
For this method, you will be using the Advanced WP Reset plugin. It is the same plugin that you will use in the next step to reset your WordPress database.
However, the downside of this backup approach is that you will have to restore your WordPress database using phpMyAdmin.
First, you need to install and activate the Advanced WP Reset plugin. For more details, see our step-by-step guide on how to install a WordPress plugin.
Upon activation, go to the Tools » Advanced WP Reset page and switch to the ‘Snapshots’ tab.

Provide a name for your backup, and then click the ‘Take Snapshot’ button.
The plugin will now prepare a copy of your database and store it as a backup. You will see it listed under the Available Snapshots section.

However, when you reset your WordPress database, the plugin will also delete this snapshot. You need to save it on your computer to use it later.
Click on the plus [+] icon to expand the snapshot options, and then click on the ‘Download’ button.

Your database backup will now download as an SQL file to your computer.
Step 2: Reset Your WordPress Database to Default Settings
Now, you need to install and activate the Advanced WP Reset plugin. For more details, see our step-by-step guide on how to install a WordPress plugin.
Next, go to the Tools » Advanced WP Reset page and switch to the ‘Reset’ tab.

Under the Site Reset section, the plugin will show you all the data it will reset. This includes the following:
- Pages, posts, and comments
- Custom database tables (created by you or a WordPress plugin installed on your site)
- Users except for the current admin user
- Advanced WP Reset plugin data (including snapshots and settings)
Below that, it will show you which data will not be deleted. This includes the following items:
- The admin user account
- Files, uploads in the media library, themes, plugins, and more. However, any plugin or theme data stored in the database will be deleted.
- Basic WordPress settings, including site title, WordPress address, site address, timezone, and language options
- Non-WordPress database tables. These tables don’t share the table prefix set in your WordPress database settings.
If everything looks good, just type ‘Reset’ under the Warning label and then click the ‘Reset’ button.

This will bring up another popup warning.
Simply click the ‘Reset Now’ button to continue.

The plugin will now reset your WordPress database to its default settings.
Once finished, you will see a success message.

You can now continue using your website with the default database settings.
Note: Upon reset, the plugin will recreate the default WordPress content that comes with a fresh install of WordPress. It includes a blog post titled ‘Hello World’, ‘A Sample Page’ under Pages, and a sample comment under Comments. Feel free to delete those manually.
Step 3: Restore WordPress Database From Backup (Optional)
If, for some reason, resetting your WordPress database to default settings didn’t work, then you can restore your database from the backup created in the first step.
Method 1: Restore Duplicator Database Backup
If you created your WordPress database backup using the Duplicator plugin, then here is how you will restore your website.
During the database reset, the Advanced WP Reset plugin will deactivate all other WordPress plugins installed on your site.
Go to the Plugins page in the WordPress admin area to activate the Duplicator plugin.

Once the plugin is activated, you need to visit the Duplicator » Import page.
Here, you need to upload the Archive file you downloaded in the first step.

Next, the plugin will scan your archive file and show you the package details.
If everything looks good, just click the ‘Continue’ button to begin the import.

On the next screen, you may be asked to confirm that you want to continue without a recovery point.
Since you already have the latest backup, it is safe to continue without creating a recovery point.

Scroll down to the bottom of the page.
You will see the number of posts, pages, comments, and media under the system overview. Click on the ‘Launch Installer’ button to continue.

This will launch the Duplicator installer.
Upon launch, the installer will automatically choose ‘Restore single site’ as your restoration type.

Scroll down to the Validation section.
Here, you will again see the warning about the recovery point. You need to check the box next to the ‘I have read and accept all terms and notices’ option.

Click on the ‘Next’ button to continue.
Duplicator will now show you a popup with your installer settings. Go ahead and click on the ‘OK’ button.

Duplicator will now start importing your website from the backup and restore your WordPress database.
Once finished, you will see a success message with a button to log in to the WordPress admin area.

Method 2: Restore Database Backup from SQL File
If you saved your WordPress database method using the Advanced WP Reset plugin’s Snapshots tool, then here is how you will restore the database.
First, you need to open up phpMyAdmin. It is a web-based tool that allows you to easily perform database operations using a friendly interface.
If the website you are trying to store is hosted on your web server, then log in to your WordPress hosting account control panel (cPanel).
From here, you need to find the Database section and click on the ‘phpMyAdmin’ button.

This will open phpMyAdmin in a new browser tab.
On the other hand, if you were working on a local website on your computer, then you can open phpMyAdmin or a similar tool from the software that you are using for local sites.
We recommend using Local, which does not come with phpMyAdmin. Instead, it uses Open Adminer to manage databases.

Once you are in phpMyAdmin, make sure that you have selected the database for your website.
Select all database tables in phpMyAdmin by clicking on the ‘Check all’ box at the bottom of the table list. After that, select ‘Drop’ from the ‘With selected’ dropdown menu.

This will empty your WordPress database.
You can now switch to the ‘Import’ tab at the top and click on the ‘Choose File’ button to select the SQL file you downloaded earlier.

After choosing the file, feel free to review the on-screen options. The default settings will work for most websites.
Scroll down toward the bottom of the page and click on the ‘Import’ button.

phpMyAdmin will now upload your SQL file and run it.
After that, you will see a success message.

You can now visit your website and log in to see your database restored to its previous settings.
We hope this article helped you learn how to reset your WordPress database to default settings. You may also want to check out our beginner’s guide to WordPress database management and our expert picks for the best WordPress database plugins.
If you liked this article, then please subscribe to our YouTube Channel for WordPress video tutorials. You can also find us on Twitter and Facebook.
این خبر را در ایران وب سازان مرجع وب و فناوری دنبال کنید
مشاهده پاسخ های این مطلب
———————————————
این مطلب از سایت انجمن وردپرس گردآوری شده است و کلیه حقوق مطلق به انجمن وردپرس می باشد در صورت مغایرت و یا بروز مشکل اطلاع دهید تا حذف گردد
منبع: انجمن وردپرس
