Last week, a friend who manages multiple WordPress sites called me in a panic. A routine plugin update had broken his client’s navigation menu, but he didn’t notice until customers started complaining.
This is a common problem I’ve seen countless times, and it’s exactly why visual regression testing is so important for WordPress website owners.
Visual regression testing might sound complicated. However, it’s actually a simple solution that can save you hours of manual checking and prevent embarrassing layout issues.
Typically, it works by automatically comparing before-and-after screenshots of your pages. This helps catch even the smallest visual changes that might break your site’s appearance. 🔍
In this guide, I’ll show you how to do visual regression testing on your WordPress site. After testing numerous tools and methods, I’ve found the most reliable solution that won’t require any coding knowledge or technical expertise.

What Is Visual Regression Testing, and Why Is It Important? 🤔
Every time you update your site — whether it’s a WordPress core update, a new plugin, a theme change, or just a minor code tweak — there’s a chance that something on the front end might shift out of place.
For example, a button could disappear, your layout might break, or a product image could stop loading properly.
The problem? These visual bugs often go unnoticed until a visitor points them out through a contact form or design feedback survey.
By then, the damage to your site’s user experience might already be done.
That’s where visual regression testing comes in.
The process is simple: take snapshots of your pages before and after an update, then compare them to spot anything that’s changed.
And if you’re testing on a staging site (which we recommend), you can safely make updates and run comparisons to catch visual issues before anything goes live.
The good news? You don’t have to do it manually.
With visual regression testing tools like VRTs, Percy, or BackstopJS, you can automate screenshot comparisons and check how your site looks across different screen sizes — helping you catch layout issues on desktop, tablet, and mobile.
Why is this important for WordPress users?
If you’re managing a WordPress website, visual regression testing is a time-saving safety net. Instead of clicking through every page after an update, this tool gives you a visual report of what changed — and whether it’s something you need to fix.
It’s especially helpful in many scenarios, such as agencies running updates across multiple WordPress sites, freelancers managing client websites, or online store owners who want to make sure the product and checkout pages stay intact.
In short, visual regression testing helps you avoid frustrating surprises, save time, and keep your WordPress site running smoothly.
With that said, I’ll share how to easily do visual regression testing in WordPress. Here’s a quick overview of all the steps I’ll cover in this guide:
🧑💻 Pro Tip: Before running visual regression tests or making design changes, I highly recommend using a staging site.
A staging site is a private clone of your live website where you can safely test updates, plugin changes, or design tweaks — without affecting your users. It helps you catch layout issues, missing buttons, or visual bugs before they go live.
Not sure how to set one up? Just see our step-by-step guide on creating a WordPress staging site for all the details.
Step 1: Install and Activate the Visual Regression Testing Plugin
In this tutorial, I’ll use the VRTs plugin because it’s beginner-friendly and offers a free version. Whether that is a shifted layout, a missing button, or a broken element after an update, VRTs helps you spot it early.
Here’s how it works: The plugin takes screenshots of the pages you select. You can then trigger comparisons manually or schedule them to run automatically after making changes to your site, such as updating a plugin or tweaking your theme.
The plugin then compares the ‘before’ and ‘after’ screenshots side-by-side and highlights any visual differences.
So, instead of manually checking every page, you get a quick visual report showing what changed, and whether anything looks off.
📝 Note: For this guide, I’ll be using the VRTs free version. It lets you run daily scans and set up to 3 visual tests — perfect for catching unexpected design issues if your WordPress site is updated often.
Need more testing options? The VRTs Pro plan lets you monitor more pages and websites. Plus, it lets you run tests after updates, trigger tests manually, and connect with your favorite tools using a simple API.
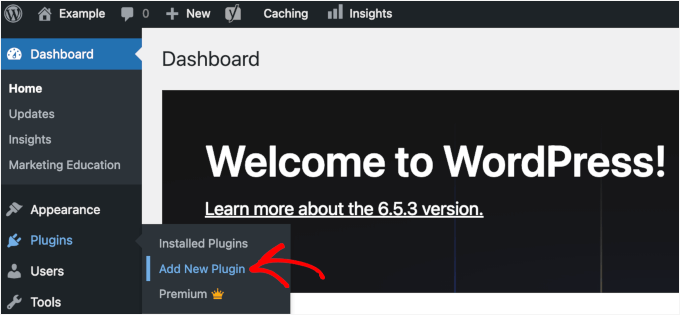
To install the plugin, you’ll first need to go to Plugins » Add New Plugin in your WordPress dashboard.

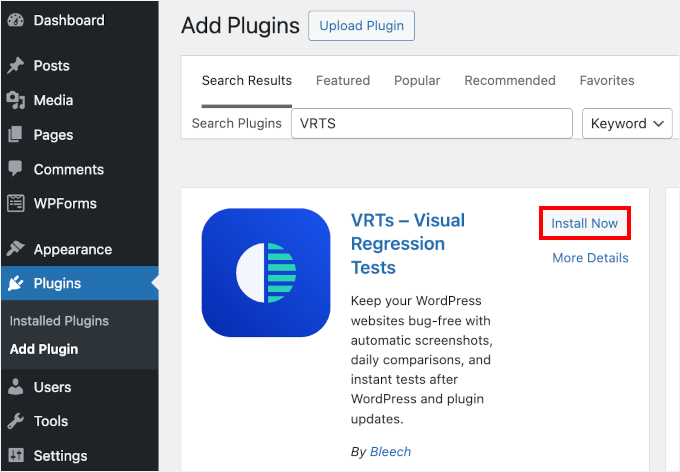
In the search bar, you can type in ‘Visual Regression Tests’ or ‘VRTs’.
Click ‘Install Now’ next to the plugin when it appears, and then click the ‘Activate’ button.

If you need help, please see our guide on how to install a WordPress plugin.
Step 2: Configure the VRTs Plugin Settings
Once you’ve activated the plugin, it’s time to set up when your visual regression tests should run.
Head over to VRTs » Settings in your WordPress admin menu.
Once inside, you can scroll down to the ‘Triggers’ section — this is where you tell the plugin when to automatically take and compare snapshots.
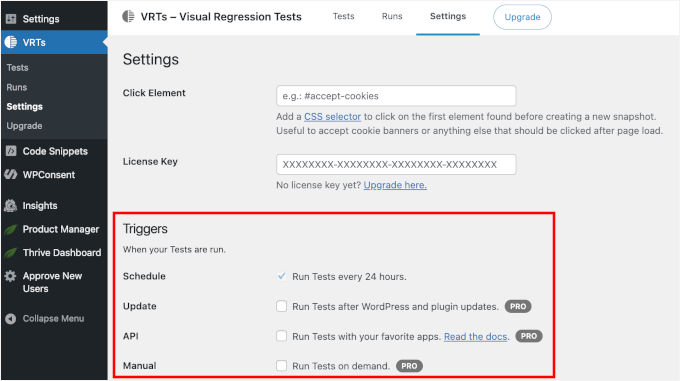

Here are the available options:
- Run Tests every 24 hours (Free) – This is the default setting. VRTs will automatically check your selected posts or pages once per day for visual changes.
- Run Tests after WordPress and plugin updates (Pro) – Great for catching layout issues caused by updates, right when they happen.
- Run Tests with your favorite apps (Pro) – Connect VRTs with external tools or workflows using webhooks.
- Run Tests on demand (Pro) – Manually trigger tests whenever you need them, directly from your WordPress dashboard.
Once you’ve selected the trigger that fits your workflow (or your license), simply click the ‘Save Changes’ button at the bottom of the page.
Step 3: Add New Pages or Posts to Test
Once you’ve configured the plugin settings, it’s time to choose which pages or posts you’d like to include in your visual regression tests.
Let’s now switch to the ‘Tests’ tab, which is where you’ll manage and run your visual tests.
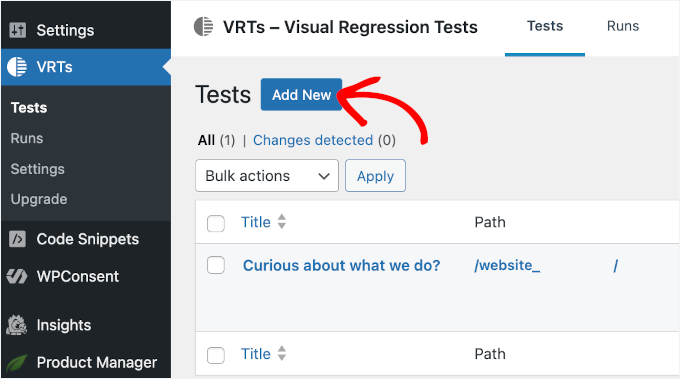
From here, you can click the ‘Add New’ button. This will let you choose posts or pages to test.

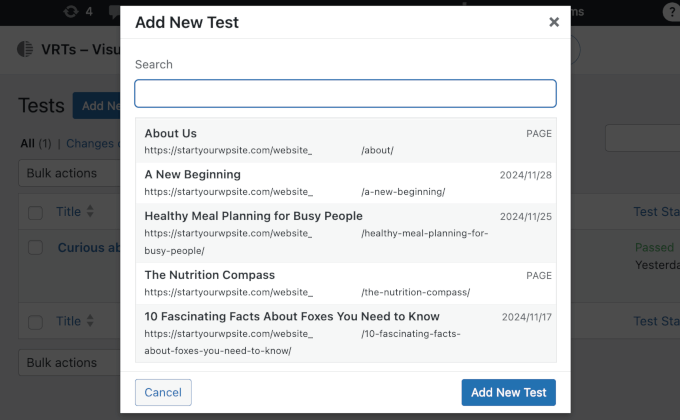
In the popup that appears, you need to choose the pages or posts you want to perform the visual regression testing on.
Then, click ‘Add New Test’ to confirm your selections.

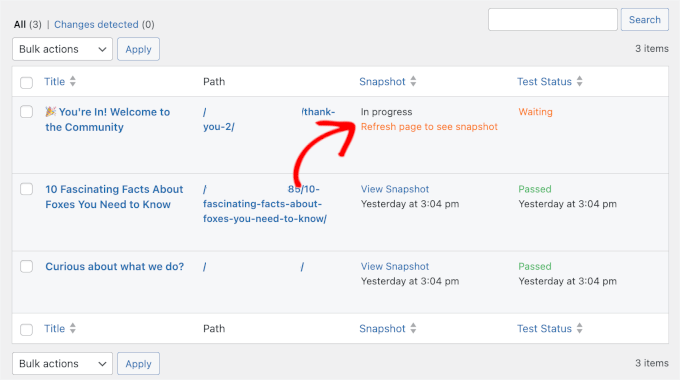
The VRTs plugin will take an initial snapshot of each selected page. This acts as your baseline — basically a “before” version of how your posts or pages look right now.
After setting up your test, you’ll see an instruction to refresh the page to load the initial snapshot. Go ahead and do just that.

With that done, you’ll find a link to the page or post snapshot you added for testing.
You will also see that the ‘Test Status’ is automatically set to ‘Scheduled’ for the next day. This is because the free version of VRTs runs tests on a 24-hour schedule.
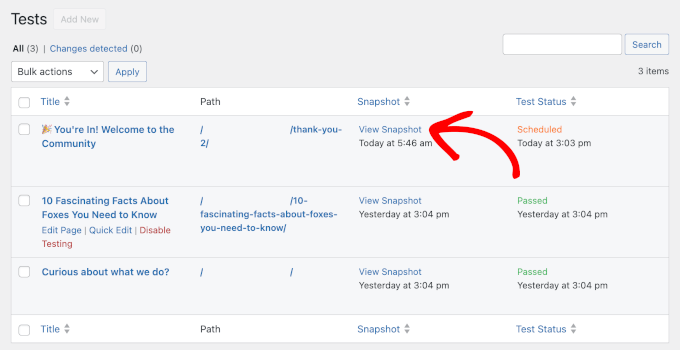

You can click the ‘View Snapshot’ link to check the initial screenshot.
It will open in a new tab like this:


Now, you can make any changes you need to your site. Then, come back tomorrow to review the comparison and spot any unexpected visual issues.
Step 4: Check for Visual Differences
Once the test is complete and any visual bugs are detected, you should see a notification alert in the VRTs » Runs tab.
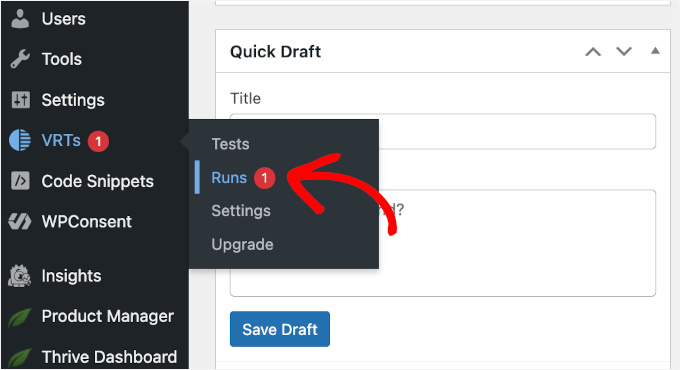

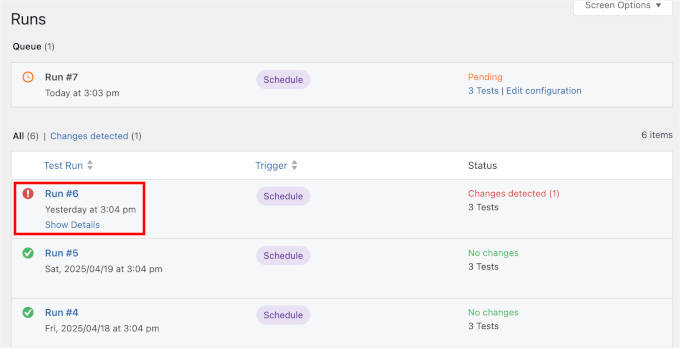
Once inside, you can hover over the run with changes detected.
Then, click the ‘Show Details’ link when it appears.

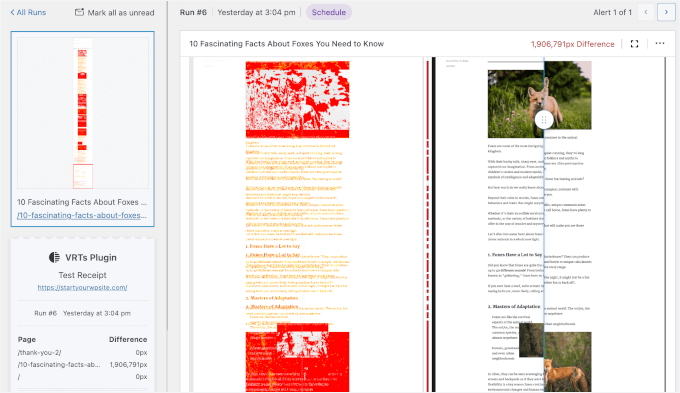
On the next screen, you’ll see a side-by-side comparison of your page, showing the before and after versions.
The plugin automatically highlights visual differences, so you can quickly spot:
- Layout Shifts and Misaligned Elements: If your design changes after a plugin update or theme change, like buttons moving out of place or text jumping around, VRTs will flag it.
- Missing or Broken Elements: Whether it’s a missing image, CTA button, or embedded form, VRTs make it easy to spot anything that disappears unexpectedly, which is especially useful for eCommerce or landing pages.
- Unexpected Content Changes: The plugin will also alert you to changes in text, links, or images, so you can catch unauthorized edits or publishing errors before users do.
You can use the drag handle in the center of the screen to slide between the old and new versions and visually confirm the exact changes.

Step 5: Review and Take Action
After running a visual regression test, you can take action based on the results. Here’s what you can do next:
- Manually edit the page: If the changes are small, you can fix the issues directly by editing the page, such as adjusting the layout, moving elements, or adding back missing features.
- Revert to a backup: If the changes are bigger or harder to fix, you can restore the page to a previous version using your website backup or version history. This helps avoid leaving issues on your site.
✋ Need a backup tool recommendation? Duplicator is an excellent choice. It’s easy to use and lets you clone your WordPress site in just a few clicks.
Some of our business websites currently use Duplicator for backups and site migrations, and I highly recommend checking it out. Read our full Duplicator review to learn more!
FAQs for Running Visual Regression Testing in WordPress
If you’re just getting started with visual regression testing, you’re not alone. Here are some quick answers to common questions I often hear from WordPress users and developers.
What is the difference between snapshot testing and visual regression testing?
Snapshot testing checks if your website’s code or content stays the same, kind of like saving a backup of how things are supposed to be.
Visual regression testing, on the other hand, focuses on the appearance of your site. It compares screenshots before and after updates to catch layout changes, missing elements, or visual bugs you might not notice right away.
What is the best tool for visual regression testing in WordPress?
The easiest option is the VRTs – Visual Regression Tests plugin. It’s beginner-friendly, doesn’t require any coding, and runs directly from your dashboard. Plus, it has a free version that’s super easy to use.
How can I do regression testing manually?
Manual regression testing means going through your site and checking key pages after you make changes, like installing a new plugin or updating your theme.
You’ll want to visit your homepage, contact page, checkout process (if you have one), and any custom layouts to make sure everything still looks and works as it should. It works, but it can be time-consuming if you manage a large or busy site.
How do you speed up regression testing?
The best way to save time is to automate it. Using a plugin like VRTs – Visual Regression Tests lets you create snapshots of your important pages and quickly compare them after an update.
No need to manually click through every page — the plugin does the visual check for you.
You can also test updates on a staging site first, so you’re not fixing issues on a live site.
What are the best ways to test WordPress website design?
Here are a few tips to test your WordPress design:
- Use a visual regression tool like VRTs – Visual Regression Tests to spot design changes.
- Preview your theme and plugin updates on a staging site.
- Test on multiple screen sizes (desktop, tablet, and mobile).
- Use browser dev tools to check how your site looks in different viewports.
- Ask for feedback from users or clients — they often notice things you might miss.
I hope this article has helped you learn how to do visual regression testing in WordPress. Next, you might want to check our article on creating chat rooms in WordPress for your users and the best user experience feedback questions to ask site visitors.
If you liked this article, then please subscribe to our YouTube Channel for WordPress video tutorials. You can also find us on Twitter and Facebook.
این خبر را در ایران وب سازان مرجع وب و فناوری دنبال کنید
جهت ادامه مقاله اینجا را کلیک نمایید
ایران وب سازان مرجع وب و فناوری