Looking to add a video schema markup in WordPress?
A video schema markup helps search engines understand the context of your videos. When used properly, it’ll help give your page an SEO boost by allowing you to display your content preview in a rich snippet format.
In this article, you’ll learn how to easily add a video schema markup in WordPress so you can drive more clicks.
Why You Need a Video Schema Markup?
If you’ve spent time, money, and effort on producing a video, you need to do everything you can to help Google find your video. 87% of video marketers say that video has helped boost traffic to their site, and 80% say it has helped increase sales.
But that can’t happen unless you tell search engines what your video is all about.
That’s where video schema markup comes into play.
Video schema markup is a type of code added to a webpage to help search engines better understand and display your video content in search results.
It provides additional information about your videos, such as the title, thumbnail, description, upload date, video duration, and more.
Google uses this information to display rich snippets, which look something like this.

This helps to make your content stand out and can help to improve your organic click-through rates.
Without the video schema markup, your video won’t be eligible to appear in the rich snippet format, which is a big opportunity you’ll miss. That’s because videos often appear near the top of search engines under ‘videos,’ giving an opportunity for your video to rank up top.
When you rank in Google’s video search results, your content will be eligible for the inclusion of other features, such as video previews and key moments, so users can get a glimpse of what your video is about.
But besides the Videos section, Google also displays the thumbnail for posts with videos in them as well.

Notice the difference between the posts with rich snippets and the ones without one. Users are way more inclined to click on the posts when there is a thumbnail of a video included.
On top of that, a video schema markup allows search engines to better understand your video content, which boosts the odds that your page will rank higher. It’ll also help you rank new WordPress content faster, provided you’ve optimized all the other areas of your page and website.
Once you’ve embedded videos to your WordPress blog posts or page, you’re ready to add a schema markup.
With that in mind, we’ll show you two methods for how to add a video schema markup to your post. Feel free to use the links below to jump to any section you prefer.
Method 1: Add Video Schema Markup with All in One SEO Plugin (Easy Way)
The easiest way to add video schema markup in WordPress is by using All in One SEO for WordPress. It is the best WordPress SEO plugin on the market and comes with a schema generator that lets you easily add schemas to your videos without any hassle.

Normally, you would have to write the JSON-LD code and ensure it’s correctly implemented into the HTML of your webpage. And on top of that, you need to check that the code works.
Note: Although there is a free version of All in One SEO, you’ll need the paid version to get schema controls for videos.
Step 1: Install All in One SEO plugin.
To get started, the first thing you need to do is install and activate the All in One SEO plugin for WordPress. For more help, you can follow our tutorial on how to install a WordPress plugin.
Upon activation, the plugin will launch a setup wizard that will guide you through the entire setup process. For more details, see our step-by-step guide on how to set up All in One SEO for WordPress.
Step 2: Check that the video sitemap on your WordPress site is enabled.
Before you add schema markup to your videos, you want to ensure your WordPress website has set up a video sitemap first.
Using a video sitemap gives your media content the best chance of ranking. A video sitemap is an XML file that provides information about the videos on your site to search engines.
That way, search engine crawlers are aware of all the video content on your site.
This helps you to rank content faster rather than waiting for Google to naturally find your video content.
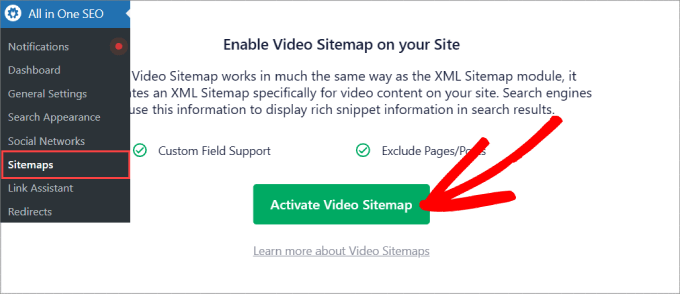
To create a video sitemap, head over to All in One SEO » Sitemaps. From there, you need to click on ‘Activate Video Sitemap.’
Under the ‘Video Sitemap’ tab, you should see that the ‘Enable Sitemap’ is on.
If it’s off, you’ll need to turn it on.
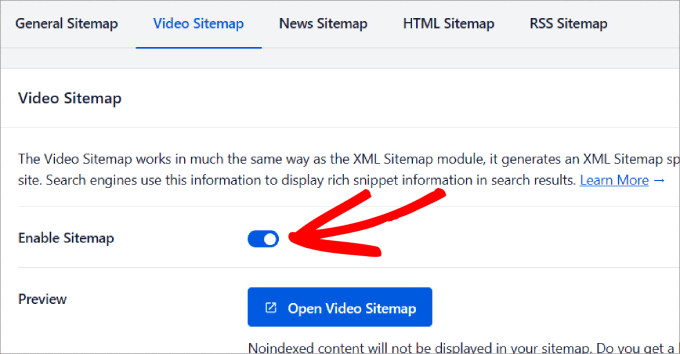
You can also view your sitemap by clicking on the ‘Open Video Sitemap’ button. This will bring you to a list of all of the video content on your site, and you can view the information included with each media.
If you scroll down, you choose whether to ‘Include All Post Types’ and ‘Include All Taxonomies’ to appear in your sitemap.
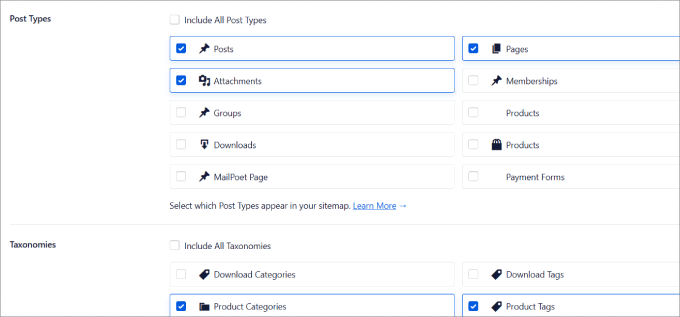
Here is where you can uncheck any post types or categories and tags that you don’t want to appear in the sitemap.
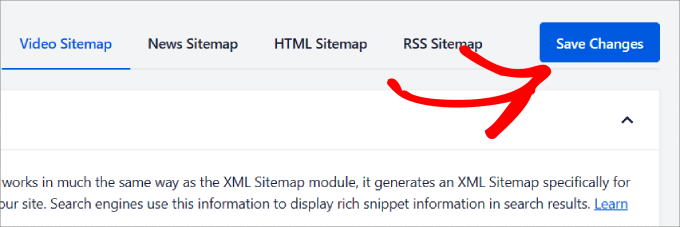
If you’ve made any changes, make sure to hit the ‘Save Changes’ button up top.
Step 3: Add the video schema markup to WordPress.
Once you have your video sitemap enabled and configured, you’ll need to head over to any page or post that you want to add video schema markup to.
Scroll to the bottom of the page to get to the AIOSEO Settings. Next, go to the Schema tab. And then, hit the ‘Generate Schema’ button.
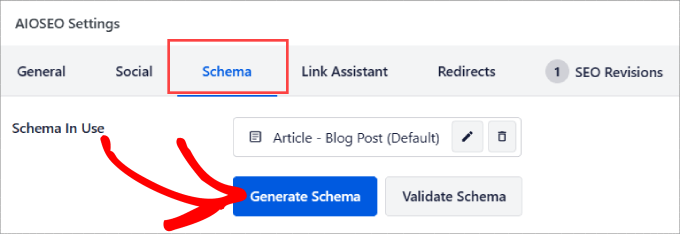
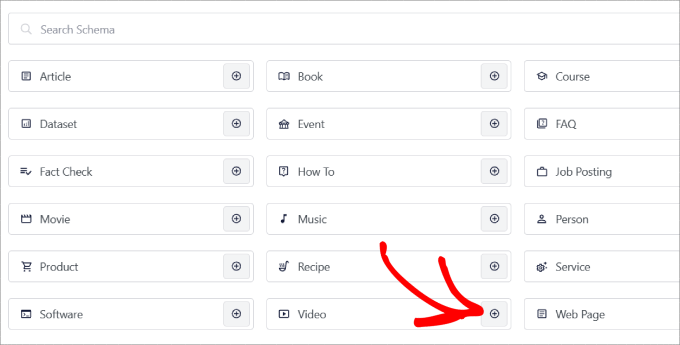
You’ll be taken to a pop-up window that shows all of the Schema templates that AIOSEO has to offer.
Go ahead and click the ‘+’ icon next to Video.
Now you can customize all of the details of the video, such as:
- Name: What is the name of your video?
- Description: Tell people what your video is about
- Content URL: What is the URL of the video file?
- Embed URL: Enter the video hosting site you used, such as YouTube, Vimeo, Wistia, etc.
- Upload date: Tell people when the video was published
- Family-Friendly: Is your video family-friendly?
- Thumbnail URL: Show off an eye-catching thumbnail that attracts visitors to your page.
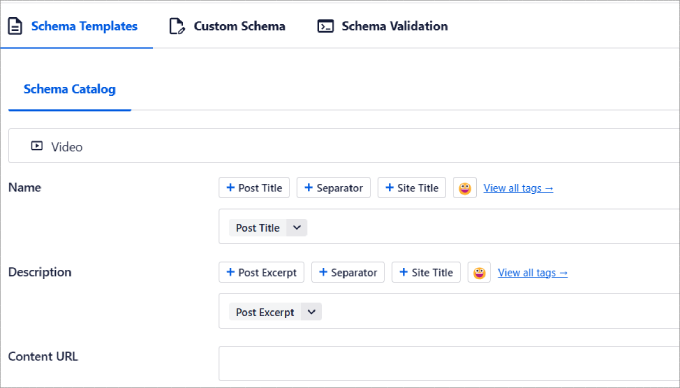
When you’re done entering your video details, just click on the ‘Add Schema’ button.
And if you want to save this schema as a template for other pages, you can hit the ‘Save Schema as Template’ button.

Step 4: Validate the schema.
Now that you’ve added your video schema markup, all that is left to do is validate it.
Click the ‘Validate Schema’ button.
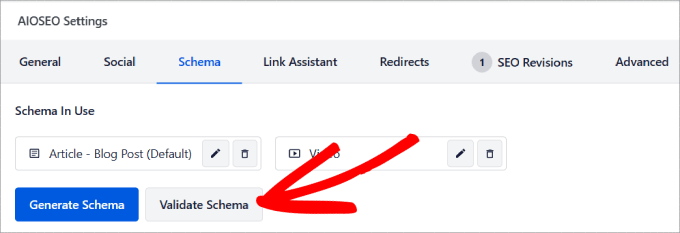
You’ll be directed to the Google Rich Results test tool. This is designed to help WordPress site owners and developers check the structured data markup on their web pages. It ensures that the HTML code follows Google’s guidelines and tells you if there are any errors with your code.
Under the ‘Schema Validation’ tab, you’ll want to select ‘Test with Google.’
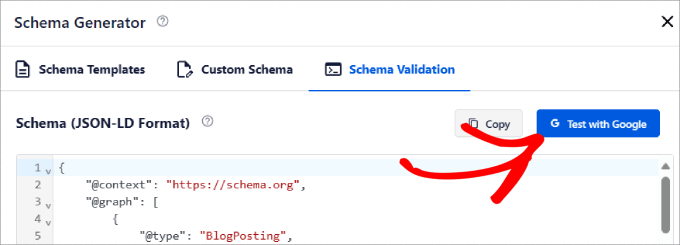
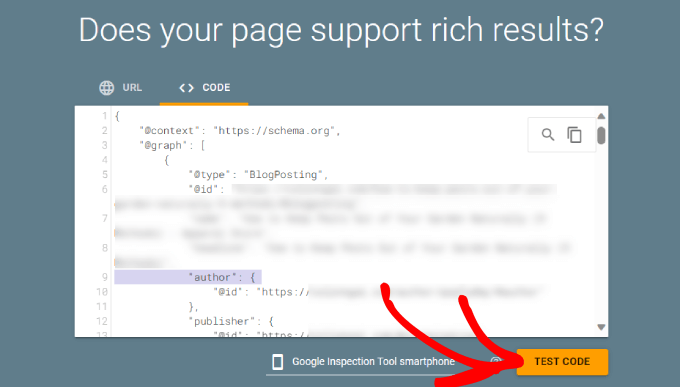
All in One SEO will automatically paste the structured schema markup data into the tool.
All you need to do is to hit the ‘Test Code’ button.
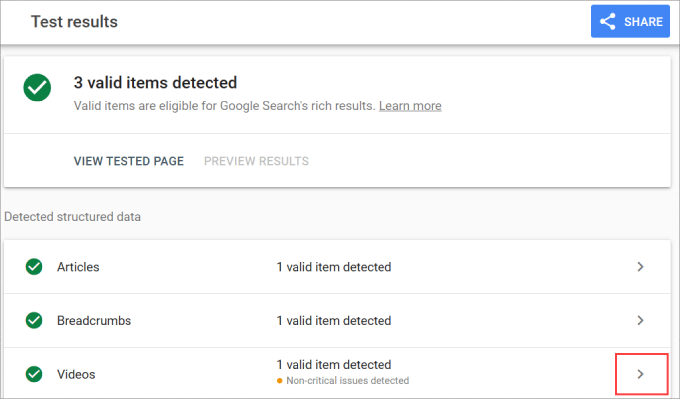
Give it a minute or two. You should see checkmarks across the board, especially next to Videos.
If not, then you can click the arrow to expand the option and see how you can fix the issue.
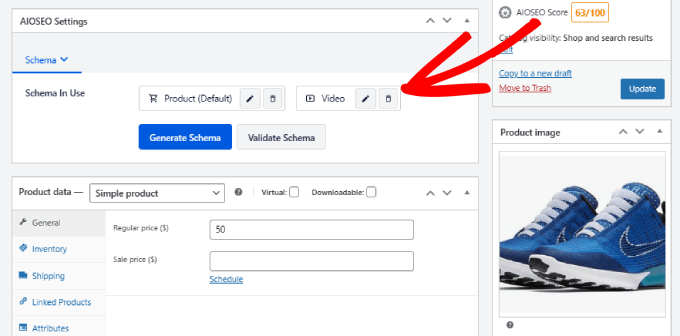
Keep in mind that this works for online stores as well.
For example, the All in One SEO settings appear within WooCommerce pages, meaning you can add schema markups to them.
While there are many schema markup plugins for WordPress, such as Schema Pro, there’s no other tool that has as many schema markup options or other SEO optimization features as All in One SEO.
Method 2: Add Video Schema Markup Manually
If you want to add video schema markup manually, you can do so by writing and pasting code into the HTML of any web page.
While you may save some money, you wouldn’t get the many benefits that the All in One SEO plugin brings. Not to mention, even the slightest mistake in code could break your WordPress website.
Step 1: Write and customize the video schema markup code.
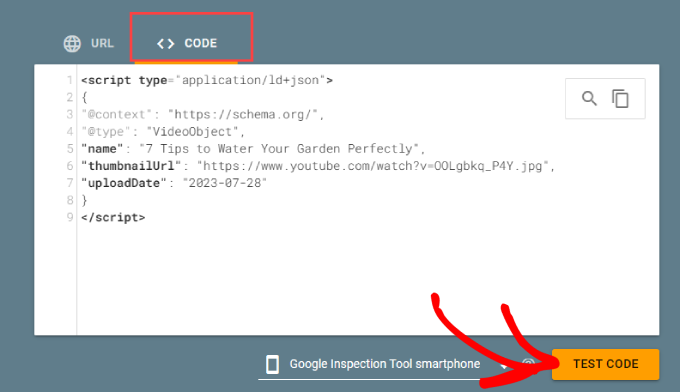
To get started, you’ll need to copy and paste this code into a text editor.
After this, you need to change the code based on your video name, thumbnail URL, and upload date.
Step 2: Validate the schema markup code.
Next, head over to Google’s Rich Results Test. Under the Code tab, paste your custom video schema markup.
Then click on ‘Test Code’ to validate this code.
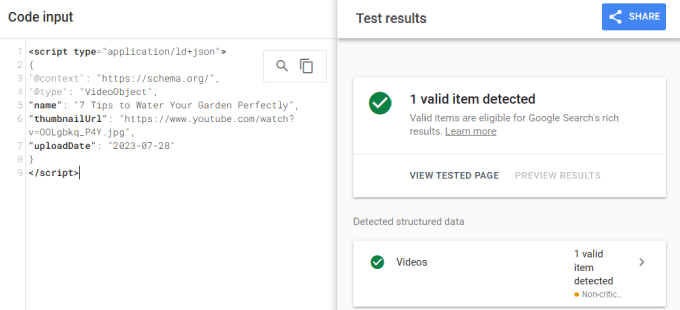
You’ll be given the test results to see whether the code follows Google guidelines and that there are no errors.
If there’s an issue, it’ll tell you which part of the code to fix.
Step 3: Add the code to your WordPress page.
Once validated, you can now paste it into the HTML of your WordPress webpage.
Head over to the WordPress block editor of any post or page with video content embedded.
Choose a block and click the ‘+’ icon. Then, search for the ‘Custom HTML’ block and add it to your page.
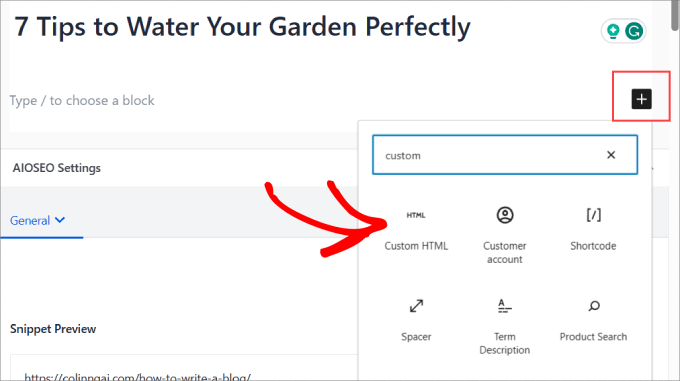
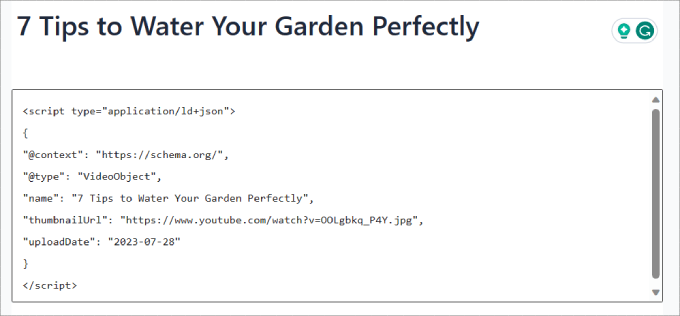
From there, you’ll see an HTML box.
This is where you paste the code into to add the video schema markup to that page.
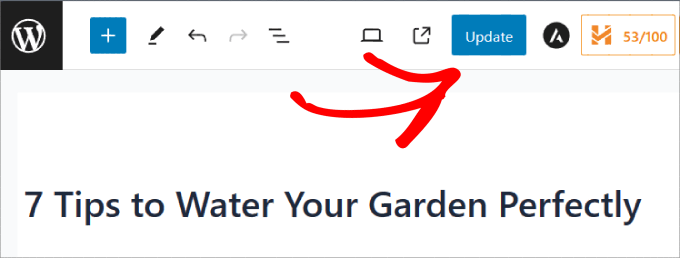
Finally, click ‘Update.’
Now you’ve added the video schema markup manually, and will be eligible for rich snippets.
Tips for Video Schema Markup
Using schema markups for videos is a great way to strengthen your organic marketing strategy.
That said, here are some best practices to keep in mind to ensure you’re keeping your video schema markup up to date:
- Whenever you replace your videos or make changes to the title, thumbnail, or description, you’ll need to update the schema markup code.
- Do not excessively stuff your video schema with keywords. Instead, include keyword phrases naturally.
- Always run your code or URL through a validation tool to test your schema markup.
- Perform a WordPress SEO audit regularly to identify and fix any new schema markup issues.
- Track how your video content is performing organically.
Measuring the Impact of Video Schema on SEO
Implementing video schema markup can help you improve your organic reach and boost WordPress SEO. But, you’ll want to measure the performance of the pages with video content to determine the impact it’s having.
There are a few ways you can measure this. The idea is to use SEO rank tracker tools for keyword tracking to see if your content is climbing up the search engine results.
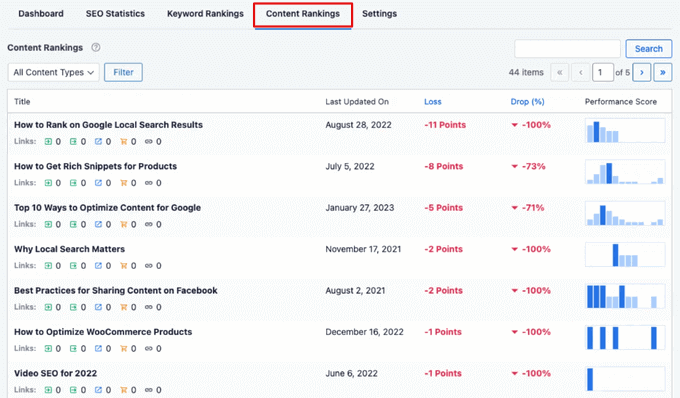
All in One SEO has a Content Rankings Report within the ‘Search Statistics’ addon.
Here, you can filter by all content types, including video. That way, you can track keywords on your site that use video content. You’ll want to monitor your content to see if it’s improving or experiencing content decay.
You could also use SEO tools like SEMRush for position tracking.
Beyond monitoring the keyword positioning of your content you also want to measure the video engagement.
Even if you’re attracting more visitors with the rich snippet, you could still see a stagnant dropoff in WordPress conversions, whether that is email signups or purchases.
You can track videos on your site by using MonsterInsights. It is the best WordPress analytics solution that allows you to set up Google Analytics in your WordPress dashboard without any coding.

All you have to do is head over to the ‘Media’ tab in MonsterInsights.
This will show you a graph of the video plays on your website.
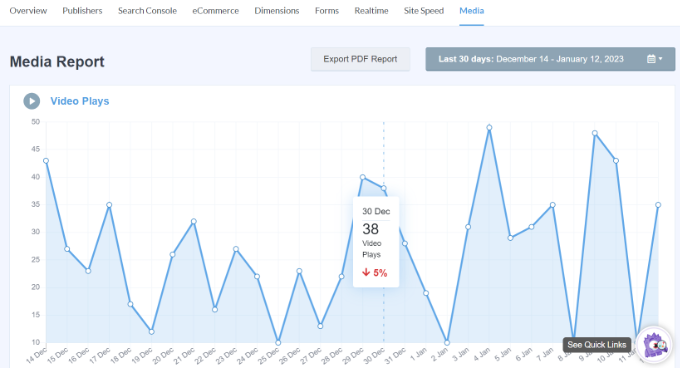
Scroll down, and you will see more in-depth information about each video.
The report will include metrics like the number of video plays, average watch time, average percentage watched, and completion rates.

If you want to learn more about video tracking, read our tutorial on how to track video analytics in WordPress.
Bonus: Adding Schema Markup for Local SEO
Besides optimizing your video SEO, there are plenty of other schema markups you can add, such as one for local SEO. With over 40% of users performing local searches, adding this schema is incredibly important for small businesses.
As a result, your business will appear in local search results.
All you need to do is head over to the All in One SEO » Local SEO page and click the ‘Activate Local SEO’ button.
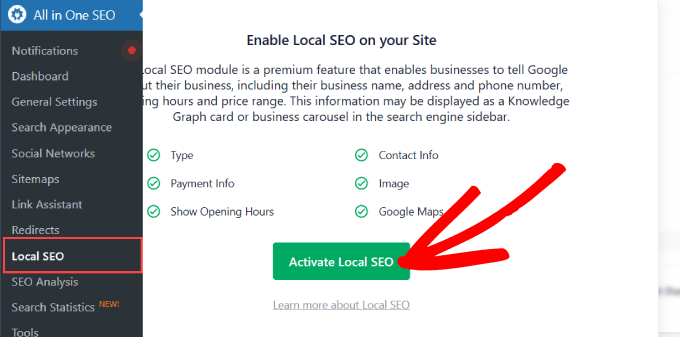
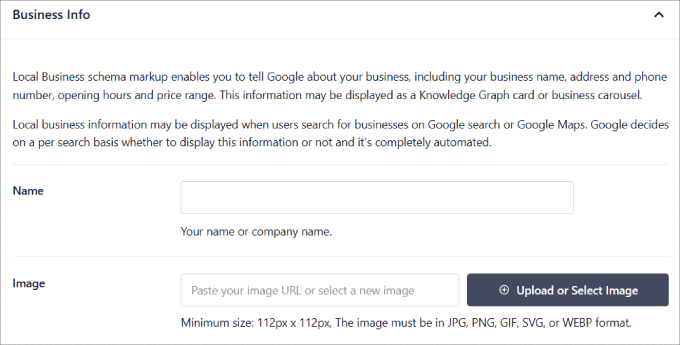
Then, under the Locations tab, you can add important information about your business.
You can include your business name, logo, phone number, business type, any payment options you accept, and more.
If you want step-by-step instructions, you can check out our tutorial on how to add schema markup in WordPress and WooCommerce.
We hope this article helped you learn how to easily add a video schema markup in WordPress. You may also want to see our guide on how to increase your blog traffic the easy way and our expert picks of the best keyword research tools for SEO.
If you liked this article, then please subscribe to our YouTube Channel for WordPress video tutorials. You can also find us on Twitter and Facebook.
این خبر را در ایران وب سازان مرجع وب و فناوری دنبال کنید
