Sometimes, adding images and visuals alone isn’t enough to hook visitors’ attention.
That’s where image hotspots can come to the rescue. These clickable areas can turn a simple picture into an engaging, informative experience for your visitors. We’ve experimented with them ourselves to showcase points on a map, tag team members in a photograph, and highlight product features.
If you’re wondering how to do the same, you’re in the right place. This guide will show you 2 simple methods to create an image hotspot for your WordPress website without any code.

When to Add Hotspots to Your Images in WordPress
Image hotspots are clickable spots that can turn simple pictures into interactive content that visitors can explore. But when should you think about adding hotspots to your images?
One good time to use hotspots is when you want to show off different parts of a product image.
Let’s say you’re selling a new phone. You can add hotspots to point out its camera, screen, and other features. This helps customers learn about the product without reading long descriptions.
Lots of home goods websites also use image hotspots to highlight the product details of items displayed in staged photos.
Hotspots are also great for making infographics and data visualization more engaging. Instead of cramming all the information into one image, you can hide extra details behind hotspots. When people click on different parts of the infographic, they can see more facts and figures.
If you run an eLearning website, then hotspots can improve the user experience and make your lessons more interactive. For example, you could add hotspots to a map, letting students click to learn about different countries or landmarks.
With that in mind, let’s look at how to easily add image hotspots to your WordPress website. We’ve come up with 2 methods, and you can use the quick links below to navigate through the article:
Expert Tip: Don’t have the time or desire to design your own website? Consider using our professional WordPress design services. Our expert designers can build you a stunning website at an affordable price, bringing your next project to life!
Method 1: Add Image Hotspots With SeedProd (For Landing Pages/Custom Themes)
This first method uses SeedProd, a drag-and-drop page builder, to add image hotspots to your WordPress website. We recommend this method if you’re creating a custom landing page or a custom WordPress theme and want to use a platform with an image hotspot block.
What we love about SeedProd is it offers over 350 landing page templates and theme kits for different industry categories, from online boutiques and cleaning services to SaaS companies. So, there’s an option for every type of site.
One thing you should consider is that if you just want a free solution to create image hotspots, then this method may not be for you. This is because SeedProd’s hotspot block is only available in the paid SeedProd versions. In that case, we recommend going with method 2.
For more information about the plugin’s features and pricing, check out our SeedProd review.
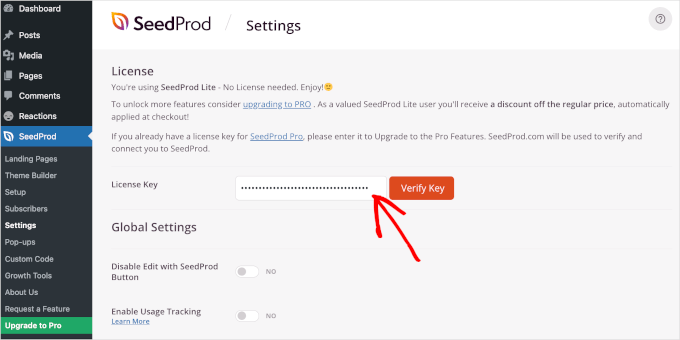
Once you have purchased a SeedProd plan, you can download and install the WordPress plugin in your admin area. After that, go to SeedProd » Settings and enter your license key. You can find this information on your SeedProd account page.
Once done, just click ‘Verify Key.’
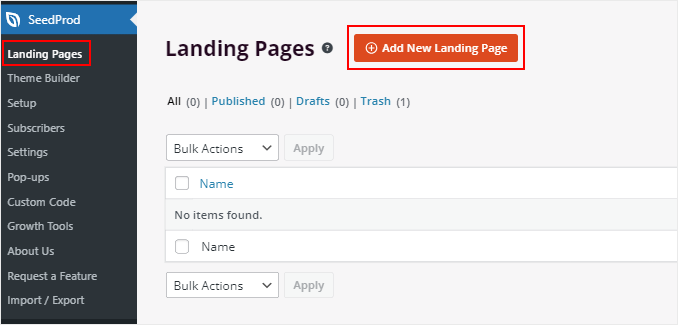
After that, navigate to SeedProd » Landing Pages.
Then, click ‘Add New Landing Page.’
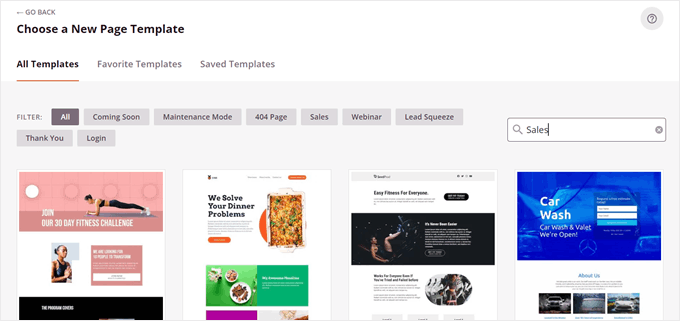
You will now see all the templates SeedProd offers. There are options for a viral waitlist landing page, a Google ad landing page, a coming soon page, and more.
Make sure to scroll through the options and preview them one by one so that you can choose the one that best suits your needs.
Once you have decided on a template, just hover over your selection.
Then, click the orange checkmark button.

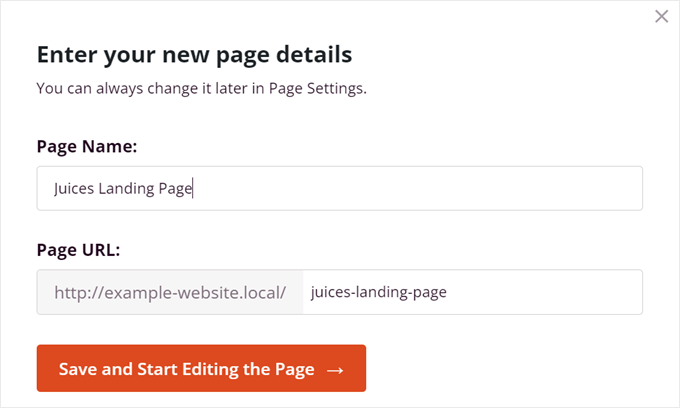
Now, a new popup will appear, asking you to name the page and insert its URL slug.
After you do that, click ‘Save and Start Editing the Page.’
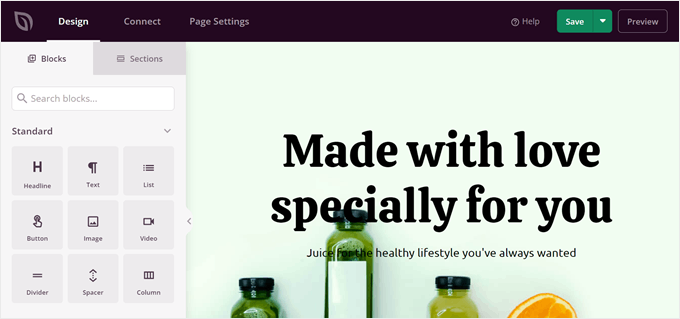
This will open the SeedProd drag-and-drop editor.
It works similarly to the WordPress block editor, where you can drag and drop blocks onto the page and click on them to customize them however you like.
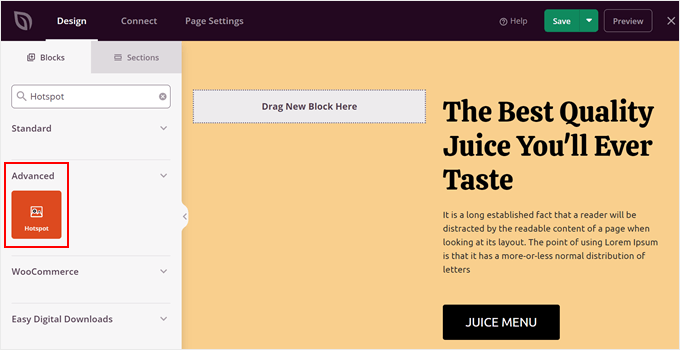
To create image hotspots, you can find the ‘Hotspot’ block in the left sidebar.
Then, just drag and drop it right on your page.
Next, you need to upload the WordPress image you want to add hotspots to.
You can do this by clicking on the ‘Hotspot’ block and choosing either ‘Use Your Own Image’ or ‘Use a Stock Image’ to select an image.
The first option will open the media library where you can pick an existing image or upload a new one. If the size is pretty large, you can check out our guide on how to upload large images in WordPress.

Once you have uploaded an image, you can input some alt text to describe the image for search engines and screen-reading tools.
You can also customize the image size and alignment.

After that, you can scroll down to start adding your hotspots.
You can do this by clicking on the ‘+ Add Hotspot’ button.

An orange dot will now appear on your image. You can adjust its position by dragging the horizontal and vertical orientation bars.
Additionally, you can insert the text that should appear when a user’s cursor hovers over the hotspot.

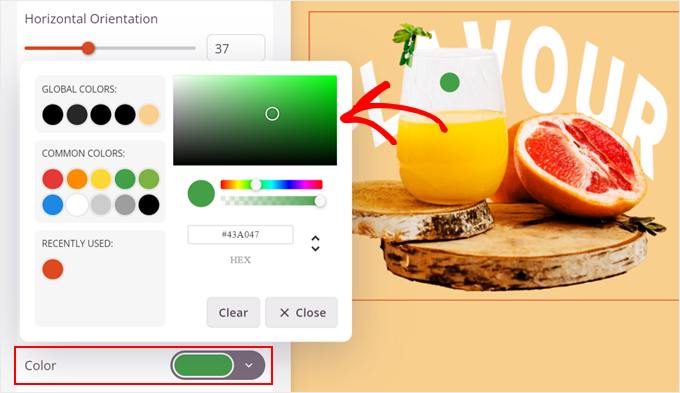
Moving down, you can change the color of the hotspot.
Simply click on the ‘Color’ settings to choose a color that suits your brand and website design.
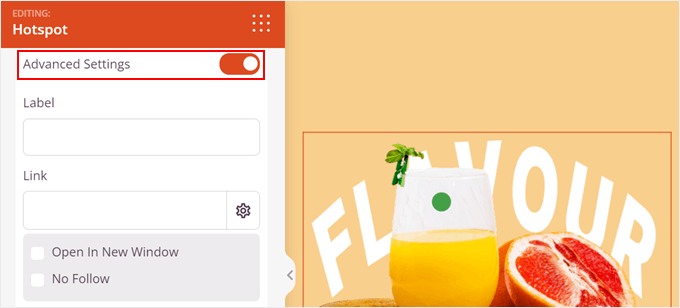
If you keep scrolling down, you can enable the ‘Advanced Settings’ toggle.
This is where you can add a link to your hotspot’s tooltip text so that users can be redirected to your desired page.
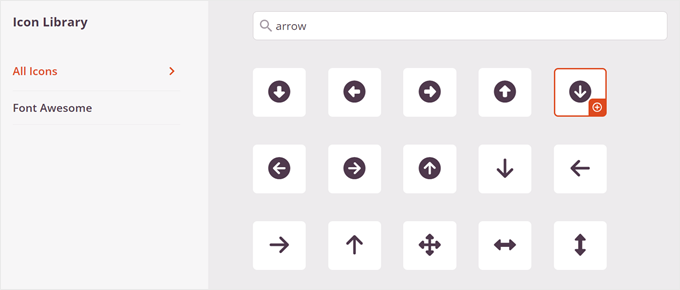
Besides that, you can choose a custom icon to replace the default circle shape.
To do this, just click the ‘Choose Icon’ button.

A popup window will appear where you can pick various icons from SeedProd’s library. You can also choose icons from Font Awesome if you need more options.
To use an icon, just click on it.
Once you have chosen an icon, you can drag the ‘Icon Size’ bar to make the shape smaller or bigger, depending on your preferences.
You can then repeat the steps to create more interactive image hotspots.
Below, you can add an animated effect to your image hotspots. There are 2 options: ‘Soft Beat’ and ‘Expand.’

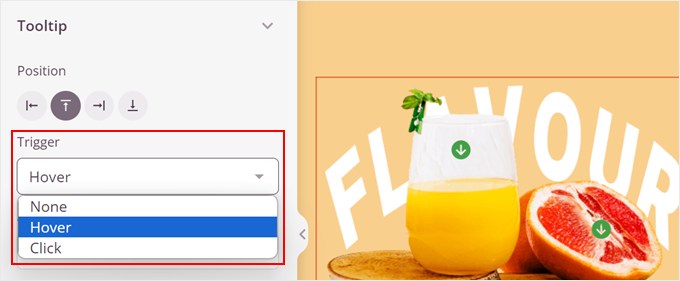
Now, let’s move down to the ‘Tooltip’ section.
Here, you can change the position of the tooltip (right, left, above, or below the hotspot) and change the trigger.
If you select ‘Click,’ that means the tooltip will show when the user clicks on the hotspot. On the other hand, ‘Hover’ means the tooltip will appear when the cursor hovers over it.
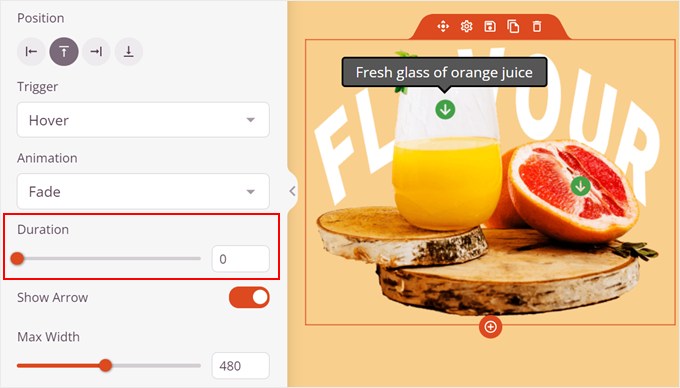
Next, you can change the duration of the tooltip.
This just refers to how long it will take for the tooltip to appear after the user hovers over or clicks on the hotspot. If you want to make the text show up instantly, then just set it to 0.
You can also disable the arrow of the tooltip, depending on your preferences.
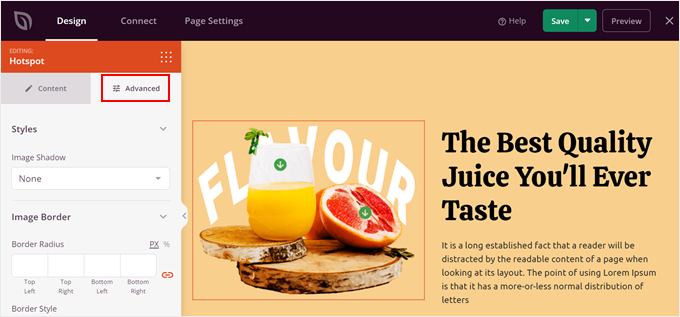
Now, if you switch to the ‘Advanced’ tab, you can customize the image’s appearance even more.
For example, you can add a box shadow or adjust the padding and margin.
Once you’re done, just click the ‘Save’ button in the top right corner.
Then, click ‘Publish’ to make the page live.

And that’s it! Make sure you view the page on mobile, desktop, and tablet to see if it looks good across all devices.
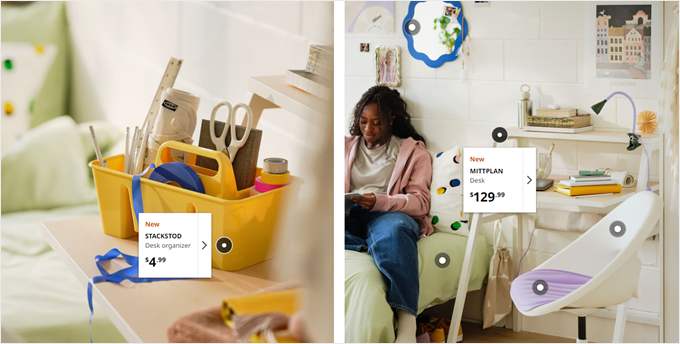
Here’s what our interactive image hotspot looks like:

Method 2: Add Image Hotspots With Image Hotspot Plugin (Free But Limited)
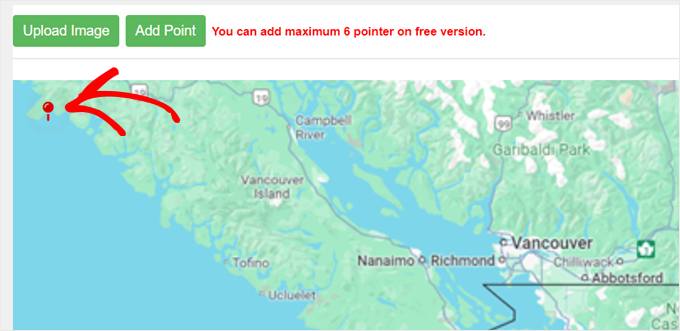
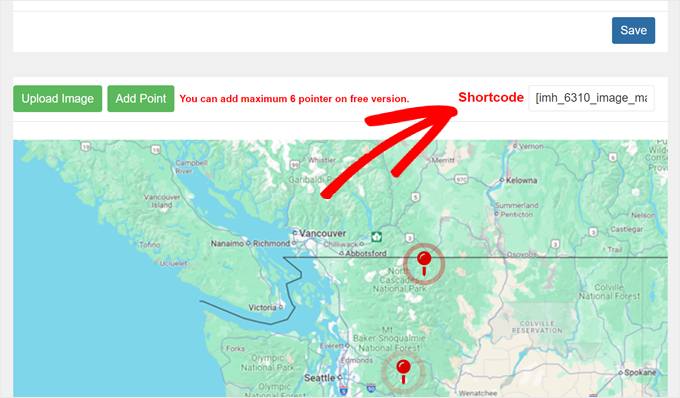
If using a page builder and switching your theme sounds like a bit too much, then you can use the free WordPress Image Hotspot plugin instead. This plugin is a great alternative to method 1, but do note that the free version only allows adding up to 6 hotspots on a single image.
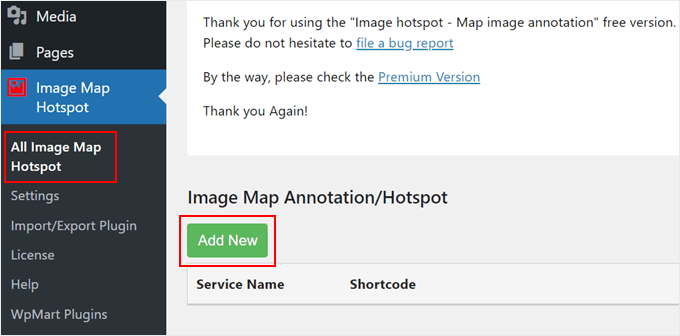
To use Image Hotspot, you can install and activate the WordPress plugin in your admin area. Then, go to Image Map Hotspot » All Image Map Hotspot and click on the ‘Add New’ button.
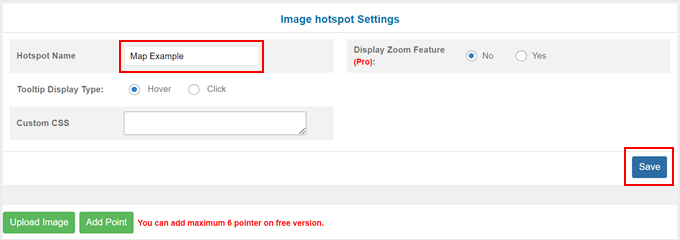
Now, go ahead and give your new image map hotspot a name. Then, select one of the tooltip display types. You can either make the hotspot’s tooltips appear by hovering or clicking.
Once done, click ‘Save.’
With that finished, let’s add your image.
To do this, just click the ‘Upload Image’ button.
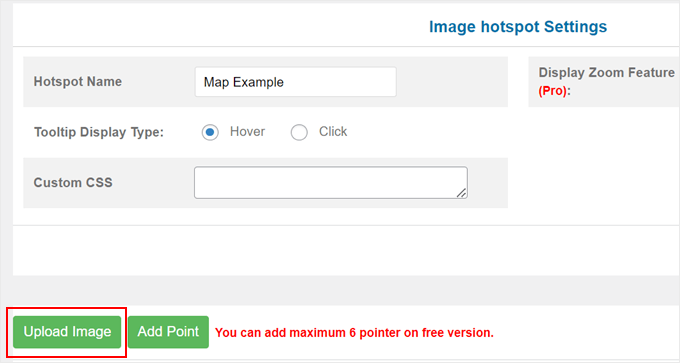
This will open the media library, where you can upload a new image or select an existing one.
Next, you can add hotspots to your image map. Simply click on the ‘Add Point’ button to do this.
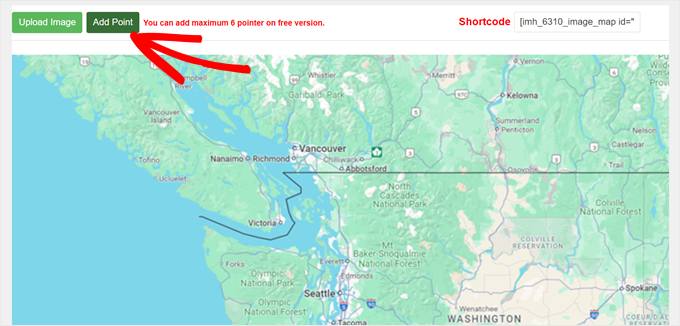
A popup window will now appear for you to configure your interactive image hotspot.
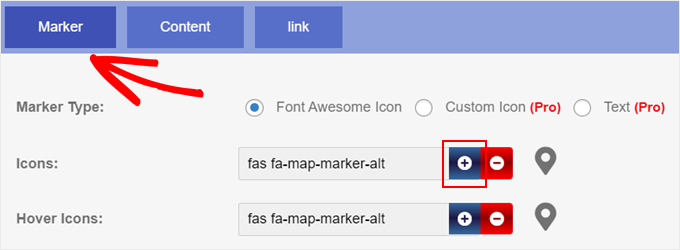
First, navigate to the ‘Marker’ tab. This is where you can customize what the hotspot image looks like. To change the icons, you can click the ‘+’ sign next to the ‘Icons’ and/or ‘Hover Icons’ fields.
‘Icons’ refers to the default hotspot symbol when it is not being clicked or hovered over. Meanwhile, ‘Hover Icons’ is the symbol that appears when the user is clicking or hovering on the hotspot.
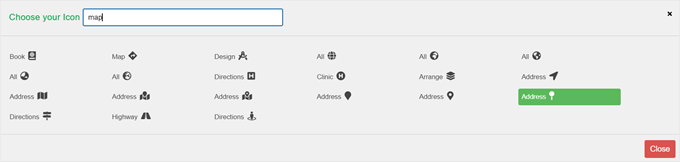
Now, go ahead and select an icon to replace the current default option. The plugin has plenty to choose from.
Once you’ve made your choice, just click on it and hit the ‘Close’ button.
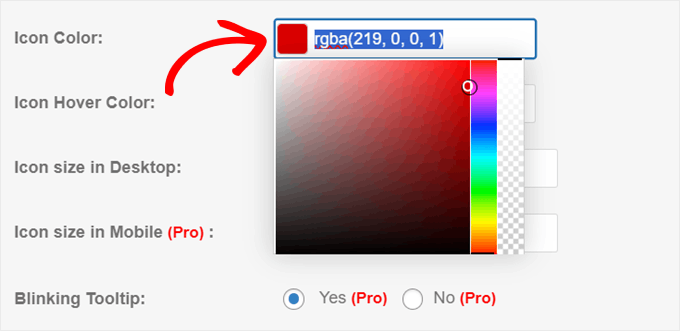
With your hotspot images set up, you can change the colors of the icons.
The plugin lets you make the default hotspot icon color different from the icon hover color. This way, users can easily tell if a hotspot is active when they click or hover on it.
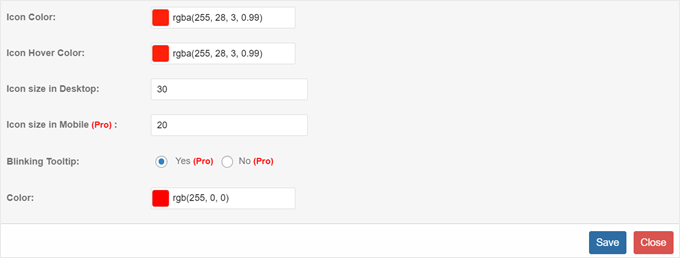
To change the color, just click on the square color selection button and select the color you’d like to use.
You can then click anywhere on the page to move on to another setting.
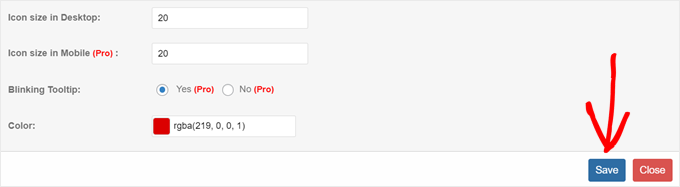
You can also customize the hotspot’s icon size on desktop. The higher the number, the bigger the icon will be.
Once you’re happy with the icon’s appearance, just click ‘Save.’
Now, scroll up and switch to the ‘Content’ tab. This is where you can customize the tooltip’s text and appearance.
The plugin gives you 4 templates to choose from, so you can pick the one that best suits your website design.
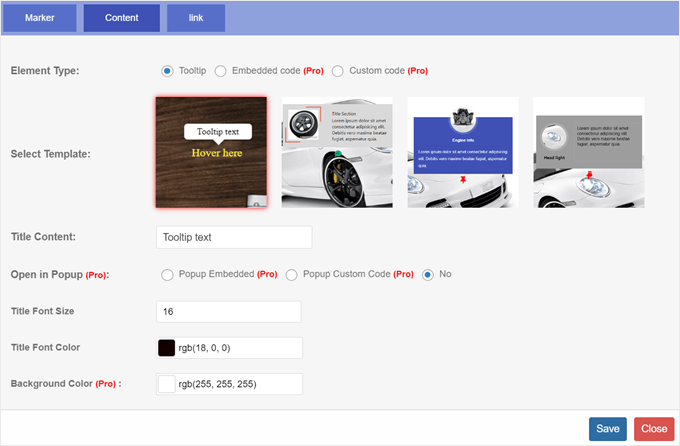
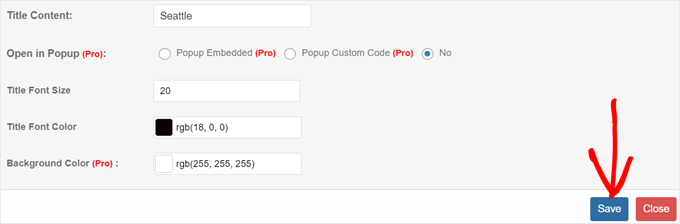
Other than that, make sure to replace the default title content with your own text.
And depending on your website design, you may want to make the font size bigger and change the text color to improve its readability.
When you’re satisfied with the settings, simply click ‘Save.’
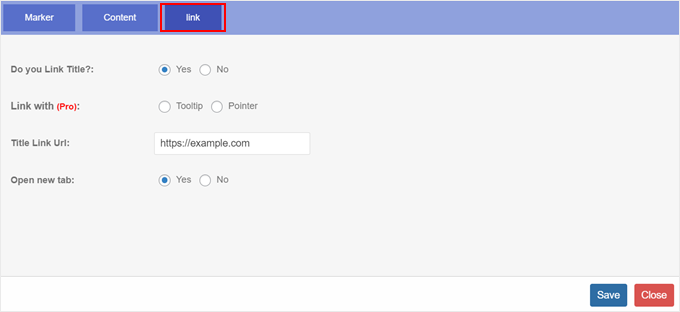
The last tab is ‘link.’ Here, you have the option to make your tooltip text hyperlinked, so that users can be redirected to a different page.
If you want to do this, then select ‘Yes’ in the ‘Do you Link Title?’ setting.
After that, insert your title link URL in the appropriate field and choose whether you want to make the link open in a new tab or not.
Finally, click ‘Save.’
Now, a new hotspot should appear on your image, which you can drag to your desired position.
You can also repeat the same steps as before to create more image hotspots.
Once you have your image map configured, you can click on the ‘Save’ button again.
To add the image hotspot to any of your pages, posts, and/or widgets, you can copy the shortcode above the image.
After that, just paste the shortcode into a shortcode block on your widget, page, or post in the block editor. You can learn more about doing this in our step-by-step guide on how to add and use shortcodes in WordPress.
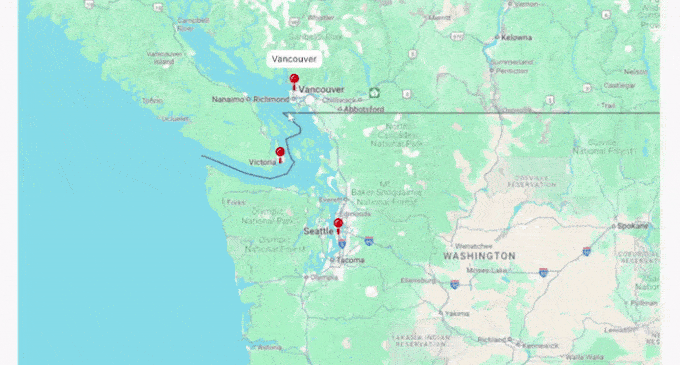
Here is what our interactive image hotspot looks like:
Discover More Exciting Design Features for Your WordPress Website
Besides creating interactive image hotspots, there are a lot more ways to make your website design engaging. Here are some guides to help you:
- How to Add Infinite Scroll to Your WordPress Site (Step by Step)
- How to Create a Visual Sitemap in WordPress (Step by Step)
- How to Create a Sticky Floating Footer Bar in WordPress
- How to Add a Font Resizer in WordPress for Accessibility
- How to Add a Click-to-Call Button in WordPress (Step by Step)
- How to Add a Custom Scrollbar in WordPress
- How to Add a Progress Bar in Your WordPress Posts
- How to Create a Custom Shape Divider in WordPress
- How to Add a Scrolling News Ticker in WordPress
We hope this article helped you learn how to easily add image hotspots in WordPress. You may also want to check out our ultimate guide of WordPress sidebar tricks to get maximum results and our expert picks of the best WordPress theme builders.
If you liked this article, then please subscribe to our YouTube Channel for WordPress video tutorials. You can also find us on Twitter and Facebook.
The post How to Add Image Hotspots in WordPress (The Easy Way) first appeared on WPBeginner.
این خبر را در ایران وب سازان مرجع وب و فناوری دنبال کنید