How to Track Customer Journey Using MemberPress (Step by Step)
Would you like to know what visitors do on your membership site before they sign up?
When you track your customers’ journeys in MemberPress, you can discover the steps they take before deciding to purchase a membership. This information can help you optimize your site for better user engagement and increased conversions.
In this article, we will show you how to track customer journeys using MemberPress.
Why Track Customer Journey Using MemberPress?
When you are running a WordPress membership site, your customers will need to purchase a user account to access certain benefits, such as exclusive content, premium newsletters, online courses, or digital downloads.
MemberPress is a popular membership plugin that comes with advanced features.
For example, it allows you to accept payments, add membership levels, create gated content, restrict access based on different membership levels, make members-only forums, and more.
Wouldn’t it be great if you could see the path your MemberPress customers take before making a purchase? You could see which pages they land on, follow their journey as they navigate to other parts of your site, and even see how long they spend on each page.
This information can give you insights into your customer’s behavior that you can use to offer a better user experience on your WordPress website, as well as boost your sign-ups.
That being said, let’s take a look at how to easily track MemberPress customer journeys. Here are quick links that you can use to jump ahead to any section:
Tracking MemberPress Customer Journeys Using MonsterInsights
The fastest and simplest way to set up MemberPress customer tracking is with the MonsterInsights plugin. It lets you view your Google Analytics traffic and visitor statistics right from the WordPress dashboard.
The plugin offers an eCommerce addon. This feature automatically detects MemberPress and other eCommerce plugins. Then, it starts tracking customer behavior in Google Analytics.
It also comes with a Customer Journey addon that allows you to see users’ behavior before they sign up.
First, you will need to install and activate the MonsterInsights plugin. For more details, see our step-by-step guide on how to install a WordPress plugin.
Note: You will need the Pro plan to access the eCommerce and User Journey addons that we will use for this tutorial. However, there is also a MonsterInsights Lite version you can use for free.
Upon activation, you will see the welcome screen and the setup wizard. Simply click the ‘Launch the Wizard’ button and follow the on-screen instructions.

For detailed instructions, see our article on how to install Google Analytics in WordPress.
Bonus: Switch to Google Analytics 4 Using MonsterInsights
MonsterInsights also helps you set up a Google Analytics 4 (GA4) property through its Dual Tracking feature. GA4 is the latest version of Google Analytics.
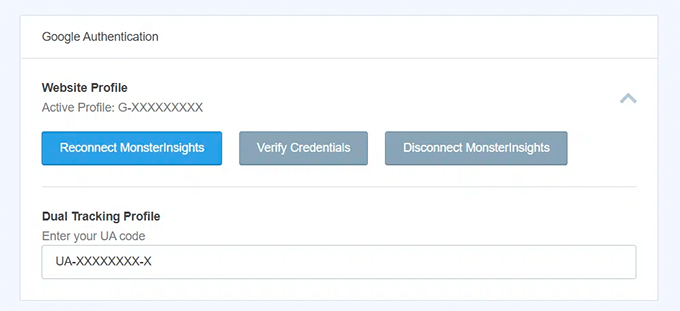
If you haven’t created a Google Analytics 4 property yet, then we encourage you to do it right away.
For more details, please see our guide on how to switch to Google Analytics 4 in WordPress.
Installing the eCommerce Addon in MonsterInsights
Once you have configured Google Analytics on your website, the next step is to install the eCommerce addon.
To do that, you need to visit the Insights » Addons page and navigate to the ‘eCommerce’ addon. Simply click the ‘Install’ button, and the addon will automatically activate.
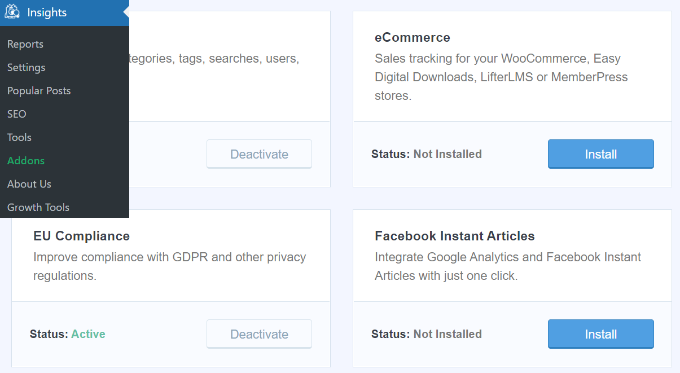
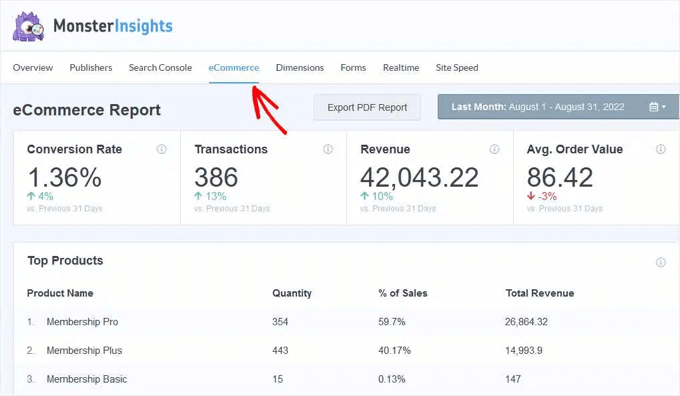
As soon as it is activated, the addon will begin to gather data. You will find this data in the MonsterInsights eCommerce Report.
You can access the report by navigating to Insights » Reports and then clicking on the ‘eCommerce’ tab. You may need to wait up to 24 hours to see any metrics.
Enabling Enhanced eCommerce Reporting in Google Analytics
The next step is to enable eCommerce tracking in Google Analytics. eCommerce tracking is not enabled by default in Google Analytics, so you must manually turn it on.
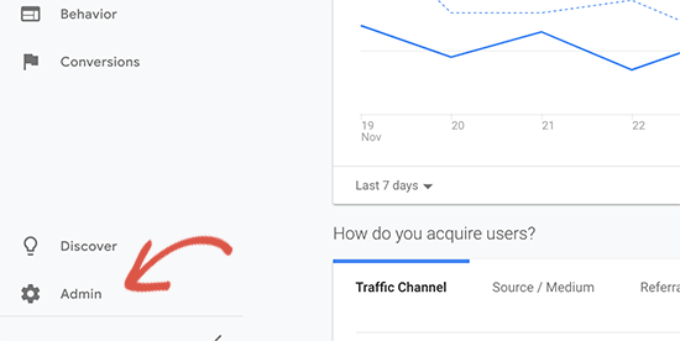
First, you will need to head over to your Google Analytics account dashboard and click the ‘Admin’ option.
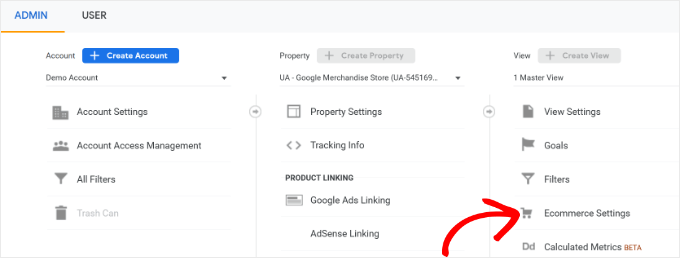
Next, you need to click on the ‘Ecommerce Settings’ option.
It is located in the View column.
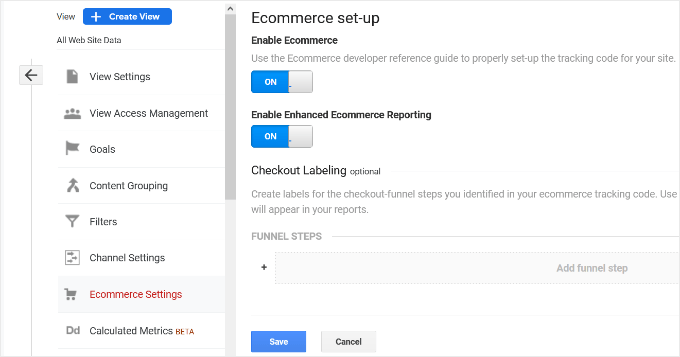
On the settings page, just click the sliders under ‘Enable Ecommerce’ and ‘Enable Enhanced Ecommerce Reporting’ to turn them on.
Don’t forget to click the ‘Save’ button when you are done.
Now that you have enabled the enhanced eCommerce settings in Google Analytics, you can head back to your WordPress website dashboard.
Simply navigate to Insights » Settings and then click the ‘eCommerce’ tab.
Next, you will need to make sure that the ‘Use Enhanced eCommerce’ option is enabled under the eCommerce Tracking section.
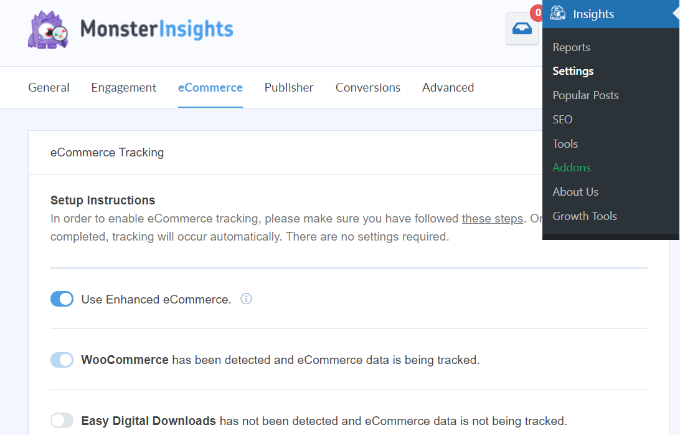
MonsterInsights will now automatically detect that you are using MemberPress and start recording analytics.
Installing the User Journey Addon in MonsterInsights
Now that Google Analytics is tracking your MemberPress site, the next step is to enable the MonsterInsights Customer Journey addon.
This addon will allow you to see the steps each customer takes before making a purchase in MemberPress, such as the pages they visit, the time spent on each page, and more.
First, you will need to go to Insights » Addons from your WordPress admin panel. Next, navigate to the User Journey addon and click the ‘Install’ button.
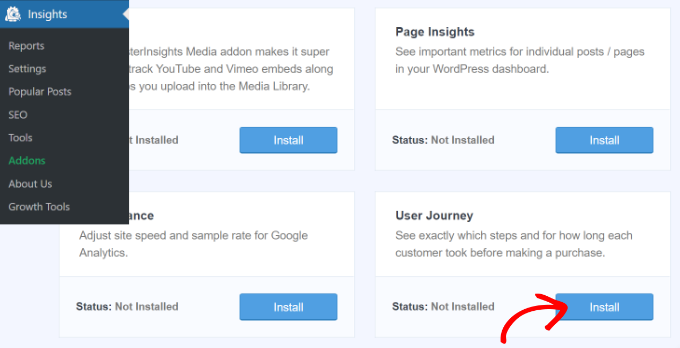
The addon will automatically activate and start tracking your customers’ journeys.
Viewing MemberPress Customer Journeys
The User Journey addon is now active. Once a visitor purchases a membership on your site, their customer journey will be automatically recorded and saved.
You might be wondering where to find that information.
Simply navigate to MemberPress » Transactions to see a list of your MemberPress orders.

You can see the details of a transaction by clicking its transaction number in the first column.
Now, you can simply scroll to the bottom of the transaction details to find the ‘User Journey by MonsterInsights’ section.
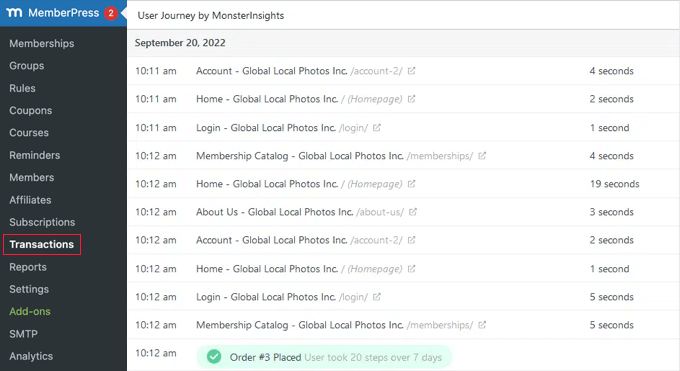
You will be able to see each step the user took along the way to purchasing a membership.
This includes the time they viewed each page, the titles of the pages they visited with a link, and the time they spent on each page. You will also see the total number of steps and time a user took before becoming a paying customer.
That’s a lot of information about the journeys your visitors take to become paying members. How can you use all of that data?
Using Customer Journey Tracking in MemberPress
Now that you are tracking MemberPress customer journeys, here are a few suggestions for using that data to improve your website and increase conversions.
Is there a post or page on your website that many visitors read before purchasing a membership? You can increase your sales and conversion rates by sending more traffic there.
For example, you can add more internal links to that post or page from other posts on your website.
You can also look for users who purchased a membership taking fewer steps or less time. Do they have anything in common so that you can start to target similar users?
For instance, are they from a similar location or age group? Or did they come from the same referral source?
You can also look at all of the pages your visitors are reading. What do most users want to know before they make a purchase? Can you simplify their journey by offering that information on a single landing page that tells them everything they need to know?
As you take time to study customer journeys in MemberPress, you will learn more about your online sign-up process and sales funnel. You can use that knowledge to improve the user experience and increase sales.
We hope this tutorial helped you learn how to track customer journeys using MemberPress. You may also want to see our guide on how to start your own podcast or our expert picks for the best AI chatbots for your website.
If you liked this article, then please subscribe to our YouTube Channel for WordPress video tutorials. You can also find us on Twitter and Facebook.
این خبر را در ایران وب سازان مرجع وب و فناوری دنبال کنید