How to Add Multiple Galleries in WordPress Posts and Pages
Do you want to add multiple image galleries to your WordPress posts and pages?
With multiple image galleries, you can show off different types of content on your website and improve your SEO and user experience. However, the default WordPress Gallery block lacks certain features.
In this article, we will show you how to easily add multiple galleries in your WordPress posts, pages, and sidebar.
Why Add Multiple Galleries in WordPress?
WordPress is used by thousands of photographers, artists, and designers to share their work with the world. Many website owners also use images and photo galleries to show the products in their online stores or make their content more visually interesting.
Many WordPress websites want to display their photos in different ways, including adding multiple galleries in a single post, adding galleries into sidebars, creating slideshows, and so on.
For example, if you have a food blog, then you may want to create separate image galleries for your recipes and restaurant reviews.
Similarly, if you run a fashion blog, then you can use multiple galleries to display your fall, winter, or spring collections separately.

WordPress comes with a built-in gallery feature that you can use to make and show image galleries.
However, these galleries lack functionality like opening images in a lightbox, browsing images without leaving the page, adding tags, creating albums, and more.
Most importantly, your galleries are not stored separately. This means that if you want to reuse a gallery in another post, then you will need to make it all over again.
That being said, let’s take a look at the best way to add multiple galleries in WordPress posts and pages.
How to Add Multiple Image Galleries in WordPress
You can easily add multiple image galleries to WordPress posts and pages using Envira Gallery.
It is the best WordPress gallery plugin on the market that allows you to create beautiful image galleries on your WordPress site.
With Envira Gallery, your users can view your images in a lightbox popup. They can also browse images without leaving the page, and you can even reuse your galleries in other posts and pages.
First, you need to install and activate the Envira Gallery plugin. For more details, see our step-by-step guide on how to install a WordPress plugin.
Note: Envira Gallery also has a free version that you can use for this tutorial.
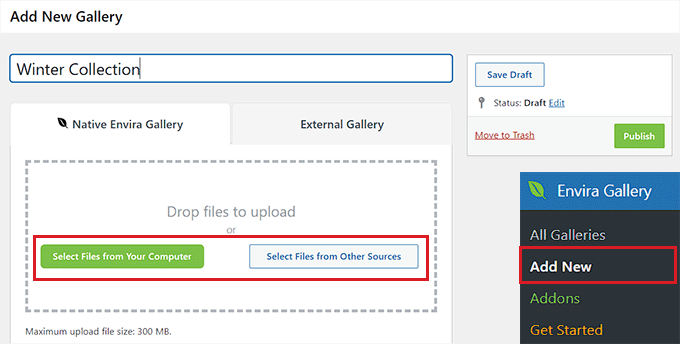
Upon activation, you need to visit the Envira Gallery » Add New page from the WordPress admin sidebar to start creating a gallery for your website.
From here, you can start by typing a name for your gallery.
Next, click the ‘Select Files from Your Computer’ button to upload gallery images from the computer.
If you want to add images from the WordPress media library, then click the ‘Select Files from Other Sources’ button instead. Keep in mind that if you use this option, then you can only upload a single image at a time from the media library.
Once you have done that, scroll down to the ‘Currently in your Gallery’ section.
Here, you will see a preview of all the images that you have uploaded to your Envira gallery.
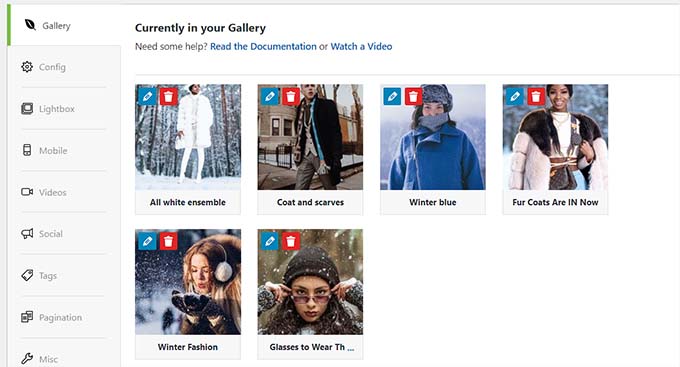
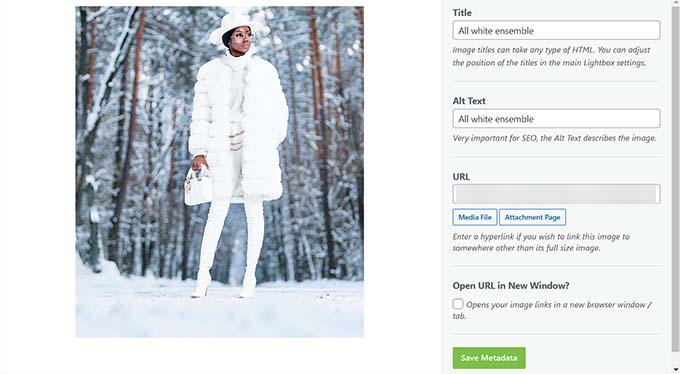
Now, you can click on the pencil icon at the top of each image to open the ‘Edit Metadata’ prompt on the screen.
From here, you will be able to add the caption, status, title, and alt text for individual images.
Once you are happy, don’t forget to click the ‘Save Metadata’ button to store your settings.
Next, you can switch to the ‘Configuration’ tab from the left sidebar to change your gallery layout, including choosing the number of columns, image lazy loading, size, title and caption positioning, margins, heights, and more.
You can also switch to the ‘Lightbox’ tab to check the ‘Enable Lightbox’ option. This will allow users to enlarge images and browse them without ever leaving the page.
After that, you can also configure other settings, including videos, social sharing, tags, pagination, and more.
For detailed instructions, see our beginner’s guide on how to create an image gallery in WordPress.
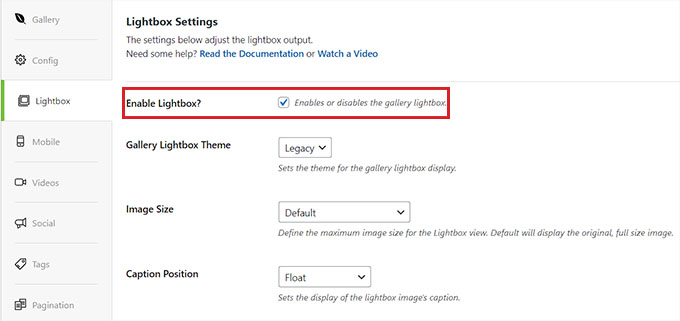
Finally, click the ‘Publish’ button at the top to store your settings.
Once you have done that, just repeat the process to create another image gallery for your WordPress blog. You can create as many image galleries with Envira Gallery as you want.
Adding Galleries to WordPress Posts or Pages
Now that you have created multiple image galleries, it’s time to add them to your WordPress posts and pages.
To do this, just open a page/post of your liking in the WordPress content editor.
Once you are there, click the ‘+’ button in the top left corner of the screen to open the block menu. From here, find and add the Envira Gallery block to the page or post.
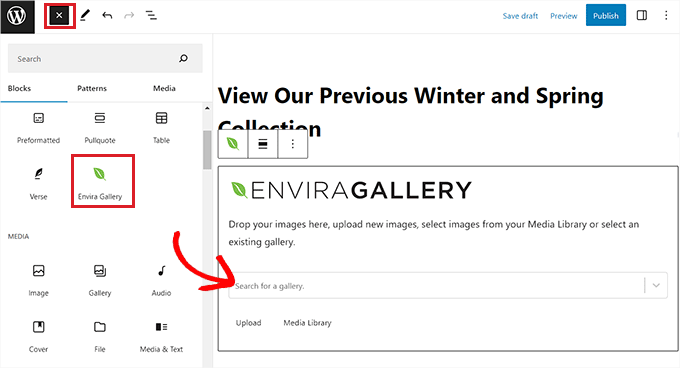
Next, you need to select one of the galleries that you created from the dropdown menu in the block itself.
After that, open the block menu once again and add the ‘Envira Gallery’ block to select a different gallery.
Once you have done that, you can change the gallery layout, enable the lightbox, or set the row height from the block panel as well.
You can even upload new images to your gallery by clicking the ‘Upload’ or ‘Media Library’ button under each gallery.
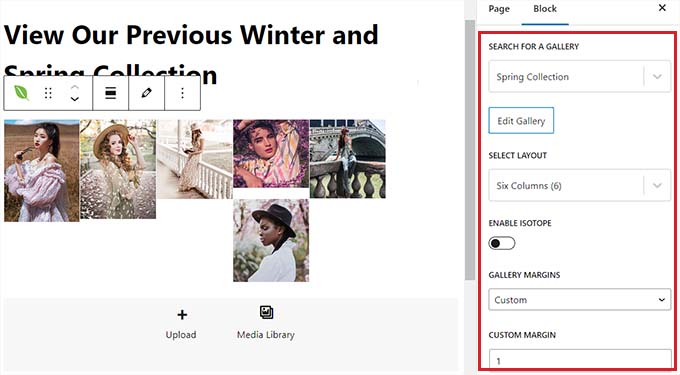
Finally, click the ‘Publish’ or ‘Update’ button at the top to store your settings.
Now, you can visit your WordPress site to view the multiple image galleries in action.

Adding Multiple Galleries in WordPress Sidebars
Envira Gallery makes it super easy to add your galleries to sidebars and other widget-ready areas.
First, you need to visit the Appearance » Widgets page from the WordPress dashboard.
Note: If you are using a block theme, then you won’t be able to see the widgets menu. Instead, you can jump to our next method, where we show you how to insert multiple galleries using the full site editor.
Once you are there, just click the ‘+’ button at the top left corner to open the block menu and add the Envira Gallery block to the sidebar.
Upon adding it, you must select an image gallery from the dropdown menu within the block itself.
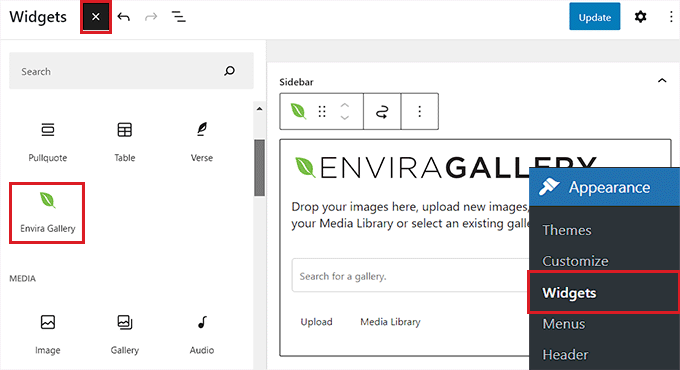
Next, simply repeat the process to add another image gallery to the WordPress sidebar.
Once you have done that, you can further configure the layout for each gallery from the block panel on the right side of the screen.
You can also click on the pencil icon in the block toolbar to launch the gallery edit screen.
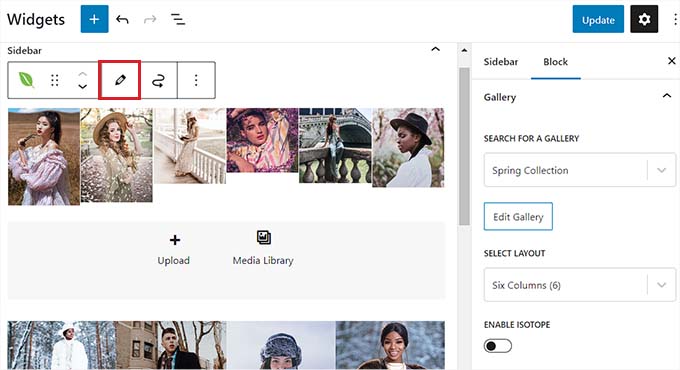
Once you are happy with your image galleries, click the ‘Update’ button at the top to save your changes.
Now, go ahead and visit your WordPress site to view multiple image galleries in your sidebar.

Adding Multiple Galleries in WordPress Full Site Editor
If you are using a block theme, then the ‘Widgets’ menu tab won’t be available for you.
Instead, you need to visit the Appearance » Editor page from the WordPress dashboard and select the ‘Templates’ option from the left column.
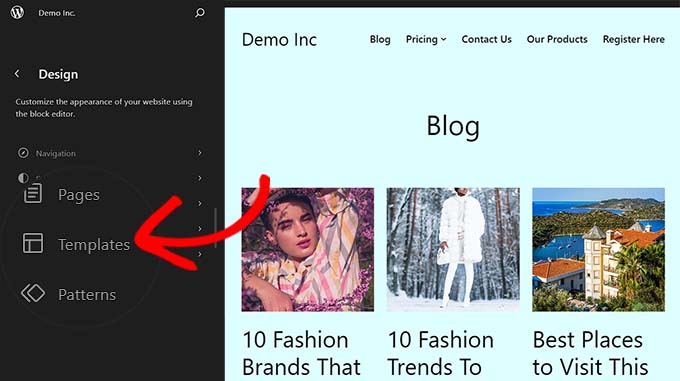
This will open a list of all the pages on your website in the left column. From here, select the page where you want to add the galleries.
This will open the page in the WordPress full site editor.
From here, click the ‘+’ add block button to open the block menu and select the ‘Envira Gallery’ block. After that, you need to pick the gallery that you created from the dropdown menu within the block.
Next, just repeat the process again to add another gallery.
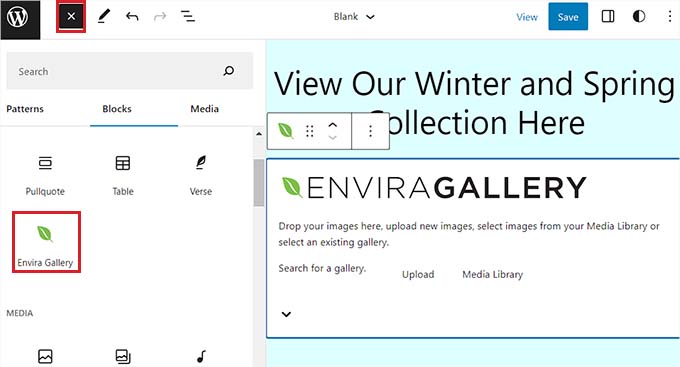
After that, you can configure the gallery settings from the block panel.
Alternatively, you can click the pencil icon in the block toolbar to launch the gallery edit screen.
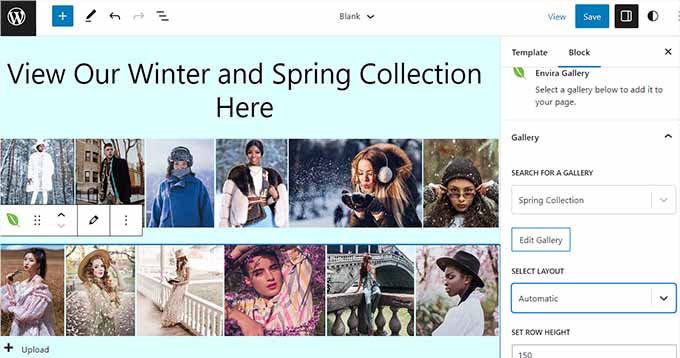
Finally, click the ‘Save’ button at the top to store your settings.
Now, visit your WordPress site to view the multiple image galleries.

Bonus: Add Video Galleries to Your WordPress Site
With Envira Gallery, you can also add a video gallery to your WordPress blog using the Envira Videos Addon. This can help you show off your filmography, products, or informational video clips on your website.
This can help improve your site’s SEO, showcase your expertise, and increase user engagement.
Envira Gallery is also one of the best YouTube video gallery plugins for WordPress. This is because it allows you to create a YouTube gallery on your site simply using the URL for each video. It also lets you adjust the playback sound, use video autoplay, use fullscreen by default, hide the playback controls, and much more.
To learn more, you can see our list of the best YouTube video gallery plugins for WordPress.
We hope this article helped you add multiple galleries to WordPress posts and pages. You may also want to see our guide on how to create a photo gallery with albums in WordPress and our list of the best WordPress portfolio plugins.
If you liked this article, then please subscribe to our YouTube Channel for WordPress video tutorials. You can also find us on Twitter and Facebook.
این خبر را در ایران وب سازان مرجع وب و فناوری دنبال کنید
