How to Add a Dynamic Copyright Date in WordPress Footer
Do you want to add a dynamic copyright date in your WordPress website’s footer?
A website with an outdated copyright date can look unprofessional. Adding a dynamic copyright date to your site’s footer shows visitors that your website is up-to-date and regularly maintained.
In this article, we will show you how to easily add a dynamic copyright date in the WordPress footer.

Why Add a Dynamic Copyright Date in WordPress Footer?
A copyright date typically covers the current year or range of years in which the content, design, and code of your WordPress website are protected by copyright laws.
The copyright date on your website should be current, but manually updating it takes time, and you might forget to do it.
That’s where a dynamic copyright date can help. It will automatically update to ensure that the date is accurate and meets the copyright laws of different countries.
It also helps protect your content from copyright infringement and plagiarism.
Plus, an updated copyright date also signals to search engines that your website is well-maintained and active. This can help improve your website’s search engine rankings and attract more traffic to your site.
In this article, we will show you how to easily add a dynamic copyright date in the WordPress footer. You can use the quick links below to jump to the method you want to use:
Method 1: Add Dynamic Copyright Date Using WPCode (Recommended)
If you want to generate a dynamic copyright date that covers all the years from the start of your WordPress blog until the current year, then this method is for you. It works by using the published date of your oldest post and your newest post.
To add a dynamic copyright date to your WordPress footer, many tutorials will tell you to add custom code to your theme’s functions.php file. However, the smallest error while typing the code can break your website.
That’s why we recommend using WPCode, which is the best WordPress code snippets plugin on the market. It is the easiest and safest way to add code to your website.
First, you will need to install and activate the WPCode plugin. For more instructions, you may want to see our tutorial on how to install a WordPress plugin.
Note: You can also use the free WPCode plugin for this tutorial. However, upgrading to the Pro version will give you access to a cloud library of code snippets, smart conditional logic, and more.
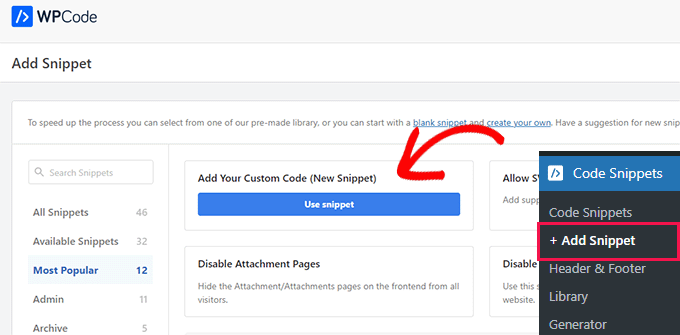
Upon activation, just visit the Code Snippets » + Add Snippet page from the WordPress admin sidebar.
From here, go to the ‘Add Your Custom Code (New Snippet)’ option and click on the ‘Use Snippet’ button under it.
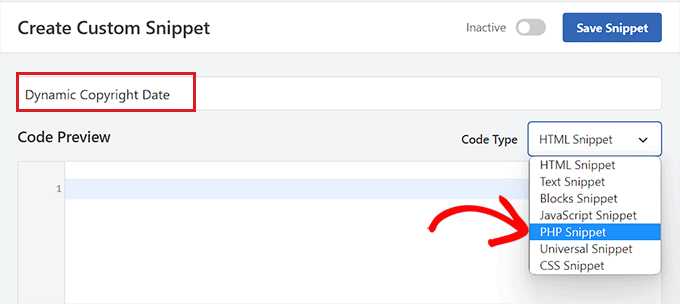
This will direct you to the ‘Create Custom Snippet’ page, where you can start by typing a name for your code snippet.
Keep in mind that this name won’t be displayed on the front end and is only used for identification purposes.
After that, you need to choose ‘PHP Snippet’ as the Code Type from the dropdown menu in the right corner.
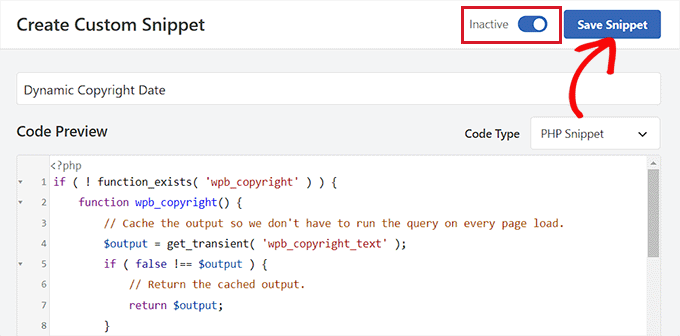
Once you have done that, simply copy and paste the following code into the ‘Code Preview’ box:
if ( ! function_exists( 'wpb_copyright' ) ) {
	function wpb_copyright() {
		// Cache the output so we don't have to run the query on every page load.
		$output = get_transient( 'wpb_copyright_text' );
		if ( false !== $output ) {
			// Return the cached output.
			return $output;
		}
		global $wpdb;
		$copyright_dates = $wpdb->get_results(
			"SELECT YEAR(min(post_date_gmt)) AS firstdate, YEAR(max(post_date_gmt)) AS lastdate FROM $wpdb->posts WHERE post_status="publish""
		);
		$output="";
		if ( $copyright_dates ) {
			$output="© " . $copyright_dates[0]->firstdate;
			if ( $copyright_dates[0]->firstdate !== $copyright_dates[0]->lastdate ) {
				$output .= '-' . $copyright_dates[0]->lastdate;
			}
			// Set the value as a transient so we only run the query 1x per day.
			set_transient( 'wpb_copyright_text', $output, DAY_IN_SECONDS );
		}

		return $output;
	}
}

echo wpb_copyright();
Upon activation, this code will automatically fetch data and display your copyright date according to the oldest and newest post on your website.
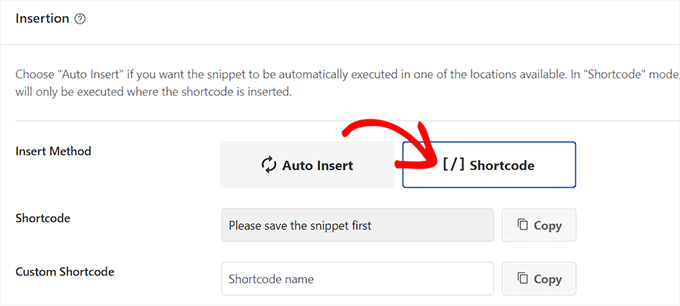
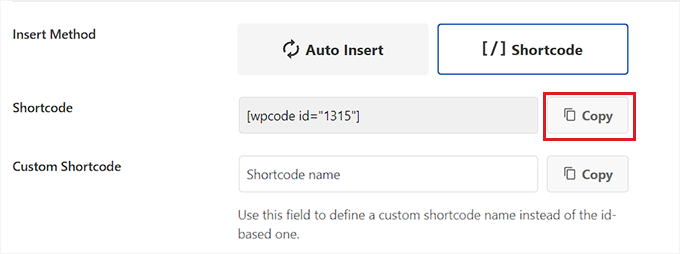
Next, scroll down to the ‘Insertion’ section and choose the ‘Shortcode’ method.
We are using this method because we want to specifically add code to the WordPress footer.
Finally, scroll back to the top and toggle the ‘Inactive’ switch to ‘Active’.
Once you have done that, just click the ‘Save Snippet’ button to store your settings.
Now, you have to scroll back to the ‘Insertion’ section and copy the shortcode by clicking on the ‘Copy’ button next to it.
Keep in mind that you won’t be able to copy the shortcode until you have activated and saved the code snippet.
Add Dynamic Copyright Date to the WordPress Footer Using a Widget
You now need to add the shortcode to your WordPress footer. This method is for you if you are using a classic theme without the full site editor.
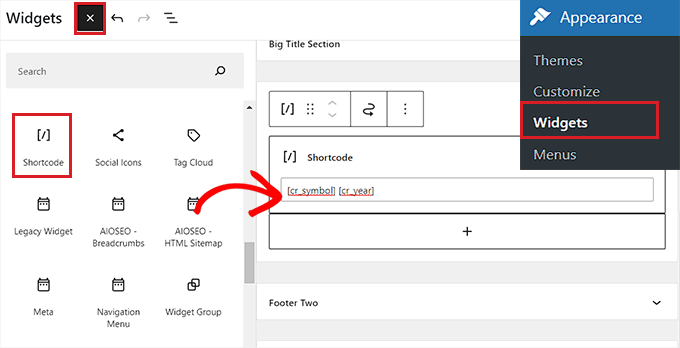
Once you have copied the shortcode, head over to the Appearance » Widgets page from the WordPress admin sidebar.
From here, scroll down to the ‘Footer’ tab and expand it.
For this tutorial, we are using the Hestia Pro theme. Depending on the theme that you are using, your widgets page may look a bit different.
Next, you need to click on the ‘+’ button in the top left corner of the screen and look for the Shortcode block.
Upon finding it, just add the block to the ‘Footer’ tab and then paste the WPCode shortcode into it.
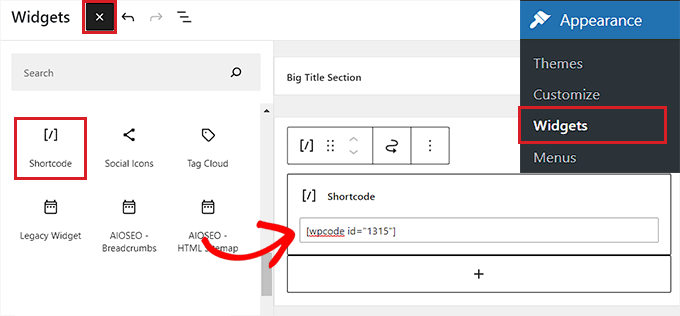
Finally, click the ‘Update’ button at the top to save your changes.
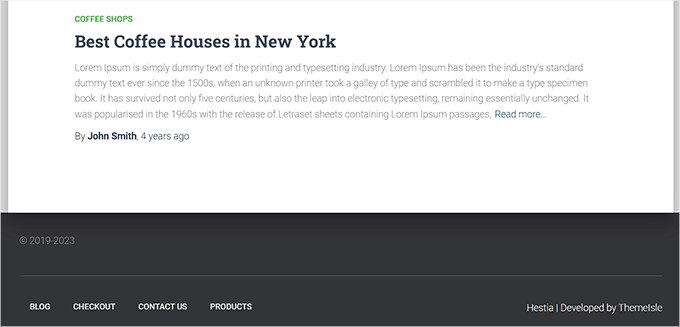
Now, you can visit your website to check out the dynamic copyright date in action.
Add a Dynamic Copyright Date in a Block-Based Theme
If you are using a block-based theme on your WordPress website, then you can use this method to add the copyright shortcode to the footer.
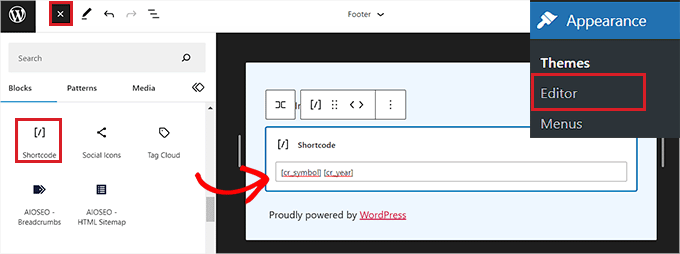
First, you need to visit the Appearance » Editor page from the WordPress admin sidebar. This will launch the full site editor on your screen.
From here, choose the Footer section and then click on the ‘+’ button in the top left corner of the screen.
Next, simply find and add the Shortcode block to your preferred area in the footer.
Once you have done that, paste the dynamic copyright date shortcode into the block.
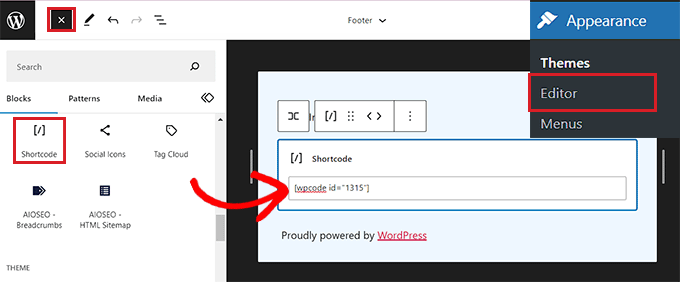
Finally, don’t forget to click the ‘Save’ button at the top to store your settings.
You can now visit your website to check out the dynamic copyright date in action.

Method 2: Add Dynamic Copyright Date to WordPress Footer Using Auto Copyright Year Updater
If you don’t want to use code on your website, then this method is for you.
First, you will need to install and activate the Auto Copyright Year Updater plugin. For details, you may want to see our guide on how to install a WordPress plugin.
Upon activation, the plugin will automatically fetch data for your copyright date. Keep in mind that the plugin only displays the current year and does not show the range of years that the site has been used.
To display the copyright date, you will now have to add a shortcode to the website footer.
Add Dynamic Copyright Date in a Classic Theme
If you are using a classic theme that doesn’t use the full site editor, then this method is for you.
First, you need to visit the Appearance » Widgets page from the WordPress admin sidebar. Once you are there, scroll down to the ‘Footer’ tab and expand it.
For this tutorial, we are using the Hestia Pro theme, so your widgets may look a bit different depending on the theme that you are using.
Next, click on the ‘+’ button in the top left corner of the screen and find the Shortcode block.
Simply add the block to the ‘Footer’ tab and then copy and paste the following shortcode into it to display the copyright date:
[cr_year]
If you also want to add a copyright symbol along with the date, then you should add the following shortcode as well.
[cr_symbol]
Finally, click the ‘Update’ button at the top to save your changes.
Now, you can visit your website to check out the dynamic copyright date in action.
Add Dynamic Copyright Date in a Block-Based Theme
If you are using a block-based theme with the full site editor, then you can insert the dynamic copyright shortcode with this method.
You need to head to the Appearance » Editor page from the WordPress admin sidebar.
Once you are there, choose the ‘Footer’ section and then click on the ‘+’ button in the top left corner of the screen. Then, look for and add the Shortcode block.
After that, add the following shortcode into the block to display the copyright date on your website:
[cr_year]
If you want to add a copyright symbol along with the dates, then simply copy and paste the following shortcode into the block as well:
[cr_symbol]
Finally, click the ‘Save’ button at the top to store your settings.
Now, you can visit your website to see the dynamic copyright date in action.
We hope this article helped you learn how to add dynamic copyright dates in the WordPress footer. You may also want to see our tutorial on how to use a headline analyzer in WordPress to improve SEO titles and our top picks for the best WordPress plugins to grow your site.
If you liked this article, then please subscribe to our YouTube Channel for WordPress video tutorials. You can also find us on Twitter and Facebook.
The post How to Add a Dynamic Copyright Date in WordPress Footer first appeared on WPBeginner.
این خبر را در ایران وب سازان مرجع وب و فناوری دنبال کنید