How to Add Dynamic Content in WordPress (Beginner’s Guide)
Are you looking to add dynamic content to your WordPress website?
Adding dynamic content to your website enables you to provide visitors with personalized experiences, recommendations, and other interactive elements. That way dynamic content can help increase user engagement and conversions.
In this article, we will show you how to easily add dynamic content in WordPress.

Why Add Dynamic Content in WordPress?
Dynamic text refers to content that changes on a website depending on different factors, including user behavior, time, location, name, and more.
Setting up dynamic text enables users on your WordPress website to see different messages according to different factors.
For example, you can use dynamic text to display the name of the user who is currently logged in to your website.

Showing personalized content can keep visitors engaged on your site for longer periods, which can reduce the bounce rate and improve your site’s SEO rankings.
It can even help convert users into customers or subscribers by showing that your website cares about its visitors, which creates a positive impression and builds trust.
Plus, dynamic content can increase sales and signups on your website. For example, you can show the current date dynamically for a countdown sale or discount offer, and it will automatically update each day. This can create a sense of urgency and lead to more conversions.
That being said, let’s take a look at how to add dynamic content in WordPress. You can use the quick links below to jump to the method you wish to use:
Method 1: Create a Dynamic Landing Page Using SeedProd
If you want to create a landing page with dynamic content, then this method is for you.
SeedProd is the best WordPress page builder on the market that helps you create attractive landing pages and themes without using any code.
It also comes with a dynamic text feature that allows you to add dynamic content to your headings and text.
First, you will need to install and activate the SeedProd plugin. For more details, you may want to see our beginner’s guide on how to install a WordPress plugin.
Note: SeedProd also has a free version, but it doesn’t have the dynamic text feature. So, for this tutorial, we are using the SeedProd Pro plugin.
Upon activation, head over to the SeedProd » Settings page to enter the plugin license key.
You can find this information under your account on the SeedProd website.

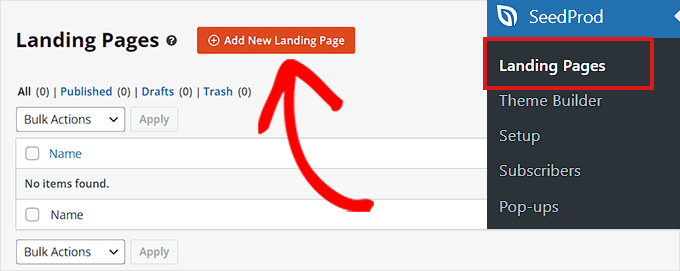
Next, you need to visit SeedProd » Landing Pages from the WordPress admin sidebar.
Once you are there, click on the ‘Add New Landing Page’ button.
This will direct you to the ‘Choose a New Page Template’ screen, where you can select any of the pre-made templates for your landing page.
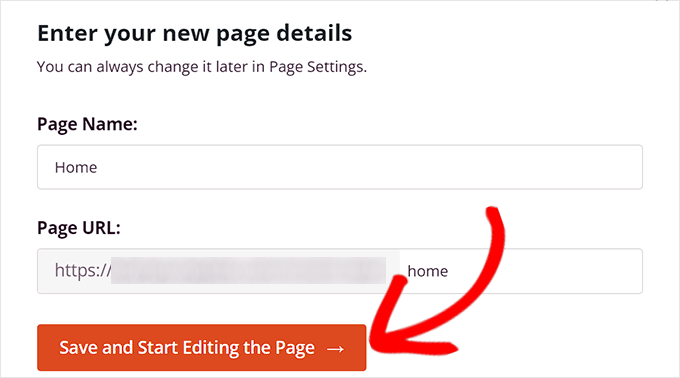
Upon template selection, you will be asked to enter a page name and choose a URL.
After entering this information, just click on the ‘Save and Start Editing the Page’ button to continue.
This will launch SeedProd’s drag-and-drop page builder, where you can now start editing your page. For more detailed instructions, you may want to see our guide on how to create a landing page in WordPress.
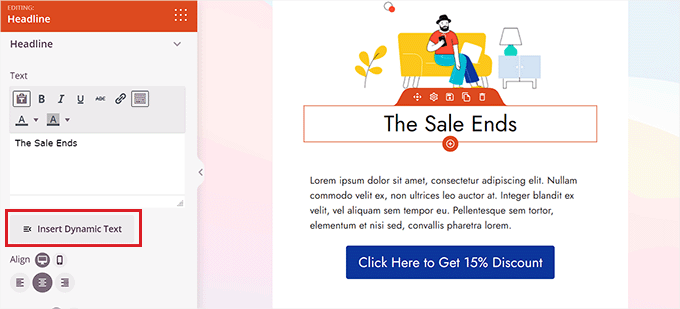
Next, simply drag and drop the Heading or Text block from the left sidebar onto the landing page. Then, click on the block to open up its settings in the left sidebar.
Once you have done that, you need to click the ‘Insert Dynamic Text’ button.
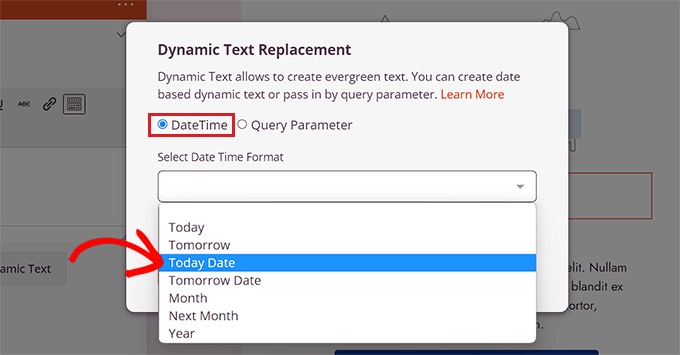
This will open up a ‘Dynamic Text Replacement’ prompt on the screen.
From here, you should select the ‘DateTime’ option if you want to set up a time or date dynamically. This can be helpful if you want to display the time limit for a sale or discount offer on your website.
After that, simply select a date format from the dropdown menu and click the ‘Insert’ button.
If you don’t see your preferred format in the dropdown menu, then you can click on the ‘Learn More’ link at the top to see other formats.
If you want to add a location, name, country, multiple language support, page title, email address, postal code, or other dynamic content, then you need to select the ‘Query Parameter’ option.
After that, add the dynamic text factor under the ‘Parameter Name’ option.
For instance, if you add dynamic text for names in the ‘Parameter Name’ option, then everyone who is logged into your site will be shown their name like ‘Hey John’ instead of ‘Hey There’ on the page.
Or if you add dynamic text for an email address, then users will be shown their email address on your landing page every time they log in.
Similarly, if you want to display the location of every user dynamically, then you can enter ‘location’ as the parameter name.
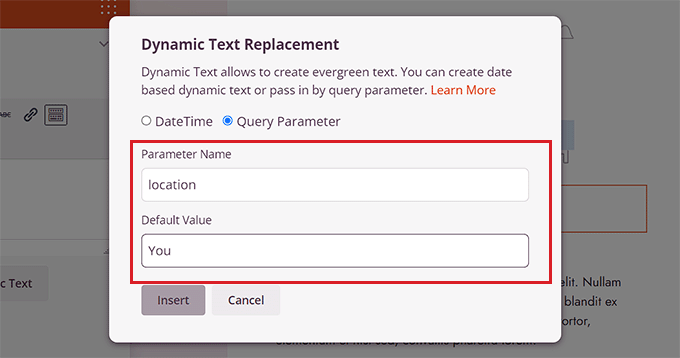
Next, add the default value that the dynamic text will revert to if the location is not available in the URL parameter.
For example, if a visitor opens up your site and their location is not available in the URL, then the dynamic text might say ‘Stores Near You’ instead of ‘Stores Near Florida’.
After that, simply click the ‘Insert’ button to add the dynamic text.
Once you have done that, click the ‘Save’ button at the top to store your settings. Finally, click the ‘Publish’ button to make your landing page live.
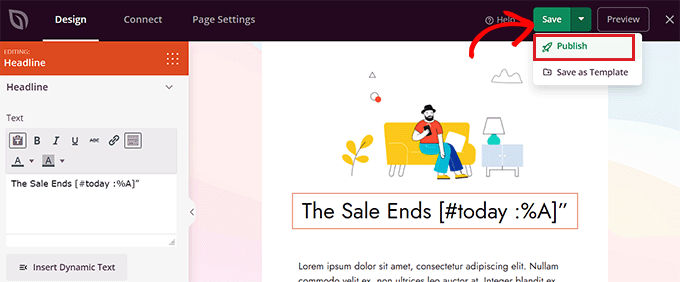
Now visit your website to check out the dynamic content in action.
This is what it looked like on our demo website.

Method 2: Add Dynamic Content Using OptinMonster
If you want to add dynamic content to your advertising campaigns, including popups or floating bars, then this method is for you.
OptinMonster is the best lead generation and conversion optimization tool on the market. It allows you to show personalized campaigns to users without using any code.
It also comes with a dynamic text replacement feature that enables you to add dynamic content to your campaigns using smart tags.
First, you will need to sign up for an OptinMonster account because the paid tool allows you to add dynamic content.
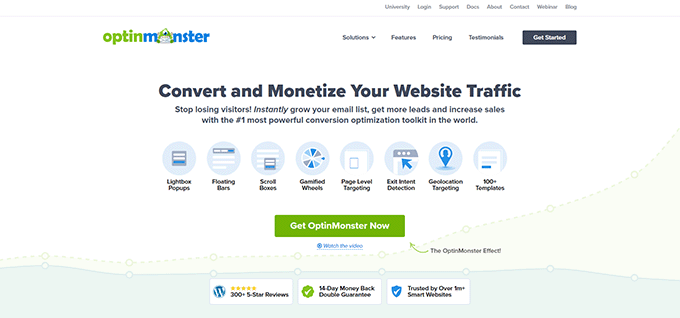
Simply visit the OptinMonster website and click the ‘Get OptinMonster Now’ button to set up an account.
Next, you have to install and activate the free OptinMonster plugin on your WordPress website. For more detailed instructions, please see our tutorial on how to install a WordPress plugin.
Upon activation, you will see the OptinMonster setup wizard in the WordPress admin panel.
From here, click the ‘Connect Your Existing Account’ button to connect your WordPress site to your OptinMonster account.
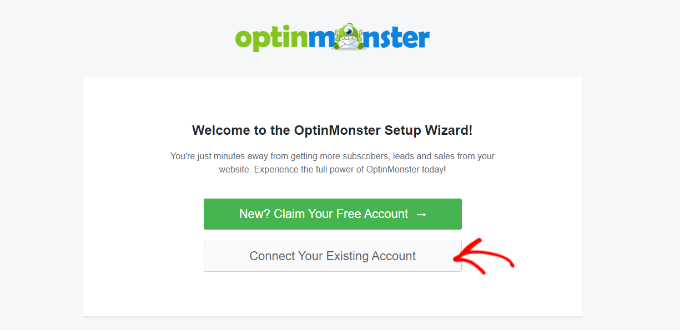
After that, a new window will open up on the screen.
Simply click the ‘Connect to WordPress’ button to move ahead.

Once you have connected your OptinMonster account with WordPress, head over to the OptinMonster » Campaigns page from the WordPress admin sidebar.
Next, you need to click on the ‘Create Your First Campaign’ button to start a campaign.

This will take you to the ‘Templates’ page, where OptinMonster offers different campaign types that you can use to show various types of content or targeted messages to your users.
These include popups, floating bars, gamified campaigns, inline campaigns, slide-in popups, and more.
For instance, if you want to show dynamic content inside a WordPress post or page, then you can choose the Inline campaign type.
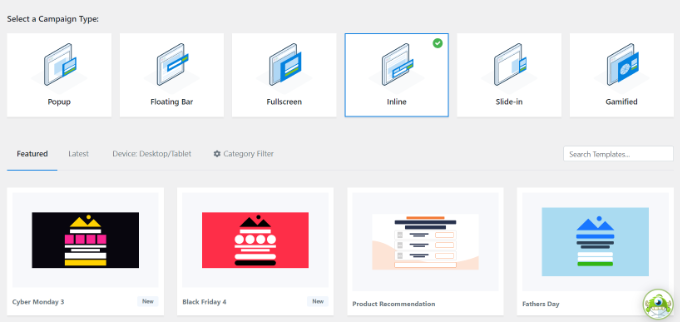
After selecting a campaign type, you can choose any of the pre-made templates for that specific campaign.
You will then be asked to enter a name for it and click the ‘Start Building’ button.

This will take you to OptinMonster’s campaign builder interface. It is a drag-and-drop tool where you can design your campaign with a live preview.
From here, drag and drop the Text or Heading block from the sidebar on the left into the campaign. After that, just select some text in the block to open up the text editor at the top of it.
Next, you must click the ‘Smart Tags’ icon at the right corner of the text editor to open up a dropdown menu with a list of smart tags
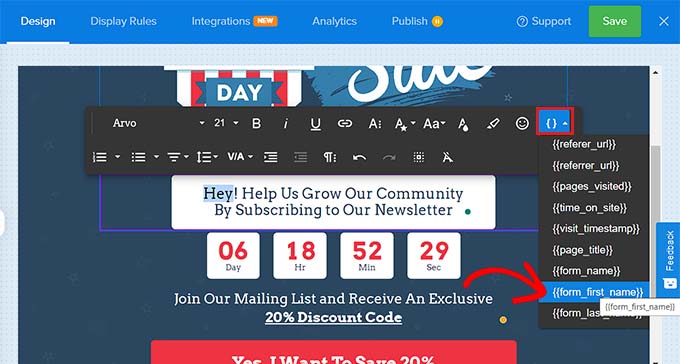
From here, you can select any of the smart tags to add dynamic content to your campaign.
For instance, you can use the {{form_first_name}} smart tag to add the name of the user at the top to make the campaign feel more personalized.
Now, all the logged-in users on your site will see their names in the campaign.
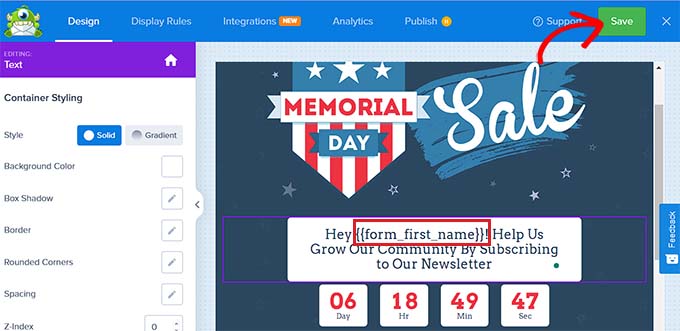
There are other smart tags that show the campaign name, email address, postal code, country, province, year, month, date, coupon code, page URL, and more.
For example, using the smart tag for countries will display the country name of each user who has logged in and is currently viewing your campaign.
Similarly, using a date smart tag will help you display the time limit for a sale without manually updating it every time.
Once you have chosen your smart tag(s), just click the ‘Save’ button at the top to store your settings.
Finally, switch to the ‘Publish’ tab from the top and click on the ‘Publish’ button to make your campaign live.
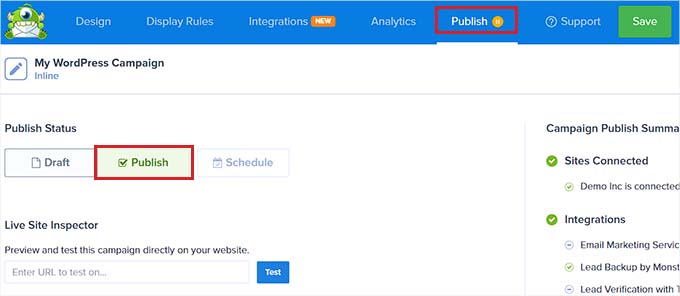
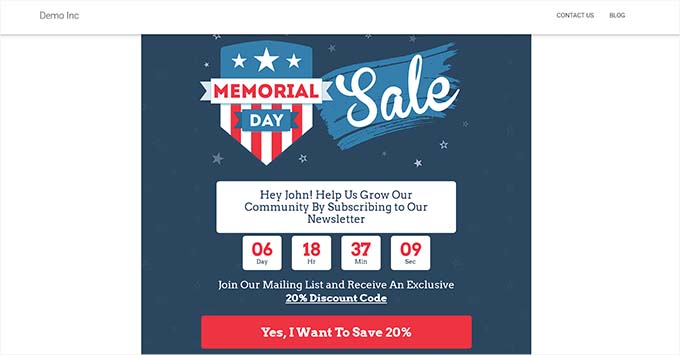
Now, you can visit your website to check out the campaign with dynamic content.
This is what it looked like on our demo website.
We hope this article helped you learn how to add dynamic content in WordPress. You may also want to see our tutorial on how to use dynamic field populations in WordPress to auto-fill forms and our top picks for the best email marketing services for small businesses.
If you liked this article, then please subscribe to our YouTube Channel for WordPress video tutorials. You can also find us on Twitter and Facebook.
پایان/
مرجع وب و فناوری